A meat or poultry product cannot be simply marinated or salt-cured like beer-brined turkey is. The process of osmosis is facilitated by immersing a protein (such as turkey, chicken, or Cornish game hens) in a liquid medium flavored with beer, salt, and herbs. The resulting time submerged in a Beer Brine flavors the protein from the inside out. The fundamental beer brine medium is made by creating a liquid that has the proper amounts of sodium (salt), sugar, and flavors (in this case, Craft Beer with some herbs and vegetables). The flavors of the beer brine take the place of the protein’s natural moisture, hydrating the meat, making it more tender by denaturing the proteins, preserving the ingredient, and acting as a temperature cushion to keep the main course from drying out.
There are several ways to cook the finished Beer Brined Turkey. This recipe is for your classic oven-roasted turkey. Below this recipe are several links to all the ways this base recipe can be cooked. This recipe yields enough brine for a 16-24 pound turkey. To make a large batch of brine that can be used to brine two turkeys, double the recipe (setting the recipe scale to 32).
Makes: enough brine for a 16-24 pound turkey, 4 whole chickens, or 10 Cornish game hens
Listen to my Home Brewed Chef podcast Thanksgiving Dinner Show for more Thanksgiving menu ideas, techniques, and recipes.
Get ready to impress your guests with the most succulent, flavorful turkey you’ve ever tasted! This beer-brined turkey recipe is a game-changer, combining the tenderizing power of beer with savory spices and herbs to create a truly unforgettable Thanksgiving feast.
Why Brine Your Turkey?
Brining is a technique that involves soaking your turkey in a seasoned liquid solution before cooking This process infuses the meat with flavor and moisture, resulting in a juicy, tender bird that’s guaranteed to be the star of your table
The Secret Ingredient: Beer
The key to this recipe is the use of beer in the brine. The beer adds a subtle, malty flavor to the turkey while also helping to break down the muscle fibers, making the meat even more tender.
Choosing the Right Beer
For this recipe, we recommend using a brown ale. Brown ales have a rich, nutty flavor that complements the turkey beautifully. However, feel free to experiment with other types of beer, such as a wheat beer or a pale ale.
The Perfect Brine Recipe
This recipe is designed for a 12-16 pound turkey. If your turkey is larger or smaller, simply adjust the amount of brine accordingly.
Ingredients:
- 10 cups water
- 1 1/2 cups kosher salt
- 1 cup light brown sugar
- 1 tablespoon black peppercorns
- 4 bay leaves
- 3 bunches fresh thyme
- 3 yellow onions, peeled and chopped
- 2 (22 oz) bottles of brown ale (or wheat beer)
- 3 cups ice
Instructions:
- In a large pot, combine the water, salt, sugar, peppercorns, bay leaves, thyme, and one of the onions. Bring to a boil, stirring occasionally to dissolve the salt.
- Remove from heat and add the beer and ice. Stir until the ice has melted.
- Place the turkey in a large brining bag or container. Pour the brine over the turkey, making sure it is completely submerged.
- Refrigerate the turkey for 16-18 hours, flipping it halfway through.
- Remove the turkey from the brine and rinse it thoroughly with cold water. Pat it dry with paper towels.
- Place the turkey on a roasting rack in a roasting pan. Roast in a preheated 400°F oven for 3-4 hours, or until the internal temperature reaches 165°F.
- Let the turkey rest for 10 minutes before carving and serving.
Tips for the Perfect Beer-Brined Turkey:
- Use a fresh turkey. The fresher the turkey, the better the flavor and texture will be.
- Don’t overcook the turkey. Overcooked turkey is dry and tough. Use a meat thermometer to ensure the turkey reaches an internal temperature of 165°F.
- Let the turkey rest. Resting the turkey allows the juices to redistribute, resulting in a more tender and flavorful bird.
- Get creative with your beer choice. Experiment with different types of beer to find your favorite flavor combination.
Additional Resources:
- Beer Brined Turkey Recipe from the Home Brew Chef: https://www.homebrewersassociation.org/beer-food/beer-brined-turkey-recipe-from-the-home-brew-chef/
- Beer Brined Turkey – Domestic Fits: https://domesticfits.com/beer-brined-turkey/
Frequently Asked Questions:
- Can I use a different type of beer? Yes, you can use any type of beer you like. However, we recommend using a brown ale or a wheat beer for the best flavor.
- How long should I brine my turkey? We recommend brining your turkey for 16-18 hours.
- Do I need to rinse the turkey after brining? Yes, you should rinse the turkey thoroughly with cold water after brining.
- What should I serve with my beer-brined turkey? We recommend serving your beer-brined turkey with your favorite Thanksgiving side dishes, such as mashed potatoes, stuffing, and gravy.
We hope you enjoy this beer-brined turkey recipe! It’s sure to be a crowd-pleaser and a delicious way to celebrate Thanksgiving.
More Beer Brined Turkey Recipes and Cooking Techniques:

Beer Brined Turkey Special Equipment:
1 each Thermapen® Mk4 Cooking Thermometer
1 each All-Clad Stainless Steel Large Roti Combo with Rack and Turkey Lifters
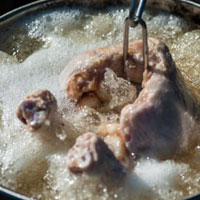
Have turkey bones? Make the best Turkey Stock with this recipe.

| Servings | Prep Time |
| 16 guests | 30 minutes |
| Cook Time | Passive Time |
| 3 1/2 hours | 2 – 3 days |
|
|
Beer Brined Turkey
|
- 16–24-pound turkey, ideally organic, heritage, or free-range
- 1 bunch sage, fresh
- Start the brine at least two days before Thanksgiving | event | Holiday. Add the water, salt, sugar, peppercorns, bay leaves, thyme, onions, celery, carrots, garlic, lemon, and orange to a large pot and heat it over high heat. To dissolve the sugar and salt and to infuse the flavors, bring the liquid to a boil and simmer for ten minutes. After 20 minutes of cooling the brine off the heat, add the ice and your preferred beer. Combine the ingredients and measure the brine’s final temperature. To ensure safety, a thermometer should read 40°F/4°C or lower. If the temperature is higher, put the pot in a kegerator or refrigerator until it reaches 40°F or 4°C.
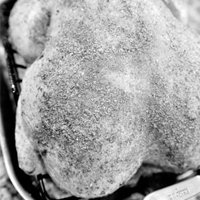
- In a sizable sink, take the fresh turkey and take it out of its packaging. Remove and set aside the liver, gizzards, and neck (for stock or gravy) Rinse the bird with cold water, giving it several turns to ensure that any blood is washed out of the cavity and under the neck flap. Remove any remaining quills from the skin, if visible. Remove any excess fat from around the inside cavity. After turning off the water, pat the turkey dry with paper towels.
- Prepare a large stock or brew pot, a brining bag or Ziploc XL HD Big Bag, a Cambro 22 qt Polypropylene Food Storage Container, and other necessary items for brining. After placing the turkey in the preferred container, cover it entirely with the chilled brine. After that, store in a cold environment, like a refrigerator or kegerator.
- Use a large cooler and sanitize it with either Star San (1 ounce per 2 gallons of water) or a bleach-water solution (1 tablespoon of bleach per gallon of water or 200ppm) if cold space is a problem.
- After the cooler has been cleaned, add the turkey and the cooled beer brine. To maintain the temperature of the bird and brine without reducing the brine’s flavor or salinity, use multiple gallon-sized sealable bags filled with ice. This will also function if you are brining several turkeys at once and have increased the recipe by two or three times to accommodate the size of the cooler you are using.
- To keep the turkey and brine ice cold, place the sealed bagged turkey in the cooler and encircle the bag with ice if you’re using a Ziploc XL HD Big Bag to hold the brine and bird.
- For a smaller 16-pound bird, brine the turkey in beer for at least 24 hours; for a larger 22-pound bird, brine for 48 hours. Keep the turkey and brine cold during this marinating process. To ensure that the turkey marinates evenly, flip or rotate it in the brine every 12 hours.
- After taking the turkey out of the brine, pat it dry thoroughly on paper towels, inside and out. Do this multiple times to remove as much moisture as possible. Because moisture will cause the skin to steam rather than roast, this will aid in the skin’s browning. Put the turkey in a roasting pan with a rack attached, backside down. Stuff the bunch of sage inside the cavity; as the meat roasts, the herbs will infuse it with flavor. Before cooking, let the turkey sit at room temperature for two hours. By doing this, the turkey will be able to warm up and cook more evenly. Throw away the brine because it has served its purpose and should not be reused.
- Once dried, the turkey can be cooked with the beer brine. You can bling up the turkey with flavoring to give it more flavor and flair when it’s served. Starting at the neck, use your fingertips to slide one finger inside the skin to begin separating the skin from the meat. Gradually add a second finger until, at last, your entire hand is flat against the breast meat. Take great care to separate the skin from the meat without forcing it, as the skin can tear. Repeat this same process with the other breast. After doing this, proceed to the open cavity and begin separating the skin from the leg/thigh on one side of the turkey, working your way around the thigh to the leg. Repeat this process for the other leg.
- Now that the skin is loose, you can stuff the turkey with herbs, rubs, or bacon to give it more taste. Additionally, the skin of the turkey will show off the garnish as it cooks, producing a beautifully finished bird.
- Herbs: Consider combining fresh oregano, marjoram, rosemary, bay leaves, and/or thyme. Put the herbs under each breast’s skin in a pattern. To ensure symmetry when presenting the finished turkey, duplicate the pattern onto the other breast. Utilize your available herbs to create a distinctive pattern around the thighs and legs. Starting at the area that is furthest away from you and working your way toward where you are stuffing comes in handy.
- Another fantastic option is bacon: cured, smoked, and sliced pork belly. As the bacon renders, it adds another layer of protection against the breast meat drying out while the turkey cooks. I like to use thick-cut bacon, that has been smoked. As you work your way down the breast, place the bacon strips next to each other and along the chest bone. If the bacon is too long, cut it with kitchen scissors so that it fits. Then repeat on the opposite side of the turkey. To create a pinwheel-like effect, first wrap the bacon around the legs and then the thighs. Squeeze the skin firmly to eliminate any trapped air and prevent the bacon from sliding.
- Rubs: The turkey has already been brined, so additional flavors should only be herbs and spices rather than salts since the brining process seasons the bird from the inside out. If you have a preferred rub, find out how much salt is in it. Since salt is less expensive than herbs and spices, a lot of commercial rubs use a lot of salt as filler. To ensure that every side of the skin is evenly coated, sprinkle the rub mixture underneath. You can also combine the rub with some olive oil or room temperature unsalted butter to make a flavor paste, which will add even more fat to the breast meat and help keep it juicy and moist while it cooks.
- Remember that the turkey has been seasoned with the brine. After the skin has completely dried, you can use room temperature unsalted butter to create a thin layer of fat or brush or rub oil (such as olive oil or vegetable oil) all over the skin to help create a wonderfully crisp skin. If desired, very lightly season the skin with salt and pepper.
- A rub can also be used to create multiple flavors. Use a jerk spice, fresh herb rub, or Cajun spice to take the turkey on a culinary adventure. If you are using a commercially produced rub, be mindful of the amount of salt it contains because salt is less expensive than herbs and spices.
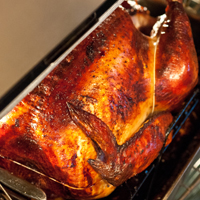
- Preheat the oven to 350°F/177°C, and if available, use the convection roast or bake setting. Use twine to secure the bird’s shape and promote uniform cooking of the turkey. To ensure that the turkey is cooked to a specific temperature (160°F | 71°C) rather than a certain amount of time, I strongly advise using a probe thermometer. Place the probe in the middle of one of the thighs or the breasts. Verify that the probe’s tip is not in contact with any bones as this could cause a false positive for temperature.
- A 16–20 pound turkey should take 3–3 1/2 hours to fully cook to 160°F | 71°C if you don’t have a probe thermometer. Verify the temperature of the turkey’s thighs and breast to ensure that it is cooked through. One reason for a dry turkey is that some recipes call for cooking the bird until the internal temperature reaches 180°F, or 82°C.
- Turkey should be consumed once it reaches 165°F, or 74°C. Because the oven’s surface temperature and heat are higher than the internal temperature, it is acceptable to take the turkey out of the oven at 160°F, or 71°C. The carryover heat will continue to cook the turkey while it rests, bringing it to a safe final cooking temperature of 165°F | 74°C.
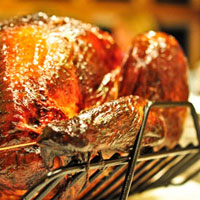
- Before carving, allow the turkey to rest for 20 to 30 minutes at room temperature. This is critical in keeping a moist and juicy turkey. By allowing the muscles to relax, the fluids will be more evenly distributed, making the bird easier to handle while carving. Cover the turkey with a large sheet of aluminum foil.