Ebi refers to a style of preparing shrimp in Japan. In traditional cooking, the shrimp are “butterflied,” which means they are cut open at the bottom and laid out flat.
Butterfly shrimp can be use on maki, but it was originally used on nigiri. So I will show the process of making the shrimp and using it for nigiri .
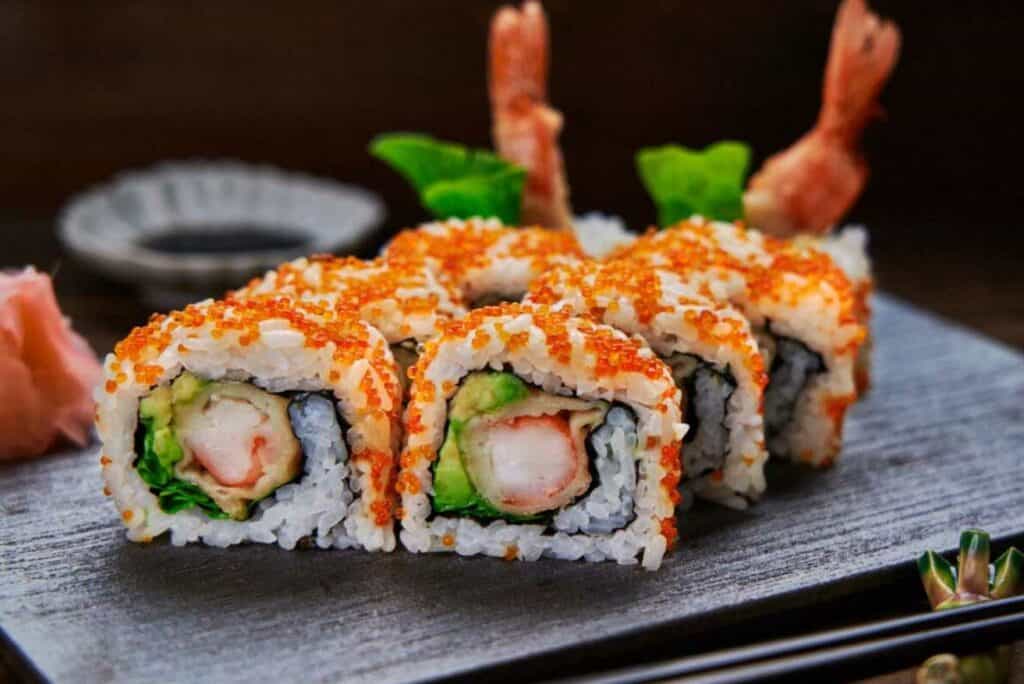
As a sushi lover, I’ve always admired the artistry and delicate flavors of sushi rolls containing tender shrimp While dining out at my favorite sushi restaurants, I would often order shrimp rolls like ebi nigiri or shrimp tempura rolls. The sweet brininess of the shrimp paired with the vinegared rice and nori was simply divine
But sushi always seemed so intimidating to make at home. Raw fish handling, locating obscure ingredients, rice preparation – it all felt out of reach for an amateur home cook like myself. That was until I finally mustered up the courage to try making shrimp sushi rolls in my own kitchen.
It turned out to be much more approachable than I expected! With a little guidance on preparing the components, I was rolling up gorgeous shrimp sushi rolls that rivaled my local sushi joints.
If you also find yourself wondering “how do I make shrimp sushi?” then this guide is for you. Today, I’ll walk through a simple step-by-step method for making shrimp sushi rolls at home, along with tips for sourcing ingredients and storing your homemade sushi creations. Let’s dive in!
Why Make Shrimp Sushi?
Before getting into the nitty gritty. let’s discuss why shrimp makes a great choice for homemade sushi
-
Mild, sweet flavor – Shrimp has a delicate brininess that pairs nicely with rice and nori. It lets the other ingredients shine.
-
No raw fish handling – Cooking shrimp is safer and easier than working with raw fish like tuna or salmon.
-
Quick cook time – Shrimp cooks fast, so it can be easily incorporated into sushi making
-
Adds color and texture – Vibrant pink shrimp livens up sushi rolls. The firm, snappy texture is a nice contrast to soft rice.
-
Price and availability – Shrimp is budget-friendly and easy to find compared to exotic sushi-grade fish.
So if you’re new to sushi making, shrimp is a great entry point before trying rolls with raw fish. Let’s get into the step-by-step method!
Ingredients Needed for Shrimp Sushi Rolls
To make shrimp sushi rolls at home, you’ll need:
Shrimp – Look for raw, peeled, and deveined shrimp. Size 31/35 or 36/40 work well.
Sushi rice – This short-grain white rice gets seasoned with rice vinegar.
Nori sheets – These dried seaweed sheets hold the rice and fillings together.
Fillings – In addition to shrimp, you can add avocado, cucumber, carrot, etc.
Condiments – Soy sauce, wasabi, and pickled ginger for serving.
Equipment – A bamboo sushi rolling mat helps roll tight logs.
Let’s go through step-by-step instructions on how to assemble these components into gorgeous shrimp sushi rolls.
Step 1 – Cook the Shrimp
I prefer to use peeled, raw shrimp to get the best texture and flavor. Here’s how to prepare the shrimp:
-
Rinse thawed shrimp under cold water and pat dry with paper towels.
-
In a pan, heat 1 Tbsp olive oil over medium heat.
-
Add shrimp and cook 2-3 minutes per side until opaque and pink.
-
Transfer cooked shrimp to a plate. Once cool, cut shrimp into 1/2 inch pieces.
The shrimp can be cooked up to a day ahead. Refrigerate until ready to use in sushi rolls.
Step 2 – Prepare the Sushi Rice
Sushi rice is the foundation of any sushi roll. Perfectly cooked rice seasoned with vinegar is key. Here’s how to make it:
-
Rinse 2 cups uncooked sushi rice in a strainer under cold water until water runs clear. Drain well.
-
In a pot, combine rice and 2 1/4 cups water. Bring to a boil, then reduce heat and simmer covered for 10 minutes.
-
Remove from heat and let stand covered for 10 more minutes.
-
Gently fold 2 Tbsp rice vinegar into the hot rice with a spatula.
-
Allow rice to cool before using for sushi rolls.
Step 3 – Slice Up Fillings
As the rice cools down, prep any fillings you want inside your shrimp rolls. Here are some ideas:
-
Cucumber – Peel, seed, and slice into long strips
-
Avocado – Slice into thin lengthwise strips
-
Carrots – Peel and cut into matchsticks
-
Bell peppers – Thinly slice into long strips
-
Cream cheese – Cut into small rectangles
Step 4 – Assemble the Roll
Once your shrimp is cooked, rice is prepped, and fillings are sliced, it’s time to roll:
-
Place a nori sheet on your bamboo rolling mat, shiny side down.
-
Dip your hands in water and take about 3/4 cup of sushi rice. Spread onto the bottom half of the nori.
-
Layer shrimp and your desired fillings horizontally across the rice.
-
Lift the edge of the mat over the fillings and roll it away from you to encase everything.
-
Lightly wet the edge of the nori with water to help seal the roll closed.
-
Slice the roll into 6-8 pieces using a sharp knife.
Repeat with remaining ingredients to yield 6-8 sushi rolls.
Step 5 – Plate and Serve
Artfully arrange your sliced sushi rolls on a platter and serve with traditional accompaniments:
-
Soy sauce for dipping
-
Wasabi paste to mix into soy sauce
-
Pickled ginger to cleanse the palate
Finally, sit back and enjoy your handmade shrimp sushi rolls! The shrimp should pop with sweet brininess against the vinegared rice and nori.
Tips for Mastering Homemade Shrimp Sushi
Through plenty of trial and error, I’ve picked up some useful tips for achieving restaurant-quality results:
-
Use freshly made rice at room temperature for best texture. Leftover rice gets too sticky.
-
Don’t overfill rolls. Too many fillings make rolling difficult.
-
Wet knife blade occasionally when slicing to prevent rice sticking.
-
Store finished rolls tightly wrapped and eat within 5-6 hours for best flavor.
-
When forming rolls, use gentle pressure for clean edges without openings.
-
If cutting rolls is tricky, serve shrimp, rice, and fillings in a poke-style bowl.
Answers to Common Shrimp Sushi FAQs
If you’re new to making sushi, chances are you have some questions. Here are answers to some frequently asked questions:
What kind of shrimp is best for sushi?
Go for raw, shell-on shrimp and peel them yourself. Shell-on shrimp stays fresher. Buy the largest shrimp available, like 16/20 per pound.
Can I use frozen shrimp?
Yes, thawed frozen shrimp works fine. Just thaw overnight in the fridge before using.
What if I can’t find sushi rice?
Short-grain white rice like Calrose or Arborio can be substituted in a pinch. The texture won’t be as sticky though.
Can I make shrimp tempura rolls?
Absolutely! Just fry peeled shrimp in tempura batter before adding to your sushi roll for fun crispy texture contrast.
How long does homemade sushi last?
For best taste and food safety, sushi rolls are best eaten fresh within 4-6 hours of assembling. Don’t let them sit at room temp for more than 2 hours.
Should I use raw or cooked shrimp?
Raw shrimp needs to be cooked first for food safety reasons. Using pre-cooked shrimp avoids this step but the texture won’t be as ideal.
Enjoy Your Handcrafted Shrimp Sushi Rolls
I hope these tips give you the confidence to finally try making shrimp sushi rolls at home. Once you master the basics, the possibilities are endless for creating your own signature rolls. Why not throw a sushi rolling party and get your family and friends involved?
Homemade sushi always impresses guests and offers a fun, interactive mealtime. The best part is you can shape rolls to suit your tastes – add spicy mayo, tempura crumbs, mango, microgreens, and more.
Make sure that your shrimp is completely thawed out before you start.
- Stretch the shrimp out by putting your thumb on the back and your fingers on the feet.
- Do not go through the shrimp all the way through; instead, aim for the vein that runs along the top. You shouldn’t feel much resistance if you hit the vain straight on!
- Do the last step again and again until you have enough shrimp on a stick for your taste.
- Bring a pot of water to a boil. You don’t have to wait for the water to boil if you do this while you’re skewering the shrimp.
- As soon as the meat on the shrimp turns white, boil them for about 60 to 90 seconds. You want the shrimp to feel firm. You can add a little lemon juice, salt, or paprika if you want to. You can use any mix of the three if you want to.
- Remove the shrimp from the water and put them in a bowl of ice water. Once they are firm and have turned a nice orange/white color, This helps keep the shrimp from cooking any longer.
- Peel off the shrimp’s shells when they are cold, but leave the tail tips on. This is purely for aesthetic reasons. If I want to make Ebi nigiri, I leave the tails on. You can take the tails off the shrimp if you only want to use them on a roll.