It’s summer, which, if anything, means it’s grilling season in Maine. If you know how to use your backyard grill well, then learn how to grill lobster. This will help you and your lobster-loving family and friends. There are many ways to cook lobster, but one that shouldn’t be missed is grilling it. To start, you can boil or steam the lobster. It gives the rich, sweet meat a smoky BBQ flavor that only an open flame can deliver.
More people eat lobster during the summer because so many lobsters are readily available. July through the early fall is the peak season for trapping and hauling. When it gets warmer near the shore in the summer, lobsters move there. Most of them also shed their old shells to grow new ones.
Lobster is a delicious indulgent ingredient that can really elevate seafood dishes. However working with live lobsters and splitting them yourself can be intimidating for home cooks. Have no fear! With the proper technique, tools and safety measures, you’ll be splitting lobsters like a pro in no time.
In this comprehensive guide we’ll cover everything you need to know about prepping and splitting live lobsters at home. From the most humane methods, to step-by-step instructions to dealing with the aftermath, we’ve got you covered. Let’s get cracking!
Why Split Your Own Lobsters?
While you can certainly purchase pre-split lobster meat, there are some good reasons to take the DIY approach:
-
Cost savings – Buying whole live or cooked lobsters is much cheaper per pound than the pre-packaged meat.
-
Flavor and texture – Splitting them yourself helps preserve that just-cooked sweetness and tender texture.
-
Versatility – You can separate different parts of the lobster for various uses.
-
Control over portions – Split to your desired serving sizes rather than relying on what’s available.
-
Fun experience – It can be very satisfying (and Instagram-worthy) to learn this new cooking skill.
Safety Tips for Handling Live Lobsters
Before getting started, keep these safety guidelines in mind:
-
Store live lobsters in a cool, dark place until ready to cook – don’t keep them in freshwater.
-
Transport them carefully to avoid damage – they can move quickly!
-
Handle firmly just behind the claws to restrict movement. Don’t compress the torso.
-
Keep bands on the claws until ready to split to avoid pinches and escapees.
-
Work on a stable surface and focus to avoid injury. The shell is sharp!
-
Keep kids and pets away from the prep area for their safety.
Most Humane Method for Cooking
We want to minimize any suffering for these glorious creatures. The most humane approach is to:
-
Steam the lobster for 3 minutes just until opaque and cooked through.
-
Remove and plunge immediately into ice water to stop the cooking.
-
Drain and pat dry before splitting.
This avoids prolonging any pain by quickly killing via steaming before splitting. The ice water dip also makes removing the meat easier.
Step-By-Step Instructions for Splitting
Once you’ve steamed and iced the lobster, follow these steps:
Gather Your Tools
You’ll need a sharp chef’s knife or cleaver, kitchen shears, cracker or mallet, picking tools, and a cutting board.
Position the Lobster
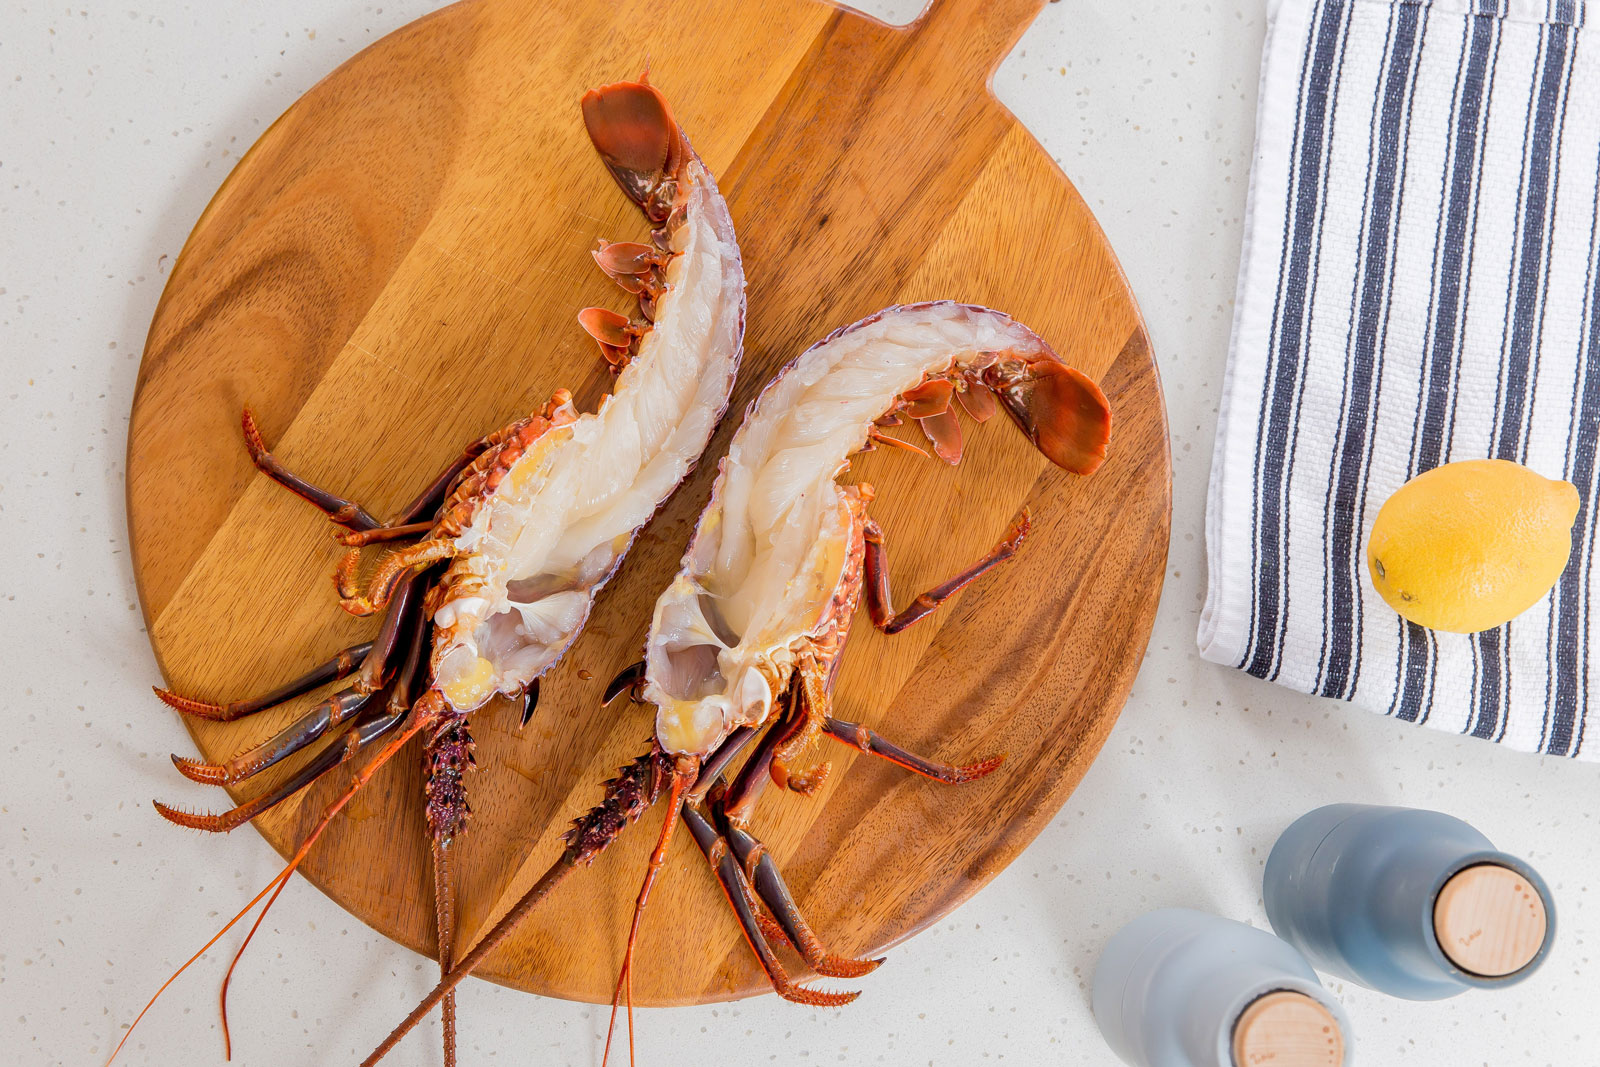
Place lobster belly up with the tail closest to you on a cutting board.
Split the Tail
Hold the tail firmly down with one hand. Starting at the center where the tail meets the body, cut lengthwise through the tail in one swift, firm motion.
Split the Body
Rotate the lobster 180 degrees so the head is now closest to you. Repeat the cut, splitting the body and head completely in half.
Loosen the Meat
Use shears/cracker to break apart the shell segments. Be thorough but careful not to shred the meat.
Remove the Meat
Use picking tools, fork or hands to remove tail, claw, leg, and body meat in pieces or whole.
Rinse the Meat
Give the lobster meat a quick rinse to remove any debris or shell fragments.
Use Immediately or Store
For best flavor and texture, use the freshly picked lobster meat right away. Or store chilled in airtight container for 1-2 days.
Make Use of the Entire Lobster
A whole lobster offers different useful parts, so take advantage!
-
Tail meat – Familiar tender chunks, best for eating as-is.
-
Knuckle and leg meat – Sweeter morsels, great in soups, pastas, sandwiches.
-
Claw meat – Heartier texture, nice presentation for whole claws.
-
Body meat – Delicate tiny pieces, ideal as delicious filler for seafood dishes.
-
Tomalley – The green liver-like substance is full of rich lobster flavor for sauces.
-
Shells/legs – Simmer in stocks and broths to impart wonderful seafood essence.
Don’t let anything go to waste!
What to Do with the Leftover Carcass
The discarded lobster bodies still have value after removing the meat. Some options:
-
Simmer shells to make seafood stock for soups, stews, rice.
-
Use shells to flavor lobster or seafood bisques and broths.
-
Bury leftovers in your garden to compost and fertilize plants.
-
Toss shells back into the ocean if disposing near a coastal area.
Tools and Equipment for Success
Having the proper tools makes lobster splitting safer and simpler:
-
Extra large pot with steamer basket for cooking multiple lobsters at once
-
Heavy duty kitchen shears to crack shells
-
Mallet or lobster cracker for breaking apart tougher areas
-
Sturdy sharp chef’s knife or cleaver to cut cleanly through lobster
-
Picks and forks to easily remove meat once separated
-
Cutting board with non-slip base and deep juice groove
-
Delicate lobster bibs or smocks to protect your clothing
-
Insulated gloves if working with very hot freshly steamed lobsters
-
Cooler filled with ice to quickly chill and stop cooking process
Hone Your Technique with Practice
Like any new skill, you’ll get better and faster with practice! Some tips:
-
Start with one lobster before moving onto multiple.
-
Time your steps to find areas for improvement.
-
Watch tutorials from experienced chefs online.
-
Find the tools and grip that work best for you.
-
Set up an organized workspace to streamline the process.
-
Work in batches to avoid eating hours old lobster meat.
-
Troubleshoot any issues as they arise. Adjust your technique accordingly.
Enjoy the Fruits of Your Labor
Once you perfect your lobster splitting abilities, the real fun begins – eating them! Some tasty ways to serve your freshly prepped lobster:
-
Lobster rolls with hot butter on toasted buns
-
Simple steamed or grilled lobster with garlic herb butter
-
Indulgent lobster mac and cheese casserole
-
Impressive lobster paella packed with seafood
-
Elegant lobster ravioli in a creamy white wine sauce
-
Lobster tacos with avocado, peppers and lime crema
-
Lobster salad on arugula with vinaigrette
-
Decadent lobster tails with drawn lemon butter
Take your new skills out for a spin and whip up these lobster masterpieces for your next special occasion meal!
Splitting live lobsters takes some courage, patience and practice. But the payoff of having fresh, humanely harvested lobster meat is worth it. Follow this guide and you’ll be preparing restaurant-quality lobster dishes in no time!
How to Prepare Lobster for the Grill
All of that said, whether soft-shell or hard-shell, the methods for grilling are essentially the same. However, as with any preparation for lobster, they must be properly stored alive before cooking. A lobster’s meat is not edible if it is not alive when cooking it. They must be refrigerated in the packaging they were transported in until cooked. Never store lobsters in cold water or place ice on them, either—freshwater kills lobsters. When it’s time for grilling, a fresh, live lobster can be swiftly and humanely killed. Dull its senses by placing it in the freezer for 10-15 minutes before cooking. Then, put it on a cutting board with its back to the wall and use a big, sharp kitchen knife to cut its head in half between its antennae.
It should be noted here that lobsters can be grilled completely whole or halved. Many recipes call for the latter to ensure more of the smoky, grilled flavor. Once the lobster is dead, put it on the grill rack over medium-high heat (400F to 450F) if you want to grill it whole. Close the top and grill for about 5-6 minutes per side. When they are done cooking, the shell will turn bright red with a few darkened spots. To be certain, check the meat color by breaking one lobster open at the tail and body. The coloring of the meat should be opaque and white.
If you want to grill a lobster, cut it in half from the head to the tail as you kill it with a big kitchen knife. It’s time to take out the black roe (if it’s a female) and the green liver after cutting it open. The small grey sac behind the head should also be taken out. e. and the black vein in the intestines that goes from the stomach to the end of the tail.
Once the food is ready to go on the grill, you can season it however you like. You can baste it with olive oil or melted butter, salt, pepper, or minced garlic. Place it on the preheated grill, medium-high heat, with the split side up. Close the top and let it grill for about 4-6 minutes. Open and baste with the oil or butter again, then cook for another 4-5 minutes. To preserve the juices, it’s suggested not to flip the lobster. The oil or butter will keep it moist.
Finally, the shell of a lobster’s claws is a little thicker and can take longer to cook. You can twist them off the shell and grill them separately for a few minutes longer, or you can leave them on and cover the claws with a roasting pan or pie tin so the lobster cooks evenly.
Today’s Live Maine Lobster Special
There are chefs who say that the hard-shell lobster is better for grilling because the older hard-shell lobsters have more meat. This is true. Because a soft-shell lobster hasn’t fully grown into its new shell yet, some of its weight comes from the extra water it carries inside it until it does. A new shell is also easier to break when grilling than an old, hard shell that can handle the rough conditions of a grill.
How to Split a Live Lobster
How do you split a lobster?
Press down firmly to split the tail portion of the lobster and ensure the shell is cut entirely through. Gently open the lobster, taking care not to separate the head from the tail. Using the liver (tomalley or mustard) is a personal choice, this can be washed away under a tap if you prefer not to use it. Splitting tips:
Can you split a lobster tail?
At first glance, splitting a lobster tail in its shell may seem impossible. But it’s not. All you need is a heavy knife and a little elbow grease. Learn how to split a lobster tail with this short technique video from the test kitchen of Cuisine at Home magazine. It’s a great way to prep lobster for faster cooking under the broiler or on the grill.
Should you split a lobster before cooking?
Splitting a lobster lengthways is often required prior to cooking (steaming or on a grill). If splitting a fresh lobster, ensure you’ve followed the steps for humanely euthanising before attempting. If splitting a frozen lobster, you’ll need to defrost it first.
How do you cut a lobster?
Stage 2; Place lobster on a flat surface (lobster belly facing down) and using a sharp knife split the lobster from head to tail along the midline. Depending on the size of the lobster/ knife, you may want to attempt this in two motions – from just behind the head, slicing forwards and from behind the head slicing backwards.