You can make a delicious shrimp cocktail at home by following these steps: making your own cocktail sauce and cooking the shrimp so they are soft, juicy, and tasty.
I’ve had some amazing shrimp cocktails in my day. They’ve usually been served as appetizers at steakhouses. Cold and tender shrimp. Sweet and spicy sauce. So good. But when we make shrimp cocktail at home, it’s simple to buy some already cooked shrimp (maybe in a ring shape) and a jar of cocktail sauce. Then we just put it out for everyone to eat. There’s nothing wrong with that. It’s tasty and easy.
To make the best shrimp cocktail, like the ones served at steakhouses, you need to do a few extra things. Not much more, mind you. Homemade shrimp cocktail is still surprisingly simple to do. Read everything you need to know by scrolling down, or click here to go straight to the recipe.
Shrimp is hands down one of my favorite foods. I could eat it fried, grilled, sautéed – you name it. But one of my preferred ways to prepare shrimp is to blanch it first. Blanching shrimp before cooking locks in moisture boosts flavor and allows you to peel and devein them with ease.
However, I used to always struggle with knowing just how long I should blanch shrimp. Blanch them too long and they turn rubbery. Too short and they won’t cook through. Throughout much trial and error in my kitchen, I’ve finally figured out the perfect blanching time for shrimp. Keep reading to learn everything you need to know!
What is Blanching?
For those unfamiliar with the term, blanching refers to briefly cooking food in boiling water or steam. The purpose is partly to cook it, but also to help retain color, texture, and flavor After blanching, the food gets immediately submerged in ice water to halt the cooking process. This shock of going from hot to cold stops the cooking immediately
Blanching works wonderfully for shrimp. That quick boiled helps partially cook them, loosen the shells, and ramp up flavor – without overcooking the delicate flesh. It’s a simple process that makes preparing shrimp for any recipe so much easier.
Benefits of Blanching Shrimp
Let’s take a closer look at why you should consider blanching your shrimp before cooking:
-
Loosens the shell – Blanching helps detach the shell from the shrimp meat. This makes it incredibly easy to peel and devein. No more struggling to remove shells and tails!
-
Brightens color – Raw shrimp have more of a blue/gray tint. Blanching gives the flesh that iconic coral pink color we associate with shrimp.
-
Enhances flavor – Exposure to the boiling water helps concentrate the natural sweetness and brininess of the shrimp. This takes their flavor up a notch.
-
Cooks partially – While not fully cooked through, blanching gets them started on the cooking process. This reduces total cooking time for recipes.
-
Preserves texture – The quick cook followed by the ice bath stops the proteins from becoming tough and rubbery, keeping the flesh tender.
-
Kills bacteria – The short boil is sufficient to kill any harmful bacteria on the exterior of the shrimp. Food safety is crucial when handling seafood.
As you can see, taking those couple minutes to blanch shrimp makes a big difference in the final results!
Step-By-Step Guide to Blanching Shrimp
Blanching shrimp is simple, but there are some key steps to follow:
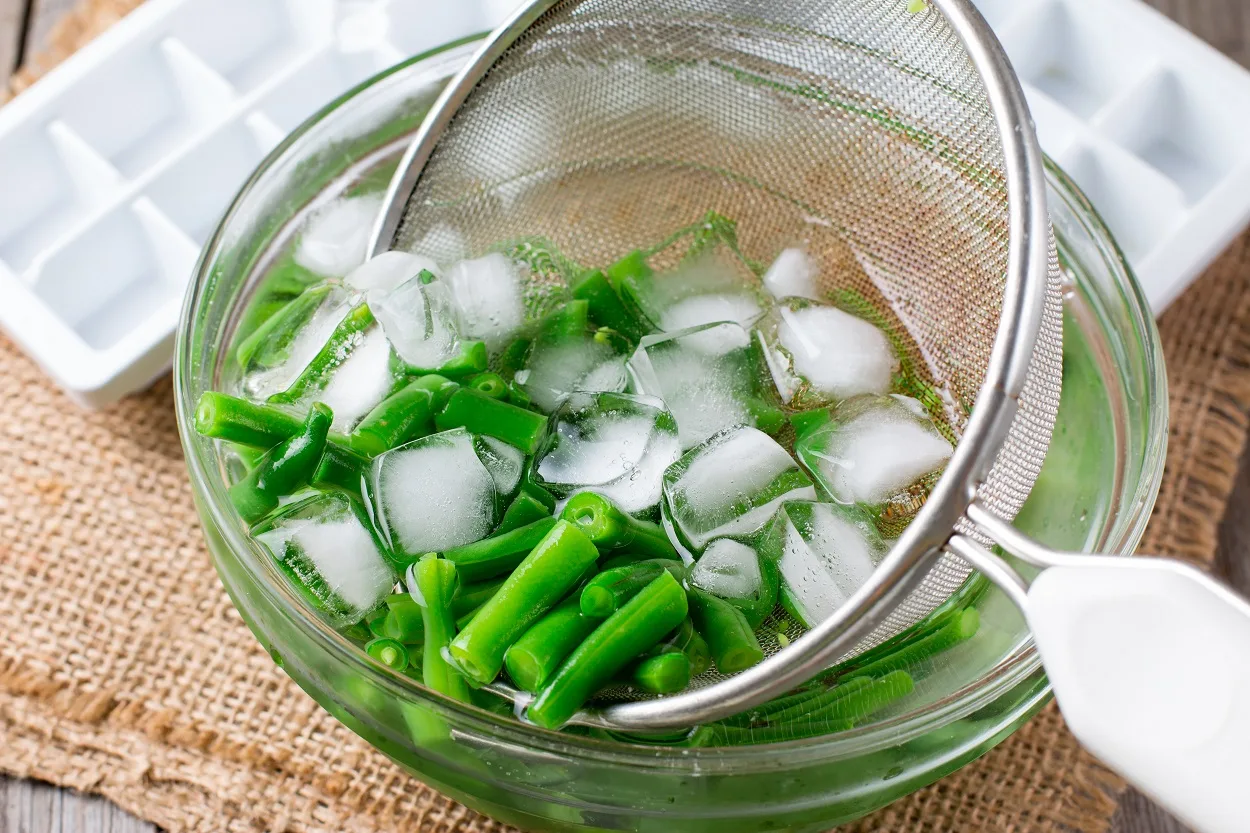
1. Prepare an ice bath
Before heating up the shrimp, get your ice bath ready. Fill a large bowl with ice cubes and cold water. Have this stationed by the stove. Once the shrimp come out of the boiling water, they go straight into the ice bath, so having it ready nearby is essential.
2. Bring water to a boil
Fill a pot about 2/3 full with water and bring to a rapid boil over high heat. You want the water to be at a rolling boil before adding the shrimp. The violent bubbling ensures the water will instantly return to a boil once the chilled shrimp are added.
For best results, I recommend using heavily salted water. The salt helps season the shrimp while also raising the boiling temperature of the water so it cooks a bit faster. Use about 1 tablespoon salt per quart of water.
3. Add shrimp and blanch
Once the water is at a rolling boil, add the shrimp. For raw peeled shrimp, they only need 60-90 seconds in the boiling water. Peeled, deveined shrimp may take about 30 seconds less time since they have less mass.
For frozen shrimp, add them still frozen to the boiling water. Let them go for 2-3 minutes until the flesh turns opaque. Frozen shrimp take longer since they must thaw and cook.
Regardless of whether they were raw or frozen, keep a close eye on the shrimp as they blanch. You want them just cooked through, but not overcooked into rubber bands.
4. Shock in ice bath
As soon as the shrimp are blanched, use a slotted spoon or sieve to transfer them to the prepared ice bath. Letting them sit for 1-2 minutes stops the cooking process. Don’t leave them much longer than that or they’ll get icy and chilled.
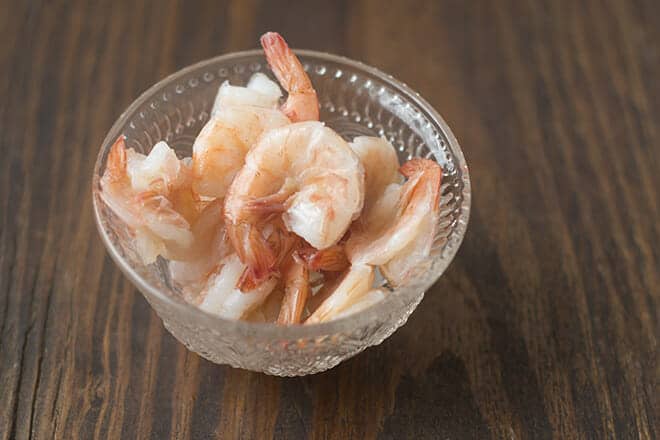
5. Drain, peel, and cook
Once cooled, remove the shrimp from the ice bath and drain off any excess water. At this point, the shells and tails should slip right off. Finish prepping the shrimp by peeling, deveining if desired, and they are ready to use!
Blanching pre-cooks the shrimp slightly, so they will require less time to finish cooking in recipes. Keep that in mind if following cooking times in a recipe.
How Long to Blanch Shrimp Based on Size
The biggest factor influencing blanching time is the size of the shrimp. Jumbo shrimp need more time than smaller varieties. Here are general guidelines:
- Colossal or Jumbo (21-25 count per pound) – 2-3 minutes
- Extra-large (16-20 count per pound) – 1 1/2 – 2 minutes
- Large (26-30 count per pound) – 1-1 1/2 minutes
- Medium (36-40 count per pound) – 1 minute
- Small (41-50 count per pound) – 30-60 seconds
These blanching times are for raw, head-on shrimp. Peeled shrimp will cook 30 seconds to 1 minute faster. And as mentioned earlier, frozen shrimp may need an extra 1-2 minutes to allow thawing.
No matter the size, watch the shrimp closely as they blanch. You want them just cooked through but not rubbery. When in doubt, underblanch slightly. You can always return them to the boiling water for another 30 seconds if needed.
Common Mistakes to Avoid
While blanching shrimp is straightforward, there are a couple mistakes people commonly make:
-
Overcrowding – Adding too many shrimp at once lowers the water temperature drastically. It takes longer for the water to return to a boil, resulting in overcooked shrimp. Blanch in batches to avoid this.
-
Overblanching – As stated earlier, it’s easy to go past that perfect blanching time. Stay vigilant and remove the shrimp as soon as they are just opaque and cooked through.
-
Forgetting the ice bath – The ice bath is crucial for stopping the cooking so they don’t overcook. Don’t skip this important step!
-
Not using salt – For best flavor and fastest cooking, be sure to generously salt the blanching water. Kosher salt is ideal.
Follow the tips in this guide and you’ll never have to worry about blanching shrimp again. Now pass me a shrimp cocktail, please! Enjoy your perfectly blanched shrimp.
Which Shrimp To Use For Shrimp Cocktail
For a really great shrimp cocktail, you want to go with large shrimp. I use a 21-25 count, which means there are 21-25 shrimp per pound. Buy them deveined but uncooked. Easy-peel or already peeled is fine.
If they’re peeled, make sure they still have their tails. Do not skip those; they are what hold your shrimp cocktail together. If they are easy-peel, you can peel them before or after cooking; it doesn’t matter. Either way, make sure that you leave the tail on.
The peel on easy-peel shrimp has been cut along the outside to get rid of the vein, and then the tail has been cut. This makes it easy to remove the peel while leaving the tail intact. You want the tail because it makes a nice presentation and acts as a handle for your shrimp.
Want To Save This Recipe?
Type in your email address
How to Make Perfectly Cooked Shrimp Every Time
How long does it take to Blanch shrimp?
Blanching shrimp usually takes only 1-2 minutes, depending on the size of the shrimp. It involves briefly cooking the shrimp in boiling water or hot oil, then immediately placing them in ice water to stop the cooking process. This helps to loosen the shell and make it easier to peel, as well as improve the texture and color of the shrimp.
Do you thaw frozen shrimp before blanching?
You don’t have to thaw the raw, frozen shrimp before you blanch them, as long as the water is at a full boil when you add the shrimp. Fill a pot with water. Use enough water to submerge the shrimp fully to a 3-inch depth. Add 1 tbsp. salt to the water. Bring the water to full boil. Submerge the shrimp in the boiling water.
How do you Blanch shrimp in a crock pot?
To prepare the shrimp for blanching, first remove the shells and devein them if necessary. Then, bring a pot of salted water to a boil and add the shrimp. Cook for 2-3 minutes, or until the shrimp are just opaque and pink. Immediately remove the shrimp from the pot and transfer them to a bowl of ice water to stop the cooking process.
Why do you Blanch shrimp?
Blanching is a cooking technique that involves briefly immersing food in boiling water and then immediately plunging it into ice water to stop the cooking process. When it comes to shrimp, blanching helps to partially cook the shrimp, making it easier to peel and enhancing its texture and flavor. How do I properly blanch shrimp?