Proper acclimation is quite literally life or death for freshwater shrimp. People who have never kept shrimp before often think that the process is the same as acclimating fish: you just pour a few cups of water into the bag and let the fish swim around for 30 to 60 minutes. If you did this, your new shrimp friends would either die or be under a lot of stress, which I doubt you want. It’s not hard to get shrimp used to their new home, but it does take a little more time to make sure they do it safely. The rest of this guide takes you through the Shrimply Approved™ method of shrimp acclimation. That starts by preparing your tank.
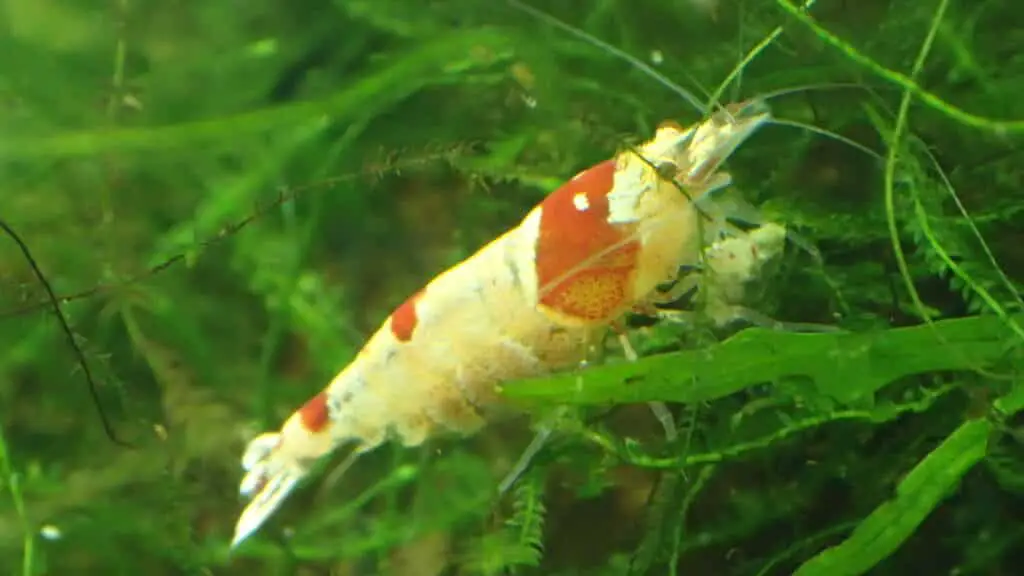
Bringing home new shrimp for your aquarium is an exciting experience. However, improper acclimation can cause serious harm or even death to your shrimp. That’s why it’s crucial to know how long to acclimate shrimp when introducing them to their new home. In this comprehensive guide, we’ll walk through the acclimation process step-by-step and discuss how long you should take at each phase for optimal shrimp health.
Why Acclimating Shrimp is Essential
Acclimating shrimp serves several important purposes:
-
Allows shrimp to adjust to new water parameters like pH, GH, KH, temperature, etc. Sudden changes in these levels create stress.
-
Lets shrimp become accustomed to potential different food sources and tankmates. This prevents aggression or competition over resources
-
Gradually introduces shrimp to possible different medications or supplements in the water. Abrupt exposure can shock their systems.
-
Reduces overall stress from transport and handling. Stress weakens the immune system, increasing susceptibility to disease.
Proper acclimation fortifies shrimp against illness and death when entering their new habitat. Rushing this process risks losing your new pets shortly after getting them home.
Equipment Needed
To acclimate shrimp you’ll need the following supplies
-
Dedicated shrimp acclimation container – A food-safe plastic bin or bucket works well. Should be 3-5 times the volume of your shrimp’s current water.
-
Airline tubing – To siphon water between containers for drip acclimation. Get a valve to control flow rate.
-
Mesh net – For transferring shrimp. Should be appropriately sized to not harm them.
-
Thermometer – Crucial for monitoring water temperature during acclimation.
-
Timer or stopwatch – To track duration of each acclimation step. A smartphone works for this.
-
Dim light source – Low lighting reduces stress. Use a desk lamp with a towel covering it.
-
Dechlorinator – If using tap water. Remove chlorine/chloramines that are toxic to shrimp.
-
other supplies like clean up crew may be needed
Having all equipment prepared ahead of time ensures proper, safe acclimation for your new shrimp.
Step-by-Step Acclimation Process
With supplies in hand, follow these steps for acclimating shrimp:
1. Inspect Shrimp on Arrival
-
Open bag/container and inspect shrimp in dim light.
-
Look for signs of stress, disease, or dead shrimp. Remove any dead individuals immediately.
-
If over 50% of shrimp appear stressed/dying, skip acclimation and do an emergency water change using tank water.
-
If shrimp look healthy overall, proceed with acclimation process.
2. Monitor Water Temperature
-
Measure temperature of shipping water and match it as close as possible to your tank’s temperature.
-
Place bag/container in tank or use a heater/cooler to adjust temp. Don’t let it fluctuate more than 2°F per hour.
-
Once matched, let sit for 30 minutes before moving to next step.
3. Transfer Shrimp
-
After temperature is matched, carefully transfer shrimp via net to the dedicated acclimation container.
-
Try to keep shipping water to no less than half the container’s volume.
-
If a piece of moss or other material came with the shrimp, move this to the container too.
4. Begin Drip Acclimation
-
Using airline tubing, start a siphon from tank into acclimation container and adjust flow to 1-2 drops/second.
-
Over the next 60-90 minutes, allow container water volume to double by adding tank water.
-
Monitor parameters like GH, KH, TDS, and pH – adjust flow rate if they change too drastically.
5. Finish Drip Acclimation
-
After 90 minutes to 2 hours, the container water should be 75% tank water.
-
Turn off flow and let shrimp sit for another 15-30 minutes to observe behavior.
-
If stressed/darting movements, extend acclimation time in 30 minute increments.
6. Introduce Shrimp to Tank
-
When shrimp appear calm and water parameters are close, use net to gently transfer shrimp to tank.
-
Introduce to lower stress part of tank first, like heavily planted areas.
-
Turn lights off for several hours to allow further adjustment.
-
Avoid feeding for 24 hours, then start with small amounts of food.
How Long Does Shrimp Acclimation Take?
The total acclimation time will depend on several factors:
-
Temperature Difference – The greater the discrepancy between shipping and tank temperatures, the longer needed to equalize.
-
Water Parameter Difference – Larger variances in GH, KH, pH, etc will require extended adjustment periods.
-
Shrimp Species – Some species inherently adapt quicker than others when introduced to new tanks.
-
Shipment Duration – Long transit times increase stress, necessitating longer acclimation.
Given these variables, here are general time guidelines:
-
Matching temperature: 30 minutes – 2 hours
-
Drip acclimation: 1-3 hours
-
Post-drip observation: 15-30 minutes
-
Total time: 2-5+ hours
Be prepared to acclimate sensitive shrimp like Caridina for 4 hours or longer when differences are more extreme. Rushing this process risks losing shrimp shortly after their arrival.
Recognizing Acclimation Issues
Watch for these signs of acclimation trouble during the process:
-
Shrimp rapidly darting around container
-
Climbing up walls or “trying to escape”
-
Consistently inactive or not moving
-
Loss of color intensity
-
Clamped down swimming legs
-
Lethargy or lack of response
Any of these suggest the shrimp are overly stressed. Immediately slow acclimation by reducing drip rate or performing a small water change using tank water.
Acclimating shrimp properly when bringing them home is crucial to avoiding preventable deaths. Expect the process to take 2-5 hours depending on variables like temperature discrepancy, water parameter differences, and shrimp species. Go slowly, observe shrimp behavior closely, and be ready to intervene if they become overly stressed. With time and patience, your shrimp will successfully transition into their new habitat. Let us know if you have any other questions on how long to acclimate shrimp!
Plan your day
The acclimation process takes a few hours so it is important to be prepared. That means having all the tools you need for proper drip acclimation and 3–4 hours to pick up the shrimp and let them get used to their new environment without being rushed. You can still do other things during that time, but you should check your acclimation setup every 30 to 60 minutes to make sure the water doesn’t get too high.
Depending on how you are buying your shrimp, the process may vary slightly:
When you buy shrimp in stores, you should figure out how to make the trip as stress-free as possible to your tank. The key is to avoid:
- Big difference in temperature: If you buy them on a very hot or cold day, the small amount of water in their bag may change temperature quickly on the way home. To avoid this, put the bag in a cooler, a Styrofoam box, or some other package that keeps things cool. It might seem like a good idea to add ice or a heating pad, but they could also make the temperature change too much, so it is best not to use them.
- Moving around too much: Just like we don’t like earthquakes, your shrimp don’t like being sloshed around in the bag as you bring them home from the store. Don’t be Darla! To keep the shrimp from moving around too much, bring a clean piece of cloth (something that won’t release chemicals into the water) or moss with you. This gives them something to hold on to and makes them feel less stressed. Also, avoid having too much air in the bag. There is more room for the water to move when there is more air. If the trip home is less than an hour, they only need about an inch of space at the top to make sure they get enough oxygen. Finally, make sure the bag doesn’t roll or shift while you’re driving home. If you’re not driving, put it in your lap or in a container that won’t move.
Ordering online: This is the simplest option that doesn’t require much planning, since most online sellers already take the above steps to make sure your shrimp aren’t stressed. Being there for the delivery is all it takes. If you’re not there, the package could get too hot or too cold depending on where you live. This concern can be avoided if the seller uses insulated packaging for shipping, which most do.
Once your shrimp arrive safely, it is time to acclimate!
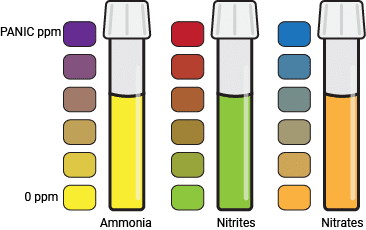
Step Ensure your tank is ready
If you are putting your new shrimp into a tank that has just been cycled, make sure it is really cycled. This means that the levels of ammonia, nitrites, and nitrates must stay below 20 ppm for at least a few days. This usually doesn’t happen until 3 to 8 weeks after the system is first set up. If cycling is not done properly, then ammonia levels may shoot up and kill your shrimp. No one wants that.

How to Acclimate Freshwater Shrimp [Beginner Shrimp Keeping]
How do you acclimate a shrimp?
Your fish (shrimp) net should also be able to fit inside to net your shrimp out at the end of the acclimation process. Smaller container or glass – Must hold at least ½ cup (or 100 ml) of water. Pour a small amount (1/2 cup or 100 ml) of water from the shrimp bag into your small container.
How long do I need to drip acclimate shrimp?
Set your timer for between 1–2 hours, depending on how different your water parameters are between the two tanks. Make sure you come back regularly to check on your shrimp, and also just in case your drip acclimating is filling up the container too fast!
Is temperature acclimation enough for freshwater shrimp?
Temperature acclimation alone will not be sufficient for fairly sensitive species like freshwater shrimp. On the other hand, the “drip acclimation” method will allow your new fauna to slowly acclimate to all of the water parameters of your tank, making for a smoother transition from the bag to the aquarium.
How do you acclimate a shrimp & fish tank?
Shrimp net – After the acclimation is complete, this net will be used to transfer the shrimp or fish into your tank. Bucket or small container – Make sure the container is large enough to contain at least double the amount of the water in the bag containing the new fauna.