Stock your pantry and enjoy the convenience of homemade soup anytime with this safe canning recipe! Preserve the warmth of homemade comfort with our guide to canning turkey soup!
A hot bowl of homemade soup, especially one that has been lovingly prepared and preserved to be enjoyed whenever the need arises, has a certain reassuring quality. This recipe for Turkey Soup will teach you how to safely pressure can a nutritious and filling pantry staple.
One of my favorite ways to use up leftover turkey from Thanksgiving is to can it at home so that we can have it for the entire winter. Leftover turkey is one of the best parts of the meal. I actually buy an extra turkey so I can roast it, can the plain turkey meat, freeze the turkey soup, and make rich, flavorful turkey stock with the bones.
Not only does canning your own turkey soup save time and effort during mealtimes, but it also ensures a robust flavor that outshines store-bought versions free of additives or unidentified ingredients.
The comforting warmth of homemade soup is unmatched, especially when it’s made with care and preserved for future enjoyment. This guide will walk you through the process of canning turkey soup, allowing you to stock your pantry with a delicious and convenient meal that’s ready to heat and serve whenever the craving strikes.
Why Can Turkey Soup?
Canning turkey soup offers several benefits:
- Convenience: Having ready-made soup on hand saves time and effort when you’re short on time or energy.
- Flavor: Home-canned soup often surpasses store-bought options in terms of taste and freshness.
- Control over ingredients: You can customize your soup with your favorite vegetables, seasonings, and broth, ensuring it perfectly suits your preferences.
- Reduced food waste: Canning allows you to utilize leftover turkey and vegetables, minimizing waste and maximizing your resources.
Ingredients:
Here’s what you’ll need to make and can your own turkey soup:
- Cooked turkey: Start with 6 cups of diced, cooked turkey. You can use leftover turkey from a roast or cook fresh turkey breast or thighs.
- Vegetables: This recipe calls for the classic trio of mirepoix vegetables—celery, onions, and carrots. However, feel free to swap these out for an equal amount of alternatives like asparagus, green beans, corn, mushrooms, thawed frozen peas, peppers, tomatoes, or turnips.
- Seasonings: This recipe uses the classic Bells poultry seasoning. However, you can use dried herbs like thyme, rosemary, oregano, or basil, but keep in mind that sage turns bitter when canned.
- Broth Liquid: I like using homemade turkey stock to add flavor to the soup, but you can use vegetable broth, chicken bone broth, or simply water – your choice. If you don’t have turkey broth or stock on hand, you can make it from the turkey carcass and roasting pan juices the day before by following this Turkey Stock Recipe. Once the stock cools in the refrigerator, the fat will rise to the top and can be easily removed before using it to make your soup.
- Canning supplies: You’ll need a pressure canner, canning jars, lids, bands, canning tools, and basic kitchen equipment.
Step-by-Step Canning Process:
- Gather and Prepare Your Canning Equipment: Ensure you have all the necessary tools and equipment ready before you begin. Wash and sterilize your jars, lids, bands, and tools. Preheat your pressure canner according to the manufacturer’s instructions.
- Prepare the Ingredients: Dice the cooked turkey, chop the vegetables, and mince the garlic. Combine all ingredients in a large saucepot, add the seasonings and broth, and bring to a boil.
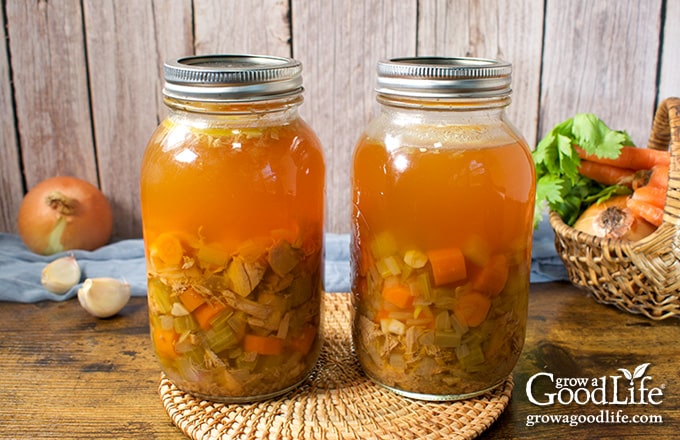
- Fill the Jars: Using a canning funnel, fill the jars halfway with solid ingredients, then add the hot broth, leaving 1-inch headspace. Remove any trapped air bubbles and adjust the headspace if needed. Wipe the jar rims clean and place the lids and bands on securely.
- Process the Jars: Place the filled jars in the pressure canner and process them for the recommended time, following your canner’s instructions.
- Cool and Store: Allow the jars to cool completely and check for proper seals. Label and store the sealed jars in a cool, dark place.
Tips for Success:
- Use fresh, high-quality ingredients for the best flavor and texture.
- Follow the recipe instructions carefully, especially regarding processing times and headspace.
- Always use a pressure canner for canning turkey soup. This is the only way to ensure safe preservation.
- Inspect your jars for cracks or chips before canning.
- Store your canned soup in a cool, dark place for optimal quality.
Enjoy Your Homemade Turkey Soup!
With a little effort, you can enjoy the convenience and deliciousness of homemade turkey soup anytime. Open a jar, heat it up, and savor the warmth and flavor of your culinary creation.
Additional Resources:
- Preserved Home Canning Turkey Vegetable Soup: https://preservedhome.com/canning-turkey-vegetable-soup/
- Grow a Good Life Canning Turkey Soup: https://growagoodlife.com/canning-turkey-soup/
FAQs:
- How long does canned turkey soup last? Properly canned turkey soup can last for up to 12 to 18 months when stored in a cool, dark place.
- Can I use a water bath canner for turkey soup? No, you should never use a water bath canner for canning turkey soup. This method is not safe for low-acid foods like turkey.
- What can I add to my turkey soup for extra flavor? Experiment with different vegetables, herbs, and spices to create your own unique flavor combinations. You can also add cooked rice or noodles to your soup at serving time.
Canning turkey soup is a rewarding and practical way to preserve your Thanksgiving leftovers and enjoy a delicious homemade meal whenever you desire. By following the steps outlined in this guide, you can create safe and flavorful canned soup that will warm your heart and satisfy your taste buds.
Step 1: Gather and Prepare Your Canning Equipment
Before you begin, make sure you have the necessary kitchen tools and canning equipment ready to go. Here’s a list of what you’ll need:
- Pressure Canner with canning rack
- Jars for Canning: 12 pint-sized jars or, for larger servings, 6 quart-sized jars
- Lids and Bands: You can reuse the bands, but you will need new lids for every jar.
- Canning Tools: a funnel for spill-free pouring, a jar lifter for safe handling, a canning ladle for jar filling, and a bubble popper to release trapped air and gauge headspace
- The essential kitchen tools include a big stainless steel pot, a dependable knife and chopping board, measuring cups, a slotted spoon, and an ample supply of fresh towels.
Wash your canning jars, lids, bands, tools, and equipment in hot, soapy water, followed by a thorough rinse. Then, set everything aside on clean kitchen towels to air dry.
Place the pressure canner with the jar rack inside it on top of a large burner on your stove and fill it with water. Refer to your canner manufacturer’s guidelines for the correct water amount. For example, a Presto canner requires three quarts of water, a Mirro canner calls for two quarts, and an All American canner suggests filling it two to three inches deep.
Preheat the jars by filling them halfway with water and arranging them upright in the canner. After covering the canner and heating it to 180°F, simmer it for at least ten minutes. Keep the jars warm until you are ready to fill them. You can get the soup ingredients ready while the canner is warming.
Step 4: Process the Jars in a Pressure Canner
Refer to the instructions that come with your pressure canner for sealing, venting, and heating, and process the jars for the duration that the recipe below specifies.
Once the processing time completes, turn off the heat and allow the pressure to return to zero. Remove the jars and place them on a dry towel to cool, ensuring they remain upright. At this stage, don’t test the seals or adjust the rings; the jars need time to cool properly before sealing properly. Let them cool completely for 12 to 24 hours.
After the cooling phase, test the seals. Refrigerate any jars that didn’t seal properly and consume them within a few days. Remove the rings from the sealed jars and give them a thorough wash in soapy water to get rid of any residue before storing. Then label, date, and find a cool spot to store the canned turkey soup. For optimal flavor, consume within 12 to 18 months.