This is the second tip page on BC Fishing Journal in regards to curing Salmon/Steelhead eggs. I’m always trying new recipes and experimenting with the best freezing practices. These two cure recipes are based on the well-known “3-2-1” egg cure, but they have a few extras added to them. The ingredients for this cure could all be picked up at your local grocery store. Even though I’m adding a few more, this page of tips should give you a good start on your own cure.
Lastly, I also outline another method on how to freeze cured roe. This was not covered in my previous tip page. At the bottom of our BC Fishing Journal YouTube channel is an instructional video that you can watch if you’d rather see it. Check it out and be sure to give the video a thumbs up if you like the recipe. Leave a comment if you want me to try your recipe or if you want me to try another one.
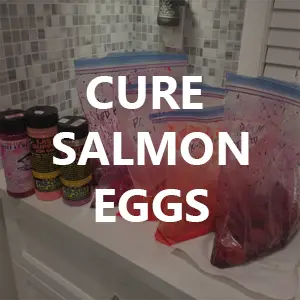
Cured salmon eggs are a top bait choice among anglers fishing for trout, salmon and steelhead. The curing process firms up the delicate eggs, allowing them to stay on the hook longer while enhancing their scent and flavor to attract more bites. While there are various curing methods, a basic salt-sugar cure makes it easy to prepare fresh salmon eggs so they keep for months in the fridge or freezer.
Why Cure Salmon Eggs?
When compared to using fresh raw eggs, letting salmon eggs cure before fishing has a number of benefits:
-
Firmness – Curing firms up the soft eggs so they don’t fall off the hook easily. This allows for longer drifts and retrieves.
-
Preservation – Cured eggs last for months in the fridge or freezer compared to just days for fresh eggs
-
Enhanced scent – The curing ingredients infuse the eggs with fish-attracting scents
-
Improved flavor – Curing adds a desirable flavor while removing fishy odors.
-
Color – Cured eggs take on an appealing orange-pink hue.
Curing Ingredients
The basic salmon egg cure contains just three ingredients:
- Non-iodized salt
- White sugar
- Optional – Borax
The salt and sugar preserve the eggs while giving them a pleasing scent and subtle sweetness Adding borax can further extend shelf life.
Step-by-Step Curing Method
Curing salmon eggs is simple with just a few easy steps:
1. Collect the Eggs
Obtain fresh salmon eggs from cleaned fish. Cut off skeins and place eggs in a colander, rinsing thoroughly.
2. Add the Cure
In a large bowl or plastic bag, mix 2 cups salt and 1 cup sugar per quart of eggs. Add eggs and mix ensuring they are evenly coated.
3. Cure the Eggs
Place the eggs and cure mixture in a covered container or zip-top bags. Refrigerate for 4-8 hours, gently mixing occasionally.
4. Rinse the Eggs
After curing, rinse the eggs thoroughly with cold water to remove excess cure.
5. Dry and Store
Pat eggs dry with a paper towel. Place in an airtight container and store in the fridge or freezer.
Curing Tips
-
Use non-iodized salt as iodized salt can give eggs a chemical taste.
-
White sugar works best, providing a subtle sweetness.
-
Curing time can vary based on factors like egg size and temperature.
-
For loose eggs, cut up female salmon skeins prior to curing.
-
Pat eggs very dry after rinsing to prevent clumping.
Adjusting the Cure Recipe
The basic salmon egg cure recipe can be customized to suit different preferences:
-
Use less salt for milder flavor.
-
Add garlic powder, Dynamic Lures treatment or Pro-Cure for more scent.
-
Substitute brown sugar or maple syrup for richer sweetness.
-
Increase sugar content for softer texture.
-
Add borax or cherry Jell-O powder to extend shelf life.
-
Use anchovy paste or tuna oil for a fishier scent.
Storing and Using Cured Eggs
Store cured salmon eggs properly to maximize freshness and usability:
-
Keep in sealed containers in the fridge for 2-6 months.
-
Freeze in vacuum sealed bags for up to a year.
-
Rinse with borax solution before use to remove excess oil.
-
Portion into small containers to avoid constant opening.
-
Take only what you’ll need frozen eggs on each trip.
-
Mix with salt each day to keep thawed eggs firm.
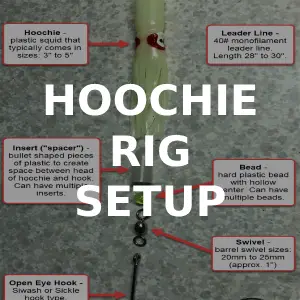
Preparing Baits and Rigs
To fish cured salmon eggs most effectively:
-
Thread single eggs on a bare hook, or use cured egg clusters.
-
Pair with a spinning float and bait holder to float eggs off bottom.
-
Add a small worm tip or marshmallow to completely hide the hook.
-
Mold cured egg dough baits around the hook and fish on bottom.
-
Use a mesh spawn sack threaded onto the hook.
Frequently Asked Questions
How long do cured salmon eggs last?
Properly cured and stored eggs can last 2-6 months in the fridge or up to a year in the freezer.
Can you use a microwave to quick cure eggs?
It’s not recommended. Microwaving cooks the eggs, changing their texture and reducing scent.
What color should cured salmon eggs be?
A light orange-pink hue is ideal. Avoid eggs that turn opaque white or gray – this signals over-curing.
Can you use the salmon egg cure recipe for steelhead eggs?
Yes, it works great for steelhead eggs too. Adjust the recipe as needed for the egg size and your preferences.
What is the ratio of salt and sugar in salmon egg cures?
A good starting point is 2 parts salt to 1 part sugar. The exact ratio can be customized to your taste.
Cured Eggs Catch Fish
With its effectiveness and ease of preparation, curing salmon eggs using a simple salt-sugar method is a must-try technique for anglers. Follow this guide for bait that stays on the hook longer while releasing fish-drawing aromas into the water. Armed with a batch of cured eggs in your tackle box, you’ll have a go-to bait ready to catch trout, steelhead, salmon and more.

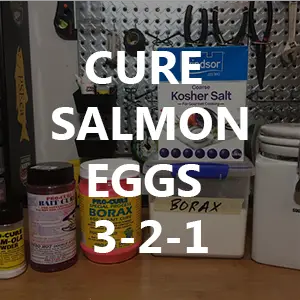
Instructions on How to Cure Salmon Eggs (3-2-1 Recipe)
The reason I love this recipe is the simplicity and memorability. The name “3-2-1” comes from the parts (amounts) of 3 different ingredients:
- 3 parts Borax
- 2 parts white Sugar
- 1 part Non-iodized Salt
All of these ingredients can be picked up at your local grocery store. You don’t have to spend a ton of money buying expensive manufactured cures. But, after I use this cure, I like to add a few extras, like scents and dyes. And that’s what I’ll be going over further in this tip.
Get the 3 ingredients outlined below and a large bowl. Put each of the ingredients into the large bowl and mix very well. If you’re using any colored manufactured Borax, I’d recommend mixing in a well ventilated room (or open window).
3 parts Borax (either the standard Borax from the grocery store, e.g. 20 Mule Team Borax, or you can use colored Borax products, e.g. Pro-Cure Borax).
2 parts white sugar (typical white sugar from the store, e.g. granulated white or cane sugar)
1 part non-iodized salt (I like to use Kosher Salt)
I’d recommend preparing more cure than you’ll need. If you bring home fresh roe and don’t want to buy and prepare another batch, it’s helpful to have cure on hand. Keep that in mind when you’re determining your part amounts. I used 1/3 cup of white sugar, 1 cup of borax, and 1/3 cup of kosher salt for this tip and video.
Prepare a work space by laying down some newspaper followed up with some paper towel. Before handling the eggs put on latex gloves (and keep them on whenever you’re handling the eggs).
Take some scissors and butterfly your skeins, then ensure there is no remaining blood in the eggs. If the eggs still have blood in them, use a dull knife or spoon to push the blood toward the ends of the skeins. You the paper towel to soak up the blood. I haven’t gone into a lot of detail about this step yet. If you want to learn more about butterflying and taking blood off of skeins, check out my other salmon cure tip page.
Apply a healthy dusting of the cure onto the both sides of the eggs. This amount can be subjective, but ensure the eggs are covered with the cure. We’re going to add a little more cure in a later step, so don’t go overboard here. Gently massage some of the cure into the eggs ensuring the cure is getting applied everywhere.
Take your scissors and cut the skeins into small chunks. I prefer larger chunks that I can cut down on the water. Typically, I like to cut the pieces into sizes that would be half a handful, aka. the size of 2 golf balls. If you’re not sure about the sizes, cut bigger ones. You can always change the sizes on the water if you need to.
Once the skeins are cut up into smaller pieces place them into a large Ziploc bag. There is some surface area on the eggs that the cure doesn’t cover because they were cut up after the first cure was added. So, once the eggs are in the Ziploc bag, I like to add a little more cure and gently shake the bag to make sure the extra cure gets into all the eggs.
Place the Ziploc bag into the fridge for 24 hours. To keep the eggs fresh for 24 hours, gently turn them over whenever you remember to (but try to do this at least twice or three times). Do not drain any of the juice that may form in the bottom of the bag.
This initial 24 hours is where the majority of the curing process occurs.
After the first 24 hours in the fridge, you can start to add perfume or color to the cure.
There are so many scents available, popular ones like Shrimp, Krill, Garlic, Anise, Salmon Eggs, Tuna, etc. A favorite scent of mine is Pro-Cure’s Slam-Ola Powder and/or a few drops of pure Anise oil. I like to add them to any egg cure. You don’t have to add just one scent; guys often use more than one in their cures. Scents come in a few ways the most popular being a powder, liquid or oil format.
If you use regular white borax in this 3-2-1 recipe, you might want to color your eggs (or not leave them orange like they are naturally). You can easily add color to the eggs by adding a little Kool-Aid juice powder from the store. You can try different colors, but if this is your first time, stick with the Cherry flavor (dark red color). Mix the Kool-Aid powder into the eggs slowly until all of them start to turn that color.
You can buy commercial powder dyes from a number of places, but I’m not going to talk about those here. You’ll notice I did 2 recipes: 1 with a colored Borax and 1 with standard white Borax. With the Colored borax there is no reason (obviously) to add any further coloring.
After adding the scents and/or colors and gently mixing them, put them back in the fridge for another 24 to 48 hours. This makes the entire curing process 2-3 days.
After three days in the fridge, the eggs are ready to be fished! If they feel soft or soupy and you’re afraid they won’t stay on the hook well, cover them in plain white borax and pop them back in the fridge overnight before you fish. This will tighten them up for your day of fishing.
If you’re looking to store the cured eggs my favorite way is by Mason jars. I fill them almost to the top where I have 1″ of room between the eggs and the lid. I then use my FoodSaver Mouth Jar Sealer which is an accessory piece to the FoodSaver which essentially air seals the jar cap. Once my Mason is air sealed, I’ll add a piece of tap and write the cure recipe and date. Lastly, I put the jars into the freezer and they should be good for at least 1 year.
If you have lots of excess juice (aka. liquid cure) that is still in the Ziploc bag after the eggs have been cured. DO NOT throw this away! Use it to coat the eggs again once they are in their jars or storage containers.
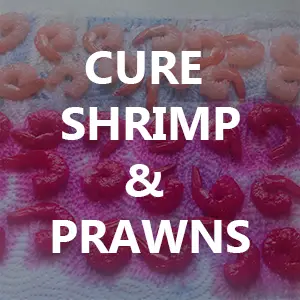
Put the extra liquid cure into a jar if you think there is still too much liquid left (see next photo for an example). I’ve used this excess liquid cure to color and cure prawns/shrimp overnight… it’s deadly!.
Video: 2 Versions on How to Cure Salmon Eggs with the 3-2-1 Cure Recipe