So, how do you make that tasty nigiri salmon that you can get at good sushi places? I’ll show you in 4 minutes!
Nigiri salmon is a tasty and easy homemade sushi option that tastes just as good as restaurant quality, but costs a fraction of the price. Making your own fresh nigiri salmon is surprisingly simple with just a few key tips
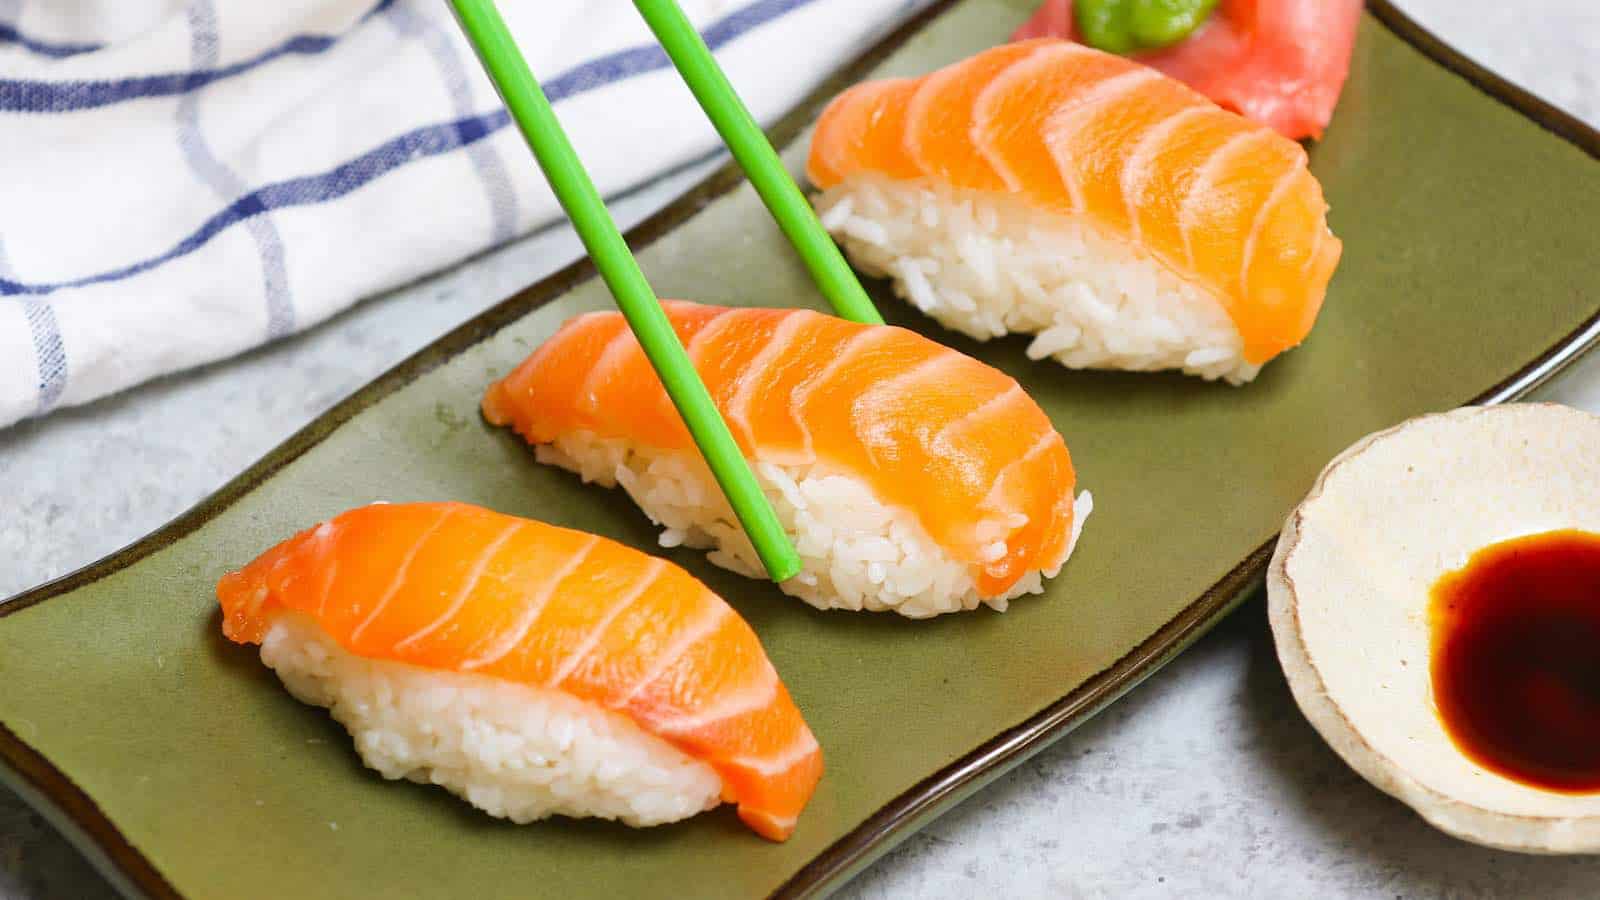
Nigiri is a hand-pressed type of sushi where a topping like fish, seafood, or vegetables is placed on a long block of flavored sushi rice. When you eat nigiris, the topping actually takes center stage, while the rice just plays a supporting role. Salmon is one of the most popular proteins used for nigiri sushi.
In this article, I’ll walk you through the entire process of making perfect nigiri salmon step-by-step from start to finish, including:
- How to cook and season sushi rice
- Slicing the salmon properly
- Shaping and assembling the nigiri
Plus plenty of tips and tricks along the way for nigiri success! Keep reading to learn all my best advice on how to make restaurant-quality nigiri salmon in your own kitchen
Step 1: Cook and Season the Sushi Rice
The foundation of great nigiri sushi is perfectly cooked rice that is seasoned just right. Here are some key steps:
-
Use high-quality Japanese short grain rice – This type of rice works best to achieve the right sticky yet firm texture required. Some good brands are Kokuho Rose, Nishiki, and Calrose rice
-
Precise rice-to-water ratio – You want the rice moist but not mushy. I recommend a 1:1 ratio of 1 cup uncooked rice to 1 cup water.
-
Make the rice. You can use a rice cooker or cook it on the stove. Just make sure not to open the lid as it steams.
-
Season the rice – Once cooked, gently mix in a seasoning mixture of rice vinegar, sugar, and salt. This is called sushi su or sushi vinegar. The amounts are usually about 1/4 cup vinegar, 2 tbsp sugar, and 1 tsp salt for 5-6 cups cooked rice.
-
Cool slightly before using – You want the rice still warm but not hot when assembling.
Properly cooked and seasoned sushi rice is the “glue” that makes the nigiri hold together. So don’t skip this step!
Step 2: Slice the Salmon Correctly
Now it’s time to prep the salmon. Be sure to get high-quality sashimi grade salmon since it will be eaten raw.
When slicing the salmon, you want pieces that are:
-
Against the grain – This makes the salmon easier to chew.
-
Thinly sliced – About 1/4 inch thick is ideal. Too thick and it’s hard to eat. Too thin and it falls apart.
-
Angled cuts – Slice at an angle about 30-45 degrees rather than straight up and down. This gives you the right shape to mold the rice around.
-
Portioned – Cut the salmon into pieces about 4 inches long by 1 inch wide. This size works well proportionally on top of the nigiri rice base.
Take your time when slicing and angle the knife as needed to get uniform slices. Use a very sharp knife for clean cuts.
Step 3: Mold the Nigiri Rice
Now it’s time to shape the sushi rice into the base for the nigiri. Here are some tips:
-
Use dampened hands – Wet your hands slightly to prevent rice from sticking. You can also dip hands in a vinegar water solution called tsuyu.
-
Compact the rice – Use about 2-3 tbsp rice and compress gently in your palm to form an oval shape.
-
Create a “neck” – Leave a space at the bottom with a ridge between your fingers for the salmon to sit on.
-
Make a flat base – So the nigiri sits upright without wobbling.
-
Consistent sizes – This helps the rice and salmon proportions stay balanced.
It takes some practice to shape the rice well, but you’ll improve quickly. Just be gentle and don’t overhandle the rice.
Step 4: Assemble the Nigiri
Now it’s time to put it all together!
-
Add wasabi – Place a thin smear of wasabi on top of the rice where the salmon will sit. This helps adherence and adds flavor.
-
Position the salmon – Lay the sliced salmon piece over the wasabi on the “neck” of the rice.
-
Press together – Use your fingers to hold the salmon in place atop the rice and compress them together.
-
Shape if needed – Gently mold the rice more tightly around the salmon.
Repeat the process with the remaining rice and salmon slices until you have a platter of perfect nigiri sushi!
Serving Suggestions
Nigiri salmon tastes best when fresh, so aim to eat it right after assembling. If you do have leftovers, you can store the nigiri in the fridge loosely wrapped in plastic wrap for up to 24 hours. Here are some serving tips:
-
Room temperature – Take the nigiri out of the fridge about 15 minutes before eating so it loses the chill but is still cool.
-
Add condiments – Provide small dishes of soy sauce, wasabi, and pickled ginger on the side for dipping or topping each piece.
-
Plate decoratively – Arrange the nigiri in a single layer on a long rectangular plate or appetizer platter.
-
Chopsticks – Supply chopsticks as the utensil for your guests to easily pick up the nigiri.
Now you can enjoy homemade gourmet nigiri sushi at a fraction of the cost! Salmon nigiri makes an elegant appetizer for a dinner party or light main course for two. I hope you’ll give this recipe a try soon.
Nigiri Making Tips and Troubleshooting
Making nigiri sushi does take some practice. Here are my best tips for troubleshooting issues and improving your nigiri making skills with each batch:
Rice Problems
Rice too dry and crumbly – Increase the water slightly next time or cook an extra 1-2 minutes. Cool and season it immediately after cooking.
Rice sticks to hands – Wet hands more or make sure rice is fully cooled before shaping. Don’t overwork the rice.
Rice falls apart – Use a bit more pressure when shaping it in your hand. Make sure it is seasoned and cooled properly.
Rice too mushy – Don’t overcook it next time or reduce the water ratio. Don’t stir rice too vigorously when seasoning.
Salmon Issues
Salmon doesn’t adhere – Make sure you’re using a thin smear of wasabi to help it stick. Press the salmon onto the rice more firmly.
Salmon slices uneven – Focus on consistent slicing angle and thickness. Protect your fingertips when slicing.
Hard to chew salmon – Double check you are slicing against the grain. The pieces may be too thick if hard to chew.
Salmon tastes fishy – Be sure you are using only the freshest sashimi grade salmon. Discard any discolored portions.
Nigiri Assembly Troubles
Nigiri falls over – Compress the rice a bit firmer when shaping and try to make a flat base.
Proportions off – Keep salmon slices and rice oval shapes consistent in size. About 1 inch by 2-3 inches is ideal.
Sloppy looking – Take a bit more time when assembling to neatly press components together.
Nigiri doesn’t stay together – Check that rice is properly cooked and seasoned. Salmon may be too thick.
With a bit of practice, you’ll be impressing your friends with homemade nigiri sushi that looks and tastes like it came from a high end sushi restaurant!
Additional Delicious Nigiri Topping Ideas
While salmon is traditional and tasty, there are lots of possibilities for nigiri toppings. Here are some additional proteins, vegetables, and other ingredients that work exceptionally well:
-
Tuna – Choose sushi grade tuna such as bluefin or yellowfin.
-
Shrimp – Cooked or raw are both delicious.
-
Scallops – Look for fresh raw scallops.
-
Crab – Real crabmeat gives amazing flavor.
-
Avocado – Pick ripe avocados and slice thin.
-
Cucumber – Seedless English cucumbers work best.
-
Omelet – Sweet Japanese tamagoyaki omelets pair nicely.
-
Tofu – Look for firm or silken tofu depending on texture desired.
-
Asparagus – Briefly blanch or pickle thin asparagus spears.
-
Radishes – Thinly slice colorful watermelon or daikon radishes.
Where does the word nigiri come from?
The word nigiri comes from the Japanese “nigirizushi,” which translates as “hand-pressed sushi. You use your hands to make the shape of this sushi. To make a perfectly shaped nigiri by hand takes practice, patience and skill.
Therefore, let’s quickly start with this lovely nigiri!
- Sushi rice
- Fresh sashimi quality salmon
- Wasabi
What is nigiri sushi?
Nigiri sushi is the most common type of sushi. A thin slice of fresh raw fish is placed on top of a small oval rice ball to make this tasty treat. Usually topped with a small amount of wasabi as well. It tastes great in your mouth because the fish has a mild flavor and the rice and wasabi have a sticky, slightly spicy taste. You will often find nigiri sushi first on the menu at any good sushi restaurant. It is simply delicious!.
How to Make Nigiri Sushi 【Sushi Chef Eye View】
How to make salmon nigiri?
Assemble Salmon Nigiri: Place the salmon slice on the root of your fingers. Then take a pea-sized portion of wasabi, and spread in the middle of the fish. Place the rolled sushi rice onto the salmon, and bend your fingers to cover both the fish and rice together. Press down the rice using the index finger from the other hand.
How to make nigiri with fish?
Cut the raw fish against the grain into the right thickness for nigiri. If your salmon or tuna is too thick, it won’t be shaped properly on top of the rice, but if it’s too thin, it will lose the flavor. The best thickness is about 1/4 inch. Wet your hands with Tezu water before handling rice. It’s made with water and vinegar.
What is salmon nigiri sushi?
Nigiri sushi is a popular type of sushi with a slice of raw fish that is placed on top of vinegary rice. Traditionally, a small amount of wasabi is placed between the fish and rice to hold the dish together. It’s pretty easy to make at home with a few simple tips. See Also: What is Masago Sushi? Is It Safe To Eat Salmon Nigiri Sushi?
How to make sushi nigiri?
Scoop out about 3 tablespoons of rice and place in your hand. Squeeze the rice until it forms an oval shape. Use your hand to flatten the bottom. Assemble your nigiri by placing your topping flat against your palm. Press the rolled sushi rice onto the topping. Flip over the roll so that the topping is on top.