Since we shared this recipe in July 2015, many of our readers’ homes have made these Disney-inspired smoked turkey legs an annual tradition.
Our aunt, who is my dad’s older sister, created the original version. We’ve since updated it with more information on important queries that you have asked over the years:
We have the answers to all of these queries, along with directions for preparing these turkey legs both outside on a charcoal grill or smoker and inside in an oven. Enjoy!.
Note: This post was originally published in July 2015. The recipe itself has not changed, but it has been updated with additional details, oven-baking instructions, and a FAQ section. Enjoy!.
Are you craving those juicy, smoky turkey legs you always get at the fair? Well, you don’t have to wait for the next fair to come to town to enjoy them! With this guide, you can learn how to make them yourself at home, and they’ll be just as delicious, if not better!
We’ll combine the best of two worlds, using the detailed instructions from Around My Family Table and the tips and tricks from The Woks of Life to create the ultimate guide for making fair-style turkey legs.
Ingredients:
For the Brine:
- 1/2 cup table salt (or 1 cup kosher salt)
- 1/2 cup brown sugar
- 2 tbsp onion powder
- 2 tbsp garlic powder
- 2 tbsp red pepper flakes
- 2 tbsp poultry seasoning
- 1 tbsp Tabasco
- 2 bay leaves
- 3/4-1 gallon water
- 6 large turkey legs
For the Rub:
- 2 tbsp chili powder
- 2 tsp steak seasoning
- 2 tsp paprika
- 1 tsp onion powder
- 1 tsp garlic powder
- 1 tsp salt
- Olive oil
Instructions:
1. Brining the Turkey Legs:
- In a large container with a lid, combine all the brine ingredients. Add the turkey legs and ensure they are fully submerged in the brine.
- Refrigerate the turkey legs in the brine for 12-24 hours, stirring occasionally.
2 Preparing the Grill:
- Prepare your charcoal grill for indirect cooking at about 325°F.
3. Applying the Rub:
- Remove the turkey legs from the brine, rinse them, and pat them dry.
- In a small bowl, mix all the rub ingredients (except the olive oil).
- Lightly drizzle olive oil over the turkey legs and then sprinkle the rub evenly over them, gently rubbing it in to coat.
4. Cooking the Turkey Legs:
- Place the turkey legs on the grill over indirect heat (325°F) and cook for 45 minutes to 1 hour, or until the thickest part of the leg reaches an internal temperature of 165°F.
- Turn the legs every 10-15 minutes to ensure even cooking.
5. Enjoy!
- Once cooked, remove the turkey legs from the grill and let them rest for a few minutes before serving.
Tips:
- If you don’t have a charcoal grill, you can also cook these turkey legs in the oven. Preheat your oven to 325°F, place the turkey legs on a wire rack set in a roasting pan with 1/2 inch of water, cover with foil, and bake for 1 hour for small (1-pound) turkey legs or 1.5 hours for larger turkey legs.
- You can also inject the turkey legs with the brine before cooking for extra flavor and moisture.
- For a smoky flavor, add wood chips to your charcoal grill or use liquid smoke in your oven recipe.
- Serve your turkey legs with your favorite dipping sauces, such as barbecue sauce, honey mustard, or ranch dressing.
FAQs:
How much salt should I use in the brine?
- The amount of salt you use in the brine will depend on your preference. If you like your turkey legs salty, use the full amount of salt (1 cup kosher salt or 1/2 cup table salt). If you prefer them less salty, use 3/4 cup kosher salt or 1/4 cup table salt.
Can I make these turkey legs in the oven if I don’t have a charcoal grill?
- Yes, you can definitely make these turkey legs in the oven. Follow the instructions above for oven cooking.
What if I’m making more or fewer turkey legs than the recipe calls for?
- If you’re making more turkey legs, you’ll need to increase the amount of brine accordingly. Make sure the turkey legs are fully submerged in the brine. If you’re making fewer turkey legs, you can still use the same amount of brine, but you may need to adjust the cooking time slightly.
Can I freeze these turkey legs after cooking?
- Yes, you can freeze these turkey legs after cooking. Let them cool completely, then wrap them tightly in plastic wrap and aluminum foil. Freeze for up to 3 months. To reheat, thaw the turkey legs in the refrigerator overnight and then reheat them in the oven at 350°F until heated through.
What if my turkey legs are very large/small?
- If your turkey legs are very large, brine them for the full 24 hours and inject them with the brine before cooking. If your turkey legs are very small, you may need to reduce the cooking time slightly.
What kind of turkey are you using? What if it’s been pre-brined?
- The type of turkey you use will affect the flavor and texture of the turkey legs. If you’re using a pre-brined turkey, be careful not to over-brine it, as this can make the turkey legs too salty.
Making delicious turkey legs just like the fair is easier than you think! With this comprehensive guide, you can impress your family and friends with your culinary skills. Just follow the instructions, use the tips and tricks, and enjoy the delicious results!
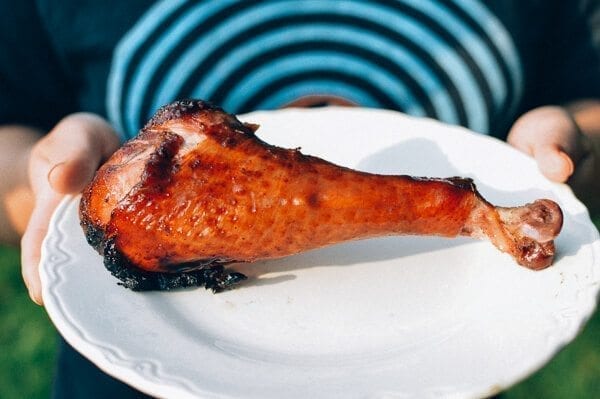
*The* Disney turkey leg
Visits to Disney World were greeted with great fanfare when we were younger:
- The break from school! (Thank you very much; I’ll forego your coloring books and multiplication tables!)
- The rides! (This year, I get to ride Thunder Mountain and raise my hands!)*
- The characters! (Mickey Mouse! Goofy! Mustn’t forget my autograph book!)
My parents were adamant about one food item in particular: the Smoked Turkey Legs, even though the cost of the food at Disney World was so high that it would make their eyes pop every time they looked at the menu. (Because that definitely deserves some capitalization. ).
Ahhh smoked turkey legs. That perfectly smoked, glossy, and salty meat with a hint of ham flavor
We would pay the outrageous $8 to $10 for one, which was astronomical in the mid-1990s, and pass it around like a meaty peace pipe, tearing off chunks of turkey like the gluttons we were happy to be at that precise moment.
For my mother, who is not fond of rides or theme parks, this turkey leg was the main draw. Maybe that was even the reason we managed to get her to enter the park in the first place!
*Of course, this never really happened because Sarah and I were weak-willed, scaredy-cats when we were younger, and Thunder Mountain was such a sleep fest that it felt more like a scenic trolley ride by the time we were old enough to not be weak-willed, scaredy-cats.
A homemade, backyard smoked turkey leg recipe
Imagine our delight, then, when a few years ago, my aunt began smoking turkey legs in her backyard on a charcoal grill! The flavor is nearly identical, and cooking them in large quantities is actually quite simple.
Over the July 4th weekend, we went to their house in Western New York, and they INSISTENT that we eat these and record the process.
Some tastes stick with you so much that they cause you to become slightly obsessed, and this is one of those tastes. Continue reading if you too have an insane fondness for this type of smoked poultry!