For those who seek to preserve the memory of a majestic turkey, taxidermy offers an incredible opportunity to transform it into a lasting work of art Whether you’re an avid hunter, a nature enthusiast, or simply someone who appreciates the beauty of these magnificent creatures, this guide will equip you with the knowledge and techniques to successfully taxidermy a turkey.
Preparation is Key:
To start this journey, make sure you have the required equipment and supplies:
- Skinning knife: A sharp and sturdy knife is essential for precise skinning.
- Scissors: Sharp scissors are needed for trimming and shaping the skin.
- Borax: This powder helps preserve the skin and prevent decay.
- Mannequin: Choose a mannequin that matches the size and pose of your turkey.
- Mounting board: This provides a stable base for your finished mount.
- Eyes: Select glass eyes that resemble the natural eyes of your turkey.
- Thread and needle: These are used for sewing the skin onto the mannequin.
- Glue: A strong adhesive is needed for attaching the beak and feet.
- Paint and brushes: These are used for adding realistic details to your mount.
The Skinning Process:
- Cooling the bird: Place the freshly harvested turkey in a refrigerator or cooler to prevent spoilage.
- Plucking the feathers: Remove the feathers carefully, leaving the skin intact.
- Skinning the bird: Make precise cuts along the back and legs, carefully separating the skin from the flesh.
- Fleshing the skin: Remove any remaining fat and tissue from the underside of the skin.
- Preserving the skin: Apply borax liberally to the skin to prevent decay and preserve its natural texture.
Mounting the Turkey:
- Preparing the mannequin: Position the mannequin in the desired pose and secure it to the mounting board.
- Attaching the skin: Carefully sew the skin onto the mannequin, ensuring a smooth and natural fit.
- Adding the eyes: Insert the glass eyes into the eye sockets and secure them with glue.
- Positioning the beak and feet: Glue the beak and feet into their natural positions.
- Adding details: Use paint and brushes to enhance the realism of your mount, such as adding feather details or painting the beak and feet.
Tips for Success:
- Work in a clean and well-ventilated area.
- Wear gloves to protect your hands.
- Be patient and take your time.
- Don’t be afraid to ask for help from experienced taxidermists.
- Enjoy the process and take pride in your finished mount.
Taxidermying a turkey can be a rewarding and enriching experience. These instructions and suggestions will help you to make a magnificent and enduring memorial to this amazing bird. Recall that the secret to success is painstaking planning, cautious execution, and a passion for protecting nature’s beauty.
Additional Resources:
- Video: How to Skin and Mount a Turkey: https://m.youtube.com/watch?v=T9Tjt0Ba6C0
Whether it was your first gobbler, one that was from a memorable trip with family and friends or maybe you were even lucky enough to hunt a Gould’s or Ocellated, there are many reasons that you may consider taxidermy.
There are a few things you should know in advance if you intend to have your bird mounted.
A taxidermist appointment should ideally be scheduled well in advance of your hunt to ensure that all the logistics are arranged and your bird is transported to its destination as swiftly and conveniently as possible. This is especially true if you plan to use a taxidermist out of state. It would also be prudent to use a taxidermist who specializes exclusively in turkeys, as this might be the bird of a lifetime.
“I’ve seen a lot of good taxidermists over the years that do a lot of different animals but specialize in maybe one of them,” said John Beard, a 27-year taxidermy veteran and the 2019 NWTF Grand National Champion in the Master of Masters turkey division. ” “From my experience, that guarantees you quantity but costs you quality. I do not want quantity, I want quality. I recommend finding someone who specializes in your species to be mounted. For turkey, find a turkey guy. For deer, find a deer guy. For duck, find a duck guy. “.
Beard suggested looking for a taxidermist who specializes only in turkeys in addition to some other advice.
“If they dont have any current work in their shop, then that is a red flag,” said Beard. “If they do have current work and you like their quality and price, then you found your taxidermist. ”.
Well-done taxidermy can be distinguished from poorly done taxidermy by the lifelikeness of the bird, the robustness of the mount, and the overall quality of the finished product. When returning a bird from the field, there are a few things you should consider to ensure these qualities.
“First and foremost, cut nothing—don’t remove the breast meat—is the most often mentioned strategy I teach hunters to ensure their birds return to me in good condition for taxidermy,” Beard said. “I want the bird whole as needed for the taxidermy process. ”.
(Hunters can refer to the instructions for “preparing a bird from outside the U.S.” if they wish to mount their bird and preserve the meat.) S. S. ”).
Prepping a turkey for your taxidermist
Beard suggests doing the following with your harvest for the best taxidermic product:
- Bring three folded paper towels in a sandwich bag, a roll of black electrical tape, and a large black trash bag. Everything easily folds into a hunting vest.
- Take steps to prevent the bird from flopping after it has been harvested, as this could cause damage and feather loss.
- Take out the three paper towels, slide one down its throat, and then encircle its head with the remaining two after it has passed away. Lastly, cover everything with the sandwich bag and secure it with tape.
- First, place the bird head in the large trash bag. After that, freeze it immediately or take it to a taxidermist as soon as you can.
How to Taxidermy wild Turkey. How to… Art of Taxidermy.
FAQ
How do you prepare a turkey for taxidermy?
How much does it cost to taxidermy a whole turkey?
How do you ship a turkey for taxidermy?
Is it hard to mount a turkey?
How do you make a Turkey taxidermy?
Here are five cool DIY turkey taxidermy projects that are easy to make . . . and even easier on the wallet. Turkey Parts: Tail fan Tools/Supplies: Knife, 3×3 sheet of plywood, thumbtacks, weights and Borax Simple Tail Fan Display Remove the turkey’s tail by slicing around the ball-and-socket joint at the base and twisting it free.
What is wild turkey taxidermy?
Wild turkey taxidermy is like other facets of taxidermy — a way to preserve a memory. It isn’t a weird cult full of stuffed dead critters. Rather, it’s a way to celebrate and remember the hunt for a valued resource. Of which these memories are oftentimes shared with family and friends.
How do you cut a turkey head?
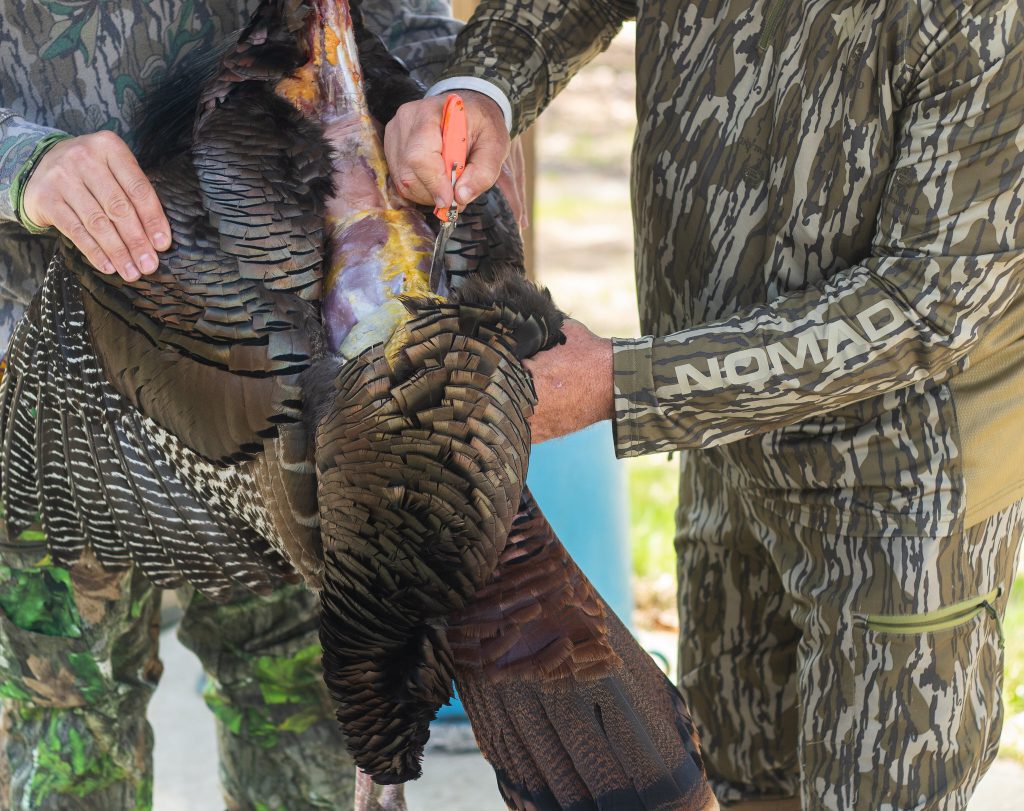
Turkey Cape Hang your turkey by the head. Begin cutting where the neck feathers meet the head skin. Gently skin away toward the direction of the tail fan, retaining as much of the skin with attached feathers as possible. You’ll need to skin alongside the bird’s flanks the farther down the back you go.
How do you use a tail fan on a Turkey?
Simple Tail Fan Display Remove the turkey’s tail by slicing around the ball-and-socket joint at the base and twisting it free. Keep all the tail feathers intact and attached to the meaty base. Carefully trim remaining flesh and liberally apply Borax. Lay the tail fan flat against the plywood and spread the tail feathers into a drying position.