In this article I’m outlining the components of a downrigger trolling setup. These setups can be watered down, but this will give you a good idea of the parts, how they work, and what their lengths, weights, colors, and sizes are. Below is a sneak preview of the 2 setups, but I’ll break these down separately further below.
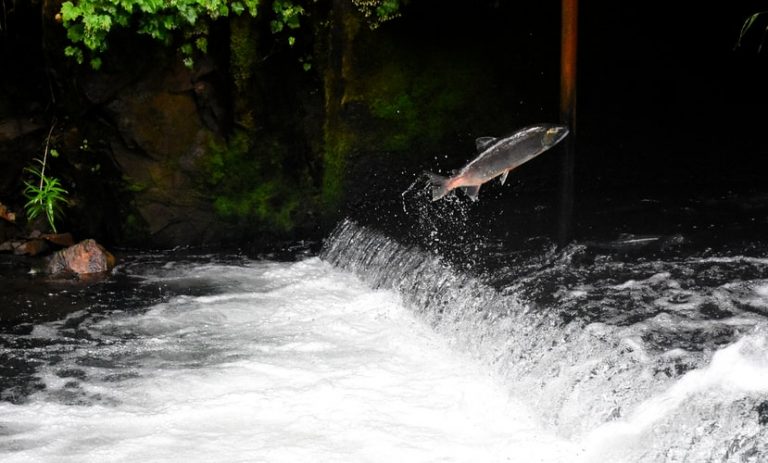
Using a downrigger is one of the most effective techniques for catching salmon while trolling, Downriggers allow you to precisely control the depth your bait or lure is running at This enables you to target salmon holding at specific depths
In this complete guide I’ll explain exactly how downriggers work and provide step-by-step instructions on how to rig and use downriggers for salmon fishing.
What is a Downrigger?
A downrigger is a device used when trolling to lower your fishing line down to a targeted depth in the water It consists of
- A horizontal boom that extends from the boat
- A weight or cannonball that slides up and down the boom
- A line release clip that holds your fishing line to the downrigger cable
If you change where your line connects to the downrigger cable, you can change how deep your bait goes. The cannonball provides the weight needed to pull the line down. The line pops free of the release when a fish strikes, so you can reel it in without having to drag the downrigger weight.
Downriggers enable much more precise depth control than lead core line or planer boards. They are a staple piece of gear for serious salmon anglers.
Downrigger Setup
Proper setup is key for downriggers to be effective. Here are the steps:
Mount the Downrigger
Downriggers mount to the boat’s gunwales, transom, or T-top. Use bolts sized appropriately for your boat. Make sure it’s firmly secured.
Attach the Cannonball
Slip the cannonball onto the downrigger cable and secure it with the quick release clip. Standard weights are 8-15 pounds. Heavier is needed for deeper water or stronger currents.
Set the Line Release
Attach the line release clip to the downrigger cable above the cannonball. Adjust the tension knob so it firmly grips the fishing line.
Connect the Fishing Rod
Put the rod in a rod holder near the downrigger. Clip the fishing line into the release clip. Let out line so there is no slack between the rod tip and release.
How to Use a Downrigger
Once set up, using a downrigger to troll for salmon simply involves:
- Lowering the cannonball to the desired depth
- Engaging the reel to pull line off the release as the weight descends
- Adjusting the release clip position to change depth
- Letting line pull free of the release when a fish strikes
- Reeling in the fish
Start at depths where you observe baitfish or salmon on your fish finder. Adjust depths every 10-20 minutes until you find where salmon are biting.
Downrigger Fishing Tips
- Use heavier weights in current or deeper water
- Keep an eye on line tension and angle
- Check release clips frequently for wear
- Use planer board on opposite side to cover multiple depths
- Pay close attention to subtle bites when the flasher or weight is in line
- Consider a dummy flasher for easier bite detection
With practice, downriggers allow unparalleled vertical fishing control. They are a major asset when trolling for salmon in both shallow and deep water. Follow these tips and with a properly rigged downrigger you’ll maximize your chances of landing trophy salmon.
Downrigger Setup Diagrams
Here are two common downrigger arrangements:
Inline Flasher Setup
[Diagram]
The flasher attaches directly to the main fishing line with a leader to the lure. This allows the flasher to impart action on the lure. fighting both flasher and fish makes detecting bites tricky.
Dummy Flasher Setup
[Diagram]
The flasher clips on a separate line attached to the downrigger cable below the fishing line. This allows the flasher to work its attracting magic without impacting bite detection.
Downrigger Gear Recommendations
Having the proper gear dialed in makes downrigger fishing extremely effective. Here are some top product recommendations:
Downrigger
- Scotty Depthpower Electric Downrigger – Precise depth control
Cannonballs
- Scotty Deep Water Release – 15 lb weights work well for most situations
Line Releases
- Scotty Power Grip Plus – Reliable release with easy tension adjustment
Flashers
- Gibbs Delta Highliner Flasher – Proven salmon catcher in UV and glow colors
Fishing Rods
- Okuma SST Salmon/Steelhead Trolling Rod – Affordable 10’6″ rod with great backbone
Investing in quality gear pays dividends when downrigger trolling. Take time to rig it up properly and you’ll be hooked up with salmon in no time!
Locating Salmon Using Your Downrigger
The downrigger enables you to quickly find where salmon are holding on a given day. Here is an effective process:
-
Identify areas holding baitfish and salmon markings on your fish finder.
-
Lower your downrigger to just above the schools and troll over them.
-
Incrementally adjust your downrigger depth 10-20 feet at a time until you start getting bites.
-
When you hook up, take note of the depth and set your downriggers to match it.
-
Continue trolling back and forth over the productive zone.
-
Periodically adjust depth to see if fish have changed depths.
Using this technique, you’ll zero in on the exact strike zone in no time!
Main Benefits of Downrigger Fishing
Downriggers offer significant advantages over other trolling methods:
- Extremely precise depth control
- Allows fishing heavy weights and diving lures
- Helps detect light biting fish
- Covers the water column quickly
- Enables fishing multiple depths simultaneously
- Allows trolling over shallow structure
- Easy to master for novice anglers
Whether new to trolling or a seasoned pro, downriggers dramatically improve your ability to target salmon. The additional vertical control is a huge asset for pinpointing where fish are biting.
Potential Downrigger Issues
When used properly, downriggers are very reliable. However, here are a few potential issues to be aware of:
- Line tangling with dummy flashers
- Frequent break-offs from worn release clips
- Inaccurate depth readings in heavy current
- Cannonballs bouncing on retrieval
- Boat drifting while gear is down
- Failed clutch mechanism on electric downriggers
Thankfully, most problems can be prevented with careful setup, regular equipment checks, and experience using downriggers in different conditions.
Why Downriggers Are Effective on Salmon
Downriggers excel at salmon fishing for several key reasons:
-
Salmon often hold in specific depth zones relating to baitfish density and water temperatures. Downriggers enable pinpoint targeting of these productive depths as they change daily.
-
Salmon frequently suspend high up or hug the bottom. Downriggers provide the weighted force needed to keep baits and lures in the strike zones at those extreme depths.
-
Precise depth control positions baits and lures right in front of salmon, triggering reflex strikes. Salmon are less likely to chase baits above or below them.
-
The thick cables don’t provide resistance when a salmon strikes compared to stretched out fishing line. More solid hooksets are achieved.
The sensitivity, precision, and range downriggers provide gives salmon anglers a deadly vertical presentation that gets bites other methods struggle with.
Alternatives to Downriggers
While downriggers are excellent for targeting salmon, there are some alternatives to consider:
-
Lead core line – Allows lures to dive 30+ feet down. More work finding depths fish are at.
-
Planer boards – Spread trolling baits and lures way out to the sides. Covers more horizontal ground.
-
Dipsy divers – Effective for getting lures down 20-40 feet without downriggers. Require more precise tuning.
-
Side planers – Attach to the main line with releases. Pulls baits and lures away from the boat.
-
Diving plugs – Lures like Magnum Wiggle Warts dive down 15-25 feet. Decent downrigger alternative for shallower water.
Each technique has advantages in certain situations. Mixing up methods can help you pinpoint fish location and trigger more strikes.
Wrapping Up
Downriggers undeniably provide a major edge to anglers when trolling for salmon. Their unmatched vertical precision and control opens up depths you simply can’t reach any other way. With some practice and patience zeroing in depths, a downrigger will take your salmon fishing to the next level.
Follow this complete downrigger guide and you’ll gain the knowledge to consistently put yourself in the strike zone. Now get out on the water this season and fill your cooler with delicious salmon fillets!
Setup #2 – Dummy Flasher
In the dummy flasher setup, the flasher is not connected to the mainline; instead, it is connected to the downrigger line or cannonball. The beauty of this setup is when you’re fighting a fish you’re not fighting the flasher as well.
Important Note: I’m not including the redundant components that are already outlined in setup #1 above, e. g. rod, mainline, flashers, 6 bead chain, etc.
They have a lot more freedom to explore and try new things because they don’t have a flasher in front of them. I still like to use monofilament or fluorocarbon leaders, but the length of my leader depends on the lure I’m using. The big idea here is to align your leader line with your dummy line below.
The length of the leader should be longer because the plugs do so much on their own. I recommend 5′ to 6′ leader lines. Plugs are my father-in-law’s favorite trolling lure, they are both old school and still deadly. To be honest, his landing rate with plugs is five times better than mine, but I like to try new things, so that’s my defense. .
Similar to the inline flasher leader lengths for spoons are usually 5′ to 6′. I would also encourage you to explore different lengths based on the size and weight of your spoons. Try putting your spoons in the water close to the boat with different lengths of line to see how they move. Find the length of line that moves and reacts the most and use that as your leader length. I hope that makes sense, if it doesn’t stick to the 5′ to 6′ length.
You can purchase these premade rigs (as shown in photo below) or you can make your own. In my Setup #2 diagram I’ve made my own as it shows a Metal trolling clip that clips just above the trolling snubber with a 150# mono line (cheap mono is fine) and a terminal gear piece like a swivel and snap to connect to the dummy flasher.
You could have multiple dummy flasher rigs if you wanted. Having different lengths of mono for each flasher. Or you could even attach multiple flashers to a single line as well. You can try a lot of different things, but I’m not going to go into a lot of detail about all of them here.
Spacing between the 2 metal snaps on the downrigger line should be at least 5′. If you’re getting tangles you can increase the distance of the top metal snap. As you lower the setup, keep the depth difference in mind. You’ll need to go that extra distance further than the depth you want.
If the dummy flasher is getting tangled with your mainline, you can resolve with a few different actions. First, be slow when you drop your gear on the downrigger. A slower drop will keep your gear from getting tangled up in some common ways. Secondly, have a larger space or gap between the dummy rig line and the mainline clip. Last, cut the monofilament dummy line shorter if these don’t work to move the flashers closer to the downrigger line.
- Fighting only the fish and not a flasher
- Much higher fish landing ratio!
- You can see small/subtle bites more easily
- Less seaweed caught on your line
- Less impact on your mainline from the release clip
- No flasher to provide the whipping/erratic motion on a lure
- Flashers are often further away from lure (hooks)
- Can tangle lines between dummy flasher rig and mainline
I didn’t list some other parts from the diagrams in the setups above because they weren’t needed.
These snaps are great for a lot of different tasks. I use them on my crab and prawn traps and anywhere else you need to connect two lines. These snaps are very important for keeping your cannonballs, release clips, and fake flasher rigs in place.
This is very important piece that pinches your mainline to hold it to the downrigger line (and cannonball). You don’t glue the mainline to the downrigger because you don’t want to be hooked up to a heavy cannonball when you hook a fish! You need to be able to disconnect the mainline from the heavy downrigger line, and the release clip does that for you.
Release clips have adjustments so they can hold the line tighter or looser. The deeper and faster the current/tide you fish in you’ll want a tighter adjustment of the clip. For people who are new to trolling, it will take some time to get their setup just right. It can be annoying when the line keeps popping off after going 175 feet down! If you’re just starting out, I suggest setting the adjustment to a fairly tight clip setting. As you get used to it, you can make it less tight.
Cannonball sizes vary big time! The most common weights range between 13 lbs to 20 lbs. The big idea is to align your cannonball weight with the tide and trolling speed. If you notice that the cannon ball is falling slowly or not at all, you need to either get a bigger one or slow down!
When you’re trolling, your downrigger line should be at a 45-degree angle at all times. Having the right cannon ball weight will help you figure out where your gear is in the water.
If I had to choose one cannonball for the rest of time based on average trolling speeds and tides it would be a 15# one, as that’s what I use for most of my trolling scenarios.
These days I’m seeing a ton of new cannon ball designs, glows colors and flash tapes. The recent fad is cannonballs in the shape of a fish with reflective metal and glow on it. I get the idea of using flash or glow to draw more attention to your downrigger, but a lot of this stuff just seems like a waste of time to me.
Your cannonball is supposed to get your gear to certain parts of the water column. I think you should add your own cheap flash tape instead of spending 3x the money on a fish shaped cannonball, haha!.
This is a strong rubber band that connects your downrigger line to your cannonball. It provides the downrigger with a little give and flexibility when bringing it up and lowering it down. It also has an easy clip to add or change up your cannonballs quickly.
- When you fish or troll, go with the tide. The baitfish will often be moving with the tide, so fish with it.
- Use your electronics to look for baitfish. You can often find schools of them, also called “bait balls.” When you find these groups of baitfish, make sure you set up your cannonball at the same depth.
- On slower days, play around with trolling speeds. Different types of fish like moving at different speeds. Find out what speeds the species you want to catch likes by doing some research on them.
- Try to get the Herring and spoon to the same size. The herring will be bigger or smaller at different times of the year. E. g. earlier in the season the herring could be 2. So use a smaller spoon. Later in the season, the herring can be 4 to 5 inches long, so use a bigger spoon.
- Make sure there isn’t a lot of extra line between the rod tip and the release clip when you’re trolling. Once you’re done setting up and everything is in the water, tighten your line so the tip of your rod is bent close to the water. The main goal is to have as little line as possible between the tip of your rod and the release clip. You may need to play around with your reel and drag to get this right.
Setup #1 – Inline Flasher
An inline flasher setup is where the flasher is attached to your mainline. The mainline attaches to the flasher followed by a leader line to your lure/bait. When you’re fighting the fish, you’ll also be fighting the flasher as well. Below the diagram I’ll outline all the different components.
There are a lot of rods you can use while trolling. Typically, I’m looking for a 10’6 Medium to Medium-Heavy mooching rod. Some guys like to use 10’6 casting rods with their baitcaster reels. It’s all a preference thing. I believe length and strength are more important, so make sure it’s between 10′ and 12′ long and strong enough to handle bigger setups.
I like using 30# Monofilament. You can also use Braided line in 50#-65#. Should you choose braid, you must have a mono or fluorocarbon shock leader at the end, but we won’t talk about that here.
The diagram doesn’t outline every component so I’ve taken a quick photo (below) of my setup at home. This is the end of my mainline. It has a bead, a plastic bumper (the same kind that come with buzz bomb lures), and a six-bead chain that connects to my flasher.
All three of these parts are not necessary. The green bead protects the rod tip eye and lets you see how far to reel up. The rubber piece is only there to keep the mainline knot from getting worn down. As the main link between your mainline and flasher (or straight to leader line), the six-bead chain is the most important piece.
Flashers do two main things: first, they act as an attractant that looks like bait fish or salmon or fish that are feeding; second, they spin to give the lure action. It’s important for lures like Hoochies or krippled baits that don’t move on their own that the flasher spins and moves all over the place (more on that later).
Sizes and colors vary for flashers, a general rule of thumb is align flasher with lighting and depth. For example, use more flash in water less than 120 feet deep because there is more sunlight. In water deeper than 120 feet, try to add more glow to the flasher because there is less to no sunlight. If your flashers don’t already have it, you can put UV flasher or silver tape on the back of them. You can also “charge up” your flashers and lures with UV lights or even direct sunlight to make them glow again.
Colors you’ll have to experiment with and find out what works for you in your area. I like to use chartreuse in higher level light and green and purple in low level light areas. Again, not exclusive here but don’t forget the flash and glow components.
Flashers ends are usually not the same, there is usually a wider end on one side. The wider should connect to your leader line, the smaller end should be connected to your mainline.
For leader line I like to use monofilament or fluorocarbon leaders. Depending on the lure I’m using, I’ll use different lengths and weights of line. Here are my general rules of thumb for leader setups specific to lures.
Leader length is shorter like 28″ to 32″. Line should be heavier (40# to 50# mono or fluoro). Because it is shorter and heavier, the line is stiffer, so it whips through the water and makes the hoochie move. The lure will move around more when the leader line is shorter and the lure is closer to the flasher. See hoochie setup tip for more info on this.
Leader length are longer for spoons, usually 5′ to 6′ (so call it 66″). The line doesn’t need to be as heavy and most common is 30# mono or fluoro. The longer, lighter line is used because the spoon does most of the work and doesn’t need to be as close to the flasher to add that extra whipping motion.
Similar to the spoon use a longer leader (5′ slightly less than spoon as it doesn’t create its own action) and line weight of 30#. When using an inline flasher on krippled baits, I’ve seen anglers use different lengths. In other words, it seems to be a bit more subjective.
- Flasher creates whipping action on lure/bait
- Since the flasher is closer to your lure, it brings fish closer to your hooks.
- Extra lines holding fake flashers are less likely to get tangled up with your mainline.
- Fighting a fish with the flasher makes the line drag and the fish pull in a way that lets it pull the hook out. A lot of the time, this is true when the fish is on the surface and the flasher is moving around.
- It can be harder to see a bite because the flasher can hide very small bites.
- Lower landing fish ratio than compared to no inline flasher
- Flashers are extra pieces of gear that you can add to your setup to help you gather more seaweed.
- Rolling flasher puts more force on the release clip and can damage your mainline, which could lead to weak spots and a snap.
How to fish for Salmon with Downriggers
FAQ
How to troll for salmon with a downrigger?
How far behind the downrigger should the lure be?
Do you need downriggers for salmon?
What is the best trolling speed for salmon?