
We provide an improved method for mounting your turkey fan for wall display if that’s what you’re searching for. Fortunately, the task is fairly simple, and the cost of supplies is minimal as well.
When it comes to mounting your turkey fan, you have a few options. You can go for a more professional look by mounting the fan to a wood plaque, or you can go for the minimalist look of just tacking the fan to the wall.
Today, as we examine how to mount a turkey fan, we’ll examine the latter with assistance from our friends at Hunter Specialties.
Fortunately, there’s not a lot of supplies necessary for this project. All you’ll need is a hot glue gun and a good knife for slicing away the meat, fat, and tail bone. Additionally, you’ll need some Borax, a wire brush, bondo (option 2) or pins to secure the fan to the board.
Finally, one of the turkey mount kits from Hunter Specialties rounds out the needed items for this project.
Mounting a turkey fan is a great way to preserve a treasured memory of a successful hunt. It’s also a relatively easy project that can be done at home with a few basic tools and materials.
Here’s a step-by-step guide on how to mount a turkey fan:
Materials:
- Turkey fan
- Mounting board
- Mounting tape or glue
- Scissors or utility knife
- Ruler or measuring tape
- Pencil
- Drill (optional)
- Screws or nails (optional)
Instructions:
- Prepare the turkey fan. Carefully remove the fan from the turkey. You can do this by cutting around the base of the fan with a sharp knife. Once the fan is removed, trim off any excess skin or fat.
- Choose a mounting board. The mounting board should be large enough to accommodate the turkey fan. It can be made from wood, plywood, or even cardboard.
- Attach the fan to the mounting board. There are a few different ways to attach the fan to the mounting board. You can use mounting tape, glue, or even screws or nails. If you’re using tape or glue, make sure to apply it evenly to the back of the fan and the mounting board. If you’re using screws or nails, be careful not to damage the fan.
- Position the fan on the mounting board. Once the fan is attached to the mounting board, you can position it however you like. You can spread the feathers out or fold them over. You can also add other decorations, such as beads or feathers from other birds.
- Hang the mounted fan. Once the fan is mounted, you can hang it on the wall or display it in a shadow box.
Tips:
- If you’re using mounting tape, make sure to use a strong tape that can support the weight of the fan.
- If you’re using glue, make sure to use a glue that is safe for use on feathers.
- If you’re using screws or nails, be careful not to overtighten them, as this could damage the fan.
- You can add a personal touch to your mounted fan by adding a nameplate or other inscription.
With a little time and effort, you can easily mount a turkey fan and create a beautiful and lasting reminder of your successful hunt.
Here are some additional tips for mounting a turkey fan:
- If you’re not sure how to mount a turkey fan, there are many online tutorials and videos that can help you.
- You can also find kits that include all of the materials you need to mount a turkey fan.
- If you’re not comfortable mounting a turkey fan yourself, you can take it to a taxidermist.
Happy mounting!
Cleaning Feathers and Meat
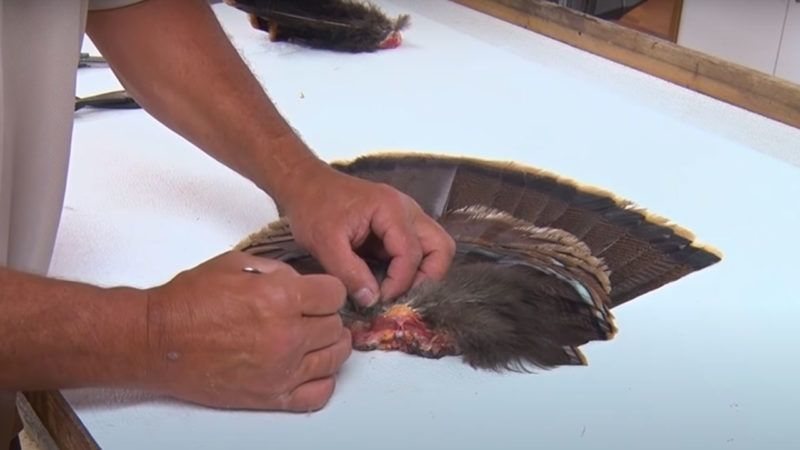
To begin, remove any secondary feathers you don’t want to include in the mount from the fan’s front or back.
Next, use a sharp knife to cut away any remaining meat, fat and the remaining tail bone nub.
You can also use a wire brush to clean fat and oil away from the feather pins.
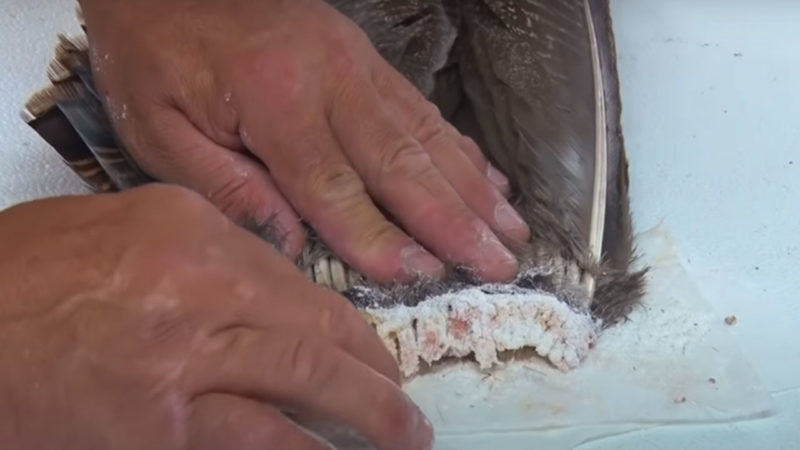
Apply Borax to the remaing skin, flesh and pins to dry things out and prevent bugs. Borax is a laundry booster and can be found where you buy detergent.
How To Mount A Turkey Fan * THE EASY WAY *
FAQ
How long does a turkey fan need to dry before mounting?
How do you mount a turkey fan with borax?
What are the different types of turkey mounts?
How to mount a Turkey fan?
There’s several options when it comes to mounting your turkey fan, from the bare minimum (nothing but the fan tacked to a wall), to a more polished look with the fan being mounted to a wood plaque. The latter is what we’re going to walk through today with some help from our friends from Hunter Specialties as we look at how to mount a turkey fan.
How do you remove a turkey tail fan?
Besides, a turkey fan has only a small patch of flesh that can spoil. To remove the tail fan from the carcass, fold the tailfeathers together and grip them as one unit. With a sharp knife, sever the tail from the carcass just above the anus by cutting through the triangular patch of flesh at the tailfeathers’ base.
What is a turkey tail fan?
Turkeys are some of the most beautiful birds with their iridescent bronze feathers and magnificent tail fans that make your heart skip a beat during turkey season. And I’ve seen some fantastic birds harvested by our amazing ladies! The tail fan is the most distinct part of a wild turkey and preserving it is not that difficult.
What do you need to mount a Turkey?
You’ll simply need a good knife for cutting away meat, fat and tail bone and a hot glue gun. You’ll also need some Borax, a wire brush, pins for tacking fan down to board (option 1), or bondo (option 2). Finally, one of the turkey mount kits from Hunter Specialties rounds out the needed items for this project.