Brine shrimp, also known as sea monkeys or aquarium shrimp, are a popular live food source for feeding fish and other aquatic pets. Most brine shrimp are sold in egg form, which hatch into tiny shrimp when placed in saltwater. But sometimes you may want to separate the live brine shrimp from the unhatched eggs. This allows you to control the population size and prevent overcrowding.
Separating brine shrimp from eggs can seem tricky at first, but it’s definitely doable with some simple tools and techniques. In this comprehensive guide, we’ll walk through everything you need to know to effectively separate brine shrimp from their eggs.
An Overview of Brine Shrimp
Before jumping into separation methods, let’s do a quick rundown on what exactly brine shrimp are and why you might want to separate the eggs from the live critters.
What are Brine Shrimp?
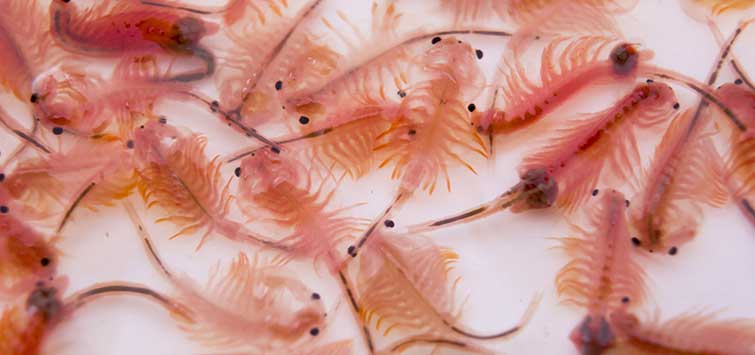
Brine shrimp known scientifically as Artemia, are tiny crustaceans that naturally live in inland salt lakes and marine waters around the world. They belong to a group called Anostraca which includes other small aquatic animals like fairy shrimp and tadpole shrimp.
Brine shrimp range in size from about 0.12 to 0.5 inches long as adults. They have a translucent body and large black eyespots that develop as they mature. These tiny animals swim by beating 11 pairs of legs, and females can carry up to 80 eggs at once.
In their natural habitat brine shrimp feed on algae yeasts, bacteria, and microscopic aquatic life. But in aquariums and fish hatcheries, they are commonly used as live food for larger fish, corals, sea anemones, and crustaceans.
Why Separate Brine Shrimp from Eggs?
Brine shrimp eggs and live adults are often sold together in kits for home aquariums. After hatching, the brine shrimp population can explode very quickly.
Within a couple weeks, thousands of brine shrimp may be packed into a small tank. This overcrowding stresses the shrimp and decreases water quality.
By periodically separating some of the live brine shrimp from the eggs, you can better control the population size. Removing excess brine shrimp helps:
- Prevent crashes from lack of oxygen
- Reduce cannibalism and diseases
- Improve growth rates to harvest larger brine shrimp
- Maintain high water quality with less waste
Separating eggs and live brine shrimp also allows you to incubate eggs longer before hatching the next generation.
Now let’s look at two simple methods for separating brine shrimp eggs from live brine shrimp.
Method #1: Attracting Brine Shrimp with Light
This separation technique takes advantage of the shrimp’s phototactic behavior. Here are the step-by-step instructions:
Supplies Needed
- Bright light source
- Fine mesh net or sieve
- Container of saltwater
- Bowl or tray for separated brine shrimp
Steps
-
Collect brine shrimp eggs and live brine shrimp together in a saltwater-filled container. A clear jar, vase, or bowl works well.
-
Position a bright light source at one side of the container. Desk lamps, flashlights, or phone lights will all work. You want an intense directional light.
-
Wait 2-3 minutes for the brine shrimp to start swimming toward the light. The phototactic critters will congregate in the brightly lit area.
-
Slowly lower a fine mesh net or sieve into the side of the container opposite the light. Scoop out the live brine shrimp while leaving most eggs behind.
-
Transfer the separated brine shrimp to another bowl or tray filled with saltwater.
-
You can repeat steps 2-5 periodically until you’ve removed the desired number of brine shrimp. Just be gentle to avoid damaging eggs.
This method allows quick and easy separation once the brine shrimp move toward the light. The fine mesh net catches the critters while the smaller eggs pass through holes.
Method #2: Using a Fine Mesh Sieve
For another simple approach, you can use a fine mesh sieve to filter out brine shrimp based on size. Here’s how:
Supplies Needed
- Fine mesh sieve or strainer
- Container of saltwater
- Bowl or tray for separated brine shrimp
Steps
-
Collect brine shrimp eggs and live brine shrimp in a container filled with saltwater.
-
Set your fine mesh sieve over a bowl and gently pour the saltwater mixture through the sieve.
-
Rinse the sieve with additional saltwater to wash any remaining brine shrimp through into the bowl.
-
The eggs should be small enough to pass through the mesh holes and remain in the starting container.
-
Transfer the collected brine shrimp to another tank or bowl with fresh saltwater.
-
Repeat as needed to harvest more brine shrimp. Take care not to damage unhatched eggs.
The sieve method works best with a very fine stainless steel mesh around 100 microns. Nylon netting can work too. Just ensure the weave is tight enough to block brine shrimp while letting eggs through.
Tips for Effective Separation of Eggs and Shrimp
Keep these pointers in mind for the best results when separating brine shrimp from their eggs:
-
Work quickly and gently to avoid stressing the brine shrimp.
-
Use cool water around 72-78°F for optimal hatching and growth. Avoid drastic temperature swings.
-
Maintain proper salinity between 25-35 ppt for good brine shrimp survival.
-
Watch shrimp behavior and movements closely. Remove only lively, healthy shrimp.
-
Keep eggs moist at all times. Letting eggs dry out will prevent hatching.
-
Don’t discard unhatched eggs. They can be incubated longer to stagger hatches.
-
Provide adequate aeration in holding containers for separated brine shrimp.
With some practice, you’ll be able to harvest brine shrimp and control populations with ease. Now let’s go over some common questions about brine shrimp separation.
Frequently Asked Questions
How often should I separate brine shrimp from eggs?
Aim to separate brine shrimp every 2-4 days once the population gets dense. This prevents crashes and maintains water quality. Check for signs of oxygen shortage like shrimp gathering at the surface.
What is the best tool for separating brine shrimp?
Fine mesh nets, sieves, and strainers all work well. Stainless steel or nylon mesh with a tight weave around 100 microns allows brine shrimp through while blocking eggs.
Can I separate brine shrimp using my hands?
It’s possible but very difficult to selectively grab brine shrimp with your hands without crushing eggs. Tools like nets or sieves allow much gentler separation.
How can I harvest the largest brine shrimp?
Older, larger brine shrimp tend to gather near the water surface. Skim the surface with a net to selectively remove bigger individuals and leave smaller ones.
What should I do with separated brine shrimp eggs?
Retain unhatched eggs in saltwater to incubate longer. Rinse off any debris and provide aeration. Staggered hatching helps maintain stable brine shrimp numbers.
Can I separate brine shrimp in fresh water?
No, brine shrimp require brackish or marine saltwater to survive. Moving them into freshwater will quickly kill the shrimp. Maintain 25-35 ppt salinity.
Enjoy Your Separated Brine Shrimp!
With a gentle touch and the right tools, separating brine shrimp from their unhatched eggs is totally doable for any home aquarist or fish hatchery. Controlling brine shrimp populations through regular separation makes keeping these organisms much easier and more sustainable.
Use the attractive power of light or the filtering ability of fine mesh to efficiently harvest healthy adult brine shrimp. Keep incubating leftover eggs to produce more shrimp as needed.
Your fish, corals, and other aquatic creatures will benefit from having a steady live food source of separated brine shrimp. And you’ll enjoy watching the fascinating behaviors of these active swimmers in a well-managed tank environment.
Storing Brine Shrimp Eggs
Brine shrimp eggs should to be stored as follows:
- free from moisture; and
- in a cool environment at or below 50°F.
Follow these guidelines for the best results:
- Salinity: About 1 1/2 tablespoons of salt for every quart (or liter) of water This equates to about 1. 018 specific gravity as measured with a hydrometer. Aquarium, sea or non-iodized table salt can be used.
- pH: Proper pH is important in hatching brine shrimp. A starting pH of 8. 0 or higher is recommended. If your water’s pH is less than 7, you can add 1/2 teaspoon of Epson salt or baking soda per quart.
- Temperature: 80 to 82°F is the best water temperature for a 24-hour full hatch. The hatching time will be longer if the temperature is lower, but it shouldn’t be higher than 86°F.
- Brightness: Adding light will improve the hatching rate, but it’s not necessary.
- Continuous aeration is needed to keep cysts in suspension and make sure there is enough oxygen for the cysts to hatch. A nice steady flow of air that shakes the eggs around without pushing them out of the water and onto the hatching cone.
- Stocking Density: It is best to have 1 gram of cysts per liter or quart, which is about 1/2 teaspoon of sugar. A lower hatch percentage will happen when there are more fish than eggs.
- Hatching Cone: Flat-bottom hatching vessels should be avoided. Containers with cone or “V” bottoms work best to keep the cysts floating while they hatch. When not in use, make sure to wash the hatching cone well with a mild chlorine solution, rinse it, and let it dry naturally.
The following steps will achieve optimum brine shrimp egg hatch rates.
|
What are the guidelines for Artemia cysts?
20 to 30 parts per thousand (ppt) salt solution, which is about 1 to 2 tablespoons of rock salt per quart (or liter) of water. This equates to around 1. 015-1. 020 specific gravity. A 2020% concentration (or about 0.2 teaspoons per quart) of Epson salt or magnesium sulfate can be added to the hatching solution to make it more stable. Temperature – Optimum temperature for a 24 hour complete hatch 26-28° C. Lowering the temperature would result in a longer hatching time. Do not exceed 30°C. Light—The embryo needs to be lit up in order for the hatching process to start within the first few hours of incubation. Keeping a light on during the whole incubation period is suggested for the best hatch results and to keep the temperature stable. Aeration—There must also be constant aeration to make sure there is enough oxygen for the cysts to break down and hatch. A minimum of 3 parts per million dissolved oxygen during the incubation is recommended. Strong aeration will not damage or hurt the brine shrimp cysts or nauplii. pH – A starting pH of 8. 0 or higher is recommended. If pH drops below 7. 5 during incubation, add a teaspoon of sodium bicarbonate or a pH buffer to raise it above 8. 0. Stocking Density – 2 grams per quart or approximately one level teaspoon of cysts per quart is recommended. A higher stocking density will result in a lower % hatch. Hatching Cone – Flat bottom hatching vessels should be avoided. Cone or “V” bottomed containers are best to insure that the cysts remain in suspension during hatching. Before each use, make sure to wash the hatching cone well with soap and water and let it dry alone.
How do I harvest the baby brine shrimp?
To get the baby brine shrimp, also known as nauplii, just turn off the air flow and wait a few minutes. The shells and nauplii will then separate. The shells will rise to the top, and the live nauplii will move to the bottom of the cone and toward the light. After being split up, the nauplii can be sucked out of the bottom or drained through the air tubing from the bottom of the cone.
Login to my account
Enter your e-mail and password: Email Password
Enter your email: Email
Please fill in the information below: First name Last name Email Password
Already have an account?
Spend $59 more and get free shipping!
Your cart is empty