Freezing green beans is one of the easiest ways to preserve your fresh garden harvest so you can enjoy their flavor all year long. Using a FoodSaver vacuum sealer takes it a step further for even better long term freezer storage.
Vacuum sealing green beans removes air to prevent freezer burn lock in flavor and retain nutrients. It enables you to store fresh frozen beans for up to 3 years while maintaining quality.
Follow this simple step-by-step guide to properly freeze fresh green beans using a FoodSaver for maximum freshness
Why Freeze Green Beans with a FoodSaver?
Freezing green beans preserves their fresh-picked flavor and lets you enjoy garden goodness all year Vacuum sealing with a FoodSaver provides these added benefits
- Removes oxygen to prevent freezer burn
- Locks in flavor, color and nutrients
- Allows freezing at peak ripeness
- Extends freezer storage time up to 3 years
- Lets you freeze beans in ready-to-use portions
- Saves time by enabling steam-in-bag cooking
The vacuum sealing process removes air from around the food before sealing it tightly shut. This protects frozen beans from exposure to oxygen which causes dry spots, discoloration and texture changes known as freezer burn.
Exposure to air also degrades flavor over time. By removing air, vacuum sealing maintains the fresh taste and vitamin content of green beans much longer.
Tips for Freezing Green Beans with a FoodSaver
Follow these tips when freezing green beans with a FoodSaver for best quality results:
- Select young, slender beans under 5 inches long
- Wash and dry beans very well before sealing
- Work quickly to freeze beans soon after picking
- Blanch beans for 2-3 minutes before sealing (optional)
- Partially freeze beans on a sheet pan before sealing
- Seal beans in meal-sized portions, not large batches
- Press out air from bags before final sealing
- Seal bags 3⁄4 full to allow room for expansion
- Label bags clearly with contents and date
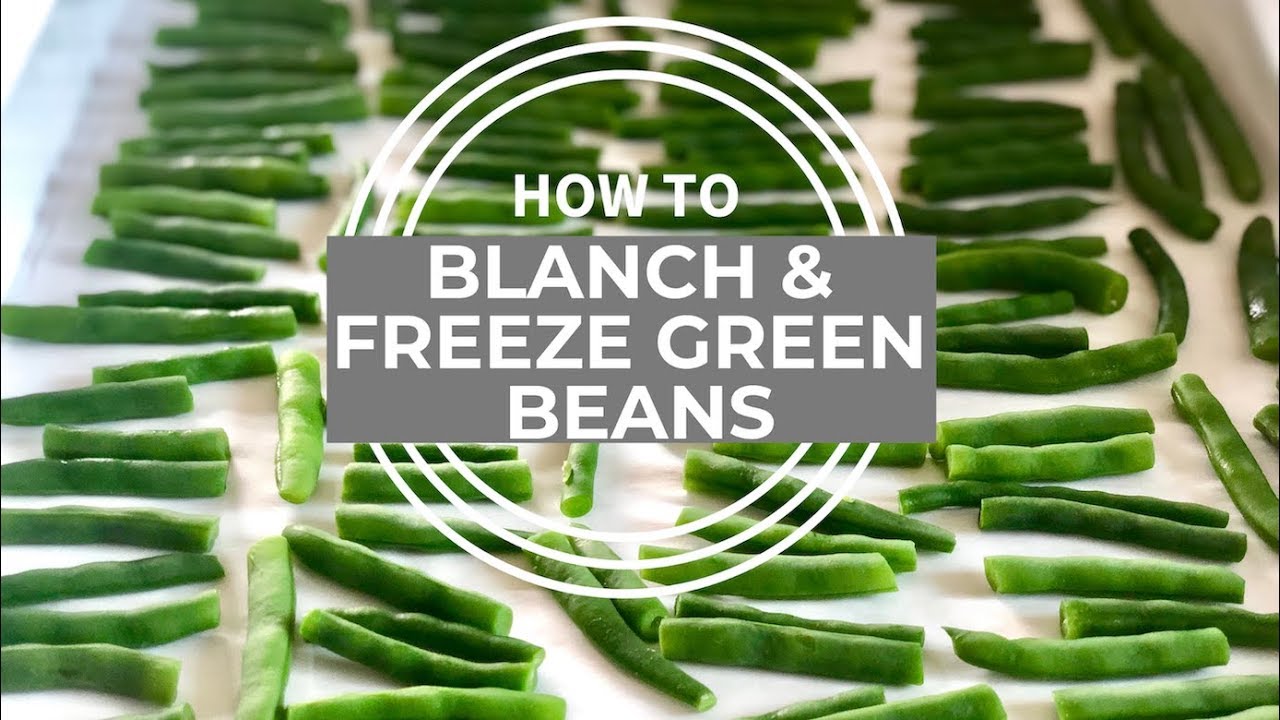
Step-by-Step Guide to Freezing Green Beans
Follow these simple steps for vacuum sealing and freezing your fresh green beans.
1. Pick Fresh Young Beans
Harvest beans in the morning when cool and crisp. Choose slender beans less than 5 inches long. Avoid old, bulging beans.
2. Wash and Dry Beans
Rinse beans under cool water and pat dry very thoroughly with towels. Any moisture left on beans will turn to ice crystals during freezing.
3. Trim Beans
Snap off stem and tip ends. Leave whole or cut into 1-2 inch pieces.
4. Blanch Beans (Optional)
To preserve texture, color and flavor, blanch beans for 2-3 minutes in boiling water or steam. Then shock in ice bath to stop cooking. Dry again.
5. Portion Beans
Divide beans into meal-size portions in FoodSaver bags. Don’t overstuff. Leave 3⁄4 inch of space at top.
6. Vacuum Seal Bags
Insert open end of filled bag into vacuum sealer. Seal according to machine directions to remove air.
7. Flash Freeze Beans First
For easier storage, place sealed bags in single layer on tray and flash freeze 1-2 hours before stacking bags.
8. Store Bags Flat
Arrange flat in freezer. Avoid overcrowding freezer to allow cold air circulation.
How Long Do FoodSaver Frozen Green Beans Last?
With vacuum sealing, frozen green beans maintain optimal quality for up to 3 years in the freezer at 0°F. Beans may still be edible beyond 3 years but will decline in texture and flavor over time.
Cooking Frozen Green Beans in FoodSaver Bags
A bonus of vacuum sealing green beans is that you can steam them in the bag without thawing first. Simply cut corner of bag and microwave 2-3 minutes until heated through.
You can also boil or simmer FoodSaver bags of frozen green beans just until warmed, then open bag and season beans. This locks in flavor and nutrients that may leach into the water if boiled loose frozen beans.
Always cook frozen beans before eating for food safety. Do not eat vacuum sealed green beans directly from the freezer.
FoodSaver Tips for Successfully Freezing Green Beans
Follow these extra tips when freezing green beans with your FoodSaver:
-
Select the right FoodSaver bag material for freezing beans – standard, wide-mouth or quart size.
-
Allow plenty of extra space at top of bag so beans have room to expand as they freeze without obstructing the seal.
-
For better sealing, fold top of filled bag over vertically before inserting into vacuum chamber.
-
Double seal bags for added protection and press out any trapped air bubbles.
-
Avoid overfilling bags which puts pressure on seal. Only fill bags 3⁄4 full.
-
Freeze small batches of beans in meal-size portions, not large bags.
-
Chill beans before sealing to reduce foods juices that can interfere with seal.
-
Work quickly and keep beans chilled until sealing is complete to retain freshness.
By following proper methods for vacuum sealing with your FoodSaver, you’ll enjoy delicious frozen green beans for up to 3 years. With a little planning, you can stock your freezer full of summer’s bounty to savor all winter long.
Frequently Asked Questions
Do you need to blanch green beans before vacuum sealing?
Blanching is recommended but optional. Blanching helps retain texture, color and nutrients during freezing. However, with vacuum sealing, beans retain quality well even when frozen raw.
How long do vacuum sealed frozen green beans last?
Properly stored in a FoodSaver bag, frozen green beans maintain best quality for about 3 years in the freezer at 0°F before declining in texture and flavor.
Can you cook frozen green beans in the FoodSaver bag?
Yes, a benefit of vacuum sealing is that you can steam or cook frozen green beans right in the bag without thawing first. Just cut bag corner and microwave or simmer until heated through.
What size FoodSaver bags should you use for green beans?
Standard 8″ x 12″ or gallon-sized wide-mouth bags work well for most green bean batches. Quart-size bags are good for larger amounts. Leave 3⁄4 inch of headspace.
Why do you need headspace when vacuum sealing green beans?
Leaving headspace allows room for food expansion as it freezes. Filling bag too full can obstruct sealing and cause bag to leak air. Allow 3⁄4 inch of space.
Can you re-seal and re-freeze a FoodSaver bag of green beans?
No, bags are designed for one-time use. Once opened, remaining beans should be transferred to a new vacuum seal bag before re-freezing for food safety.
How do you prevent freezer burn on FoodSaver frozen green beans?
Freezer burn is caused by exposure to air. Vacuum sealing removes air from bag which protects beans. Proper sealing and headspace prevent air leaks.
Freezing green beans. The great debate, to blanch or not to blanch prior to freezing. That is the question.
To enjoy the taste of fresh green beans all year, it’s easy to freeze your harvest. “When green beans come on, they COME ON!” and they do! I love to freeze all of my (gallons) of green beans for the winter. Nothing like having that bright green bean that still has remained crisp come December!.
I like my green beans al dente, which means they are still a little crunchy. After trying a few different ways to freeze and store green beans, this is the one that works the best for me.
I pick almost on a daily basis once they start coming on. Basket fulls. As you might expect, we eat those fresh green beans with almost every meal when they are in season.
PREPARING GREEN BEANS FOR STORAGE
You should harvest the beans, put them in a clean storage bag or baggie of your choice, and store them in the crisper of your fridge until you have enough to make preserving them worth your time. Green beans stored in this manner will keep up to 7 days. People who grow their own know that it only takes a few days to get a good harvest.
No matter which method you choose, getting your green beans ready to store is a pretty easy process. No matter what, I think you should go through your green bean yield, pick out any dirt, and give the beans a quick rinse.
Depending on how you plan to freeze your beans for long-term storage, you may or may not need to dry them after that. If you are staying true to the blanch method for preserving, drying is not necessary. If you’re taking a stand,
If you didn’t already, snap off the top stem of your beans. This is the end where the green bean is attached to the plant. Some will also snap off the tail end (the pointy end) of the bean off as well. Personally, I leave it on. It’s edible, waste not want not, and it makes for a pretty green bean on the plate.
In the past, I typically always blanched my green bean harvest. However, I’m always looking to simplify things here on the hill and re-thinking this process. This year I will freeze my harvest using both methods, blanching and not blanching to compare. Should there really be no difference in taste, color, or texture, you can bet I will skip the whole blanching step.
There are many thoughts on this, to blanch or not to blanch. It’s believed that blanching stops the enzyme actions which can cause loss of flavor, color, and texture. By blanching the beans, you get rid of any dirt or germs that are still on the surface, keep their bright green color, and stop the loss of vitamins.
I will be sure to post the results once completed