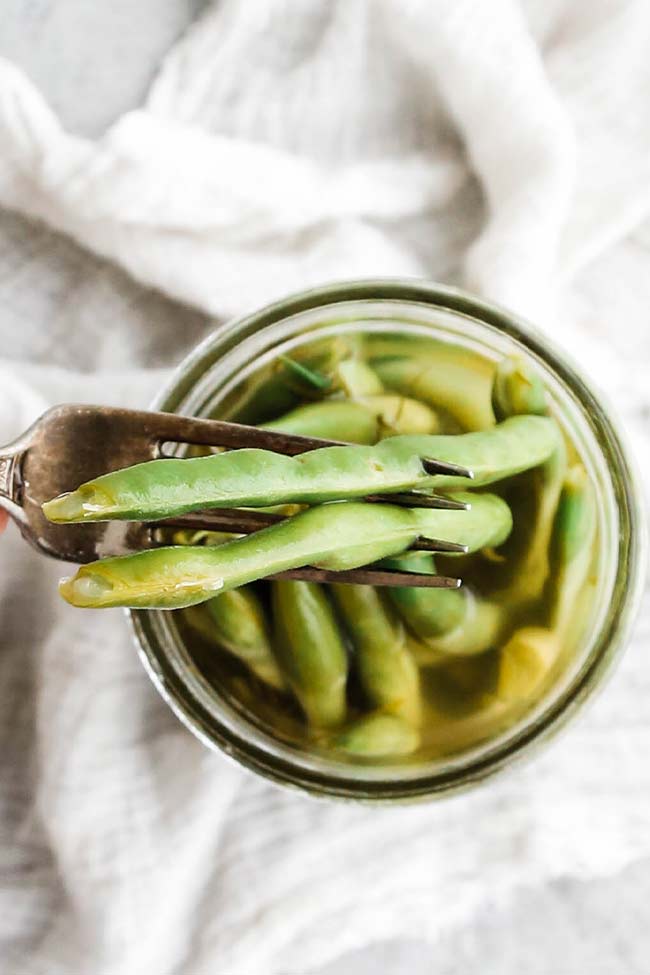
This easy recipe for pickled green beans is a great way to make your next salad or side dish taste even better.
Pickled green beans are fresh green beans that have been soaked in a flavored vinegar brine to make them taste better and last longer. People often call my recipe “dilly beans” because they have dill in them and are soaked in a brine that tastes like dill pickles. Cut these up and put them in a salad, an antipasto platter, a charcuterie board, or even a giardiniera. They’re great on their own.
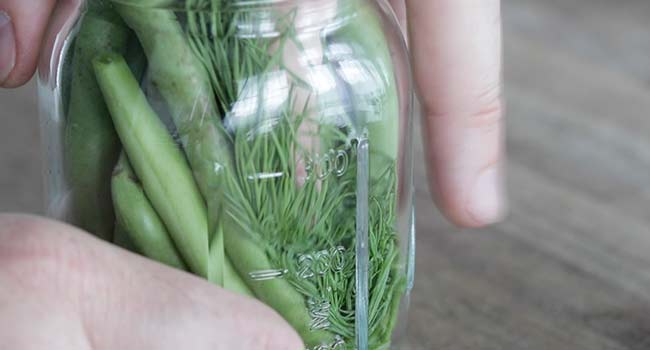
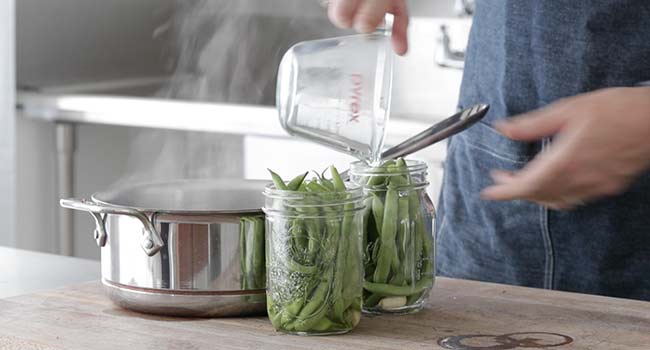
Place the garlic cloves and as many green beans as possible into a clean, sterilized jar. Fit a few sprigs of fresh dill into the jar, and the beans.
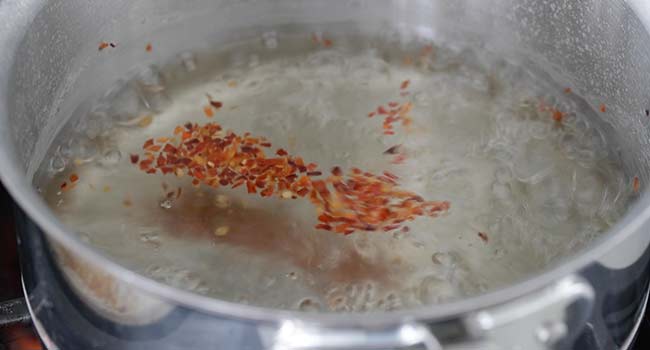
Next, make the brine and bring it to a boil over high heat. Ensure the salt is completely dissolved before removing them from the burner.
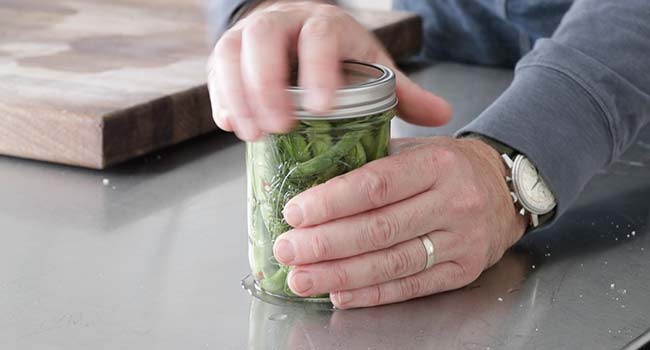
Cool to room temperature before adding on the seal and lid and placing them in the refrigerator. See make and storage, along with chef notes.
In order to store the pickled green beans, put the jar lid on top and seal it. Store in the fridge for 4 to 6 weeks. These will not freeze.
Green beans are a tasty and nutritious vegetable that can be prepared in many different ways. One of my favorite recipes is for dill green beans, which are crisp, flavorful, and easy to make. In this article, I’ll walk you through the simple steps for making delicious dill green beans at home.
An Overview of Dill Green Beans
Dill green beans are green beans that are flavored with fresh or dried dill and packed in a vinegar brine. The dill adds a distinctive flavor that pairs well with the crunchy texture of fresh green beans. The vinegar brining process helps preserve the beans while also infusing them with tangy flavor.
Dill green beans make a tasty side dish or appetizer They can be served hot or cold. Some people also enjoy them straight from the jar as a healthy snack The brining process leaves them with a nice pickle-like crunch.
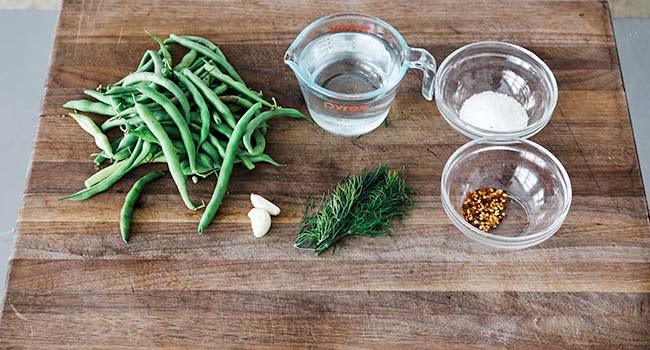
This recipe only requires a few simple ingredients:
- Fresh green beans
- White vinegar
- Water
- Salt
- Fresh dill
- Garlic (optional)
- Red pepper flakes (optional)
The process involves blanching the green beans briefly to cook them just until crisp-tender. Then they are packed into sterilized jars along with the other ingredients and processed in a water bath canner. The resulting jars can be stored at room temperature for up to a year.
Benefits of Dill Green Beans
Dill green beans are low in calories and high in nutrients. Green beans provide vitamin C, vitamin K, manganese, and fiber. The dill offers additional micronutrients like calcium, iron, and potassium.
The brining process enhances the shelf life of the beans compared to fresh-picked green beans. The finished jars can be stored without refrigeration.
Dill green beans add tangy aromatic flavor to meals and snacks. The convenience of canned beans means you can enjoy fresh-tasting beans all year round.
Home canning your own dill green beans gives you control over the ingredients. You can adjust the amounts of dill, garlic, and red pepper flakes to suit your taste preferences.
Step-by-Step Instructions
Making dill green beans at home is straightforward. With the right supplies and a little time you can make multiple jars in one batch
Supplies Needed
- 1.5-2 pounds fresh green beans
- 4 cups white vinegar
- 4 cups water
- 1/4 cup salt
- 1 head garlic, peeled and smashed
- Fresh dill sprigs (1 per jar)
- Red pepper flakes (optional)
- Canning jars, lids, and rings (1/2 pint or pint size)
- Large pot with lid
- Canning rack
- Jar lifter
- Bubble remover or plastic knife
- Clean towels
Prep the Beans
-
Wash and trim the ends off the green beans. Cut them into lengthwise halves or leave whole.
-
Fill a large pot with water and bring to a boil over high heat. Blanch the beans for 2 minutes to partially cook but leave them crunchy.
-
Drain beans in a colander and rinse with cool water. Allow them to drain well while preparing the brine.
Make the Brine
-
Combine the vinegar, water, salt, and smashed garlic in a pot. Bring the mixture to a boil.
-
Remove the pot from the heat. Let the brine cool slightly while packing the jars.
Pack the Jars
-
Wash and sterilize the canning jars, lids, and rings in boiling water. Keep them hot until ready to use.
-
Place one dill sprig in the bottom of each empty jar.
-
Tightly pack the blanched green beans upright into the hot jars. Add 1/8 tsp red pepper flakes to each jar, if desired.
-
Ladle the hot brine over the beans, leaving 1/2 inch of headspace.
-
Use a bubble remover or knife to release any trapped air bubbles. Add more brine if needed to maintain headspace.
-
Wipe the jar rims clean and seal with the lids and rings.
Process the Jars
-
Place a canning rack at the bottom of a large pot. Fill with enough water to cover the jar tops by 1-2 inches. Bring the water to a simmer.
-
Use a jar lifter to carefully place the filled jars in the pot. Make sure they are fully submerged.
-
Bring the water back up to a gentle simmer. Do not boil. Process pint jars for 15 minutes. Process 1/2 pint jars for 10 minutes.
-
Turn off the heat. Use the jar lifter to transfer the jars to a towel-lined countertop. Allow them to cool undisturbed for 12-24 hours.
-
Check the jar seals. The lid should not flex up and down when pressed. Refrigerate any jars with unsealed lids and use first.
-
Store properly sealed jars in a cool, dark place for up to 1 year.
Serving Dill Green Beans
Allow the canned beans to cure for at least two weeks before opening. The flavors will develop and meld during this time.
To serve, remove jars from storage and let come to room temperature. Once opened, store any leftover beans in the refrigerator and use within a week.
The brined green beans make a great addition to salads, main dishes, appetizer platters, or snack trays. You can also simply enjoy them straight from the jar! The possibilities are endless with these tangy, crunchy dill green beans.
Tips for Making Perfect Dill Green Beans
- Look for slender, tender green beans without bulges or bruises. Avoid thick, tough beans.
- Trim just 1/4 inch off the stem and tip ends. Leaving some stem helps the beans stay crunchy.
- Blanching is important to partly cook the beans while leaving some crunch. Do not skip this step.
- Pack the beans upright and snug in jars, with minimal headspace for the best texture.
- Use a non-reactive pot for the brine, such as stainless steel or enameled cast iron. The brine can react with reactive metals like aluminum.
- Make sure the beans stay submerged while canning. Top off jars with extra brine if needed.
- Letting the jars cure for 2+ weeks allows the flavors to fully develop. Taste improves over time.
- Refrigerate and use any jars that don’t seal properly within a week. Don’t take risks with canning safety.
Follow these tips and the canning instructions carefully, and you’ll end up with tender-crisp dill green beans that are delicious and shelf-stable. The jarred beans make great gifts for fellow green bean fans too!
Common Questions
Can I use dried dill instead of fresh?
Yes, you can substitute dried dill weed for the fresh sprigs. Use about 1 teaspoon of dried dill per pint jar. Add it to the jars before packing in the green beans.
What vinegar works best?
A mild white vinegar like distilled, cider, or white wine vinegar provides the best flavor. Avoid balsamic or other dark vinegars, which can discolor the beans.
How long do canned dill green beans last?
Properly processed and sealed jars stored in a cool, dark place will keep for 12 months. Refrigerate after opening and use within one week.
Is it safe to adjust the processing time?
No, follow the recommended canning times precisely. Increasing or decreasing the processing time can lead to spoiled beans or loss of seal.
Can I double or halve the recipe?
Yes, the recipe can be doubled or halved. Just maintain the same ratios of vinegar, water, salt, and other ingredients per pound of green beans. Adjust canning time if jar size changes.
With this easy recipe and guide, you’ll be ready to make your own delicious jars of dill green beans. The brined beans add a pop of flavor to meals while providing the satisfying crunch of fresh green beans any time of year.

Find a RecipeSearch our recipes
This easy recipe for pickled green beans is a great way to make your next salad or side dish taste even better.
Pickled green beans are fresh green beans that have been soaked in a flavored vinegar brine to make them taste better and last longer. People often call my recipe “dilly beans” because they have dill in them and are soaked in a brine that tastes like dill pickles. Cut these up and put them in a salad, an antipasto platter, a charcuterie board, or even a giardiniera. They’re great on their own.
- Green Beans – Use fresh, trimmed green beans for this.
- Water—To help tone down the vinegar taste, you will need cold water.
- Vinegar – I used white distilled vinegar in my recipe.
- Salt—I always use sea salt in my cooking. This helps season the green beans and keeps them fresh.
- Garlic: Just a few cloves will make the pickled carrots taste so much better.
- Pepper Flakes: These will make the brine a little spicier.
- Dill – Use fresh dill in this recipe.
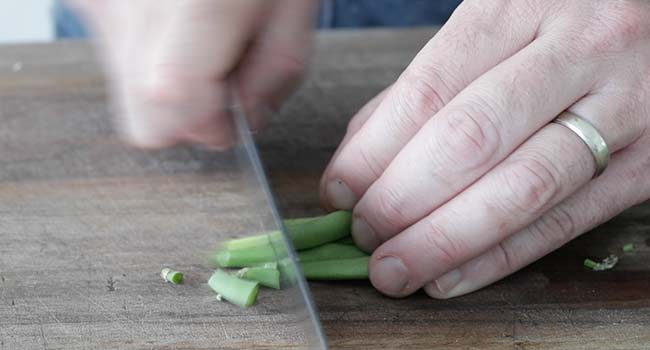
Trim the stem end of the green beans or remove the string using bush beans.
Place the garlic cloves and as many green beans as possible into a clean, sterilized jar. Fit a few sprigs of fresh dill into the jar, and the beans.
Next, make the brine and bring it to a boil over high heat. Ensure the salt is completely dissolved before removing them from the burner.
Pour the brine over the green beans in the jar and submerge them.
Cool to room temperature before adding on the seal and lid and placing them in the refrigerator. See make and storage, along with chef notes.
Make-Ahead: You can make these up to 1 week ahead of time.
In order to store the pickled green beans, put the jar lid on top and seal it. Store in the fridge for 4 to 6 weeks. These will not freeze.
Chef Notes + Tips
- With a butter knife, you can move the green beans and brine around in the jar once it’s full.
- Wait at least 24 hours before eating the pickled green beans for the best taste. When you wait longer, the flavors will get stronger.
- Before you use your jars, make sure they are completely clean and germ-free.
- How many green beans you need to fill the jars will depend on their size.
- When green beans are pickled, they may need an extra two to three days to break down while fermenting in the fridge. This makes them softer.