Black Turtle beans are some of my favorite beans to grow. Not only are they easy, but oh-so-delicious when combined with onions, oregano, garlic and olive oil. This mix of cooked beans and rice is a “must eat” in our house; it tastes a lot like black bean soup.
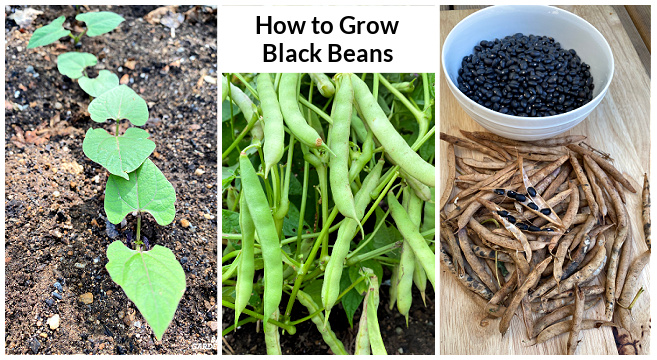
Growing black beans requires warm weather and a mild fertilizer and that’s about it. For your first batch, you can order an organic black turtle bean online (or other variety). Plant bean seeds (bean and seed are the same thing) about an inch deep and water well. In a month your bean pods will form and in two months, you’ll be looking to harvest!.
But how do you know when your black beans are done? These are “shelling” beans, which means we don’t eat the pod whole like we do with pole beans or garden peas. We have to open the pods, remove the beans and dry them.
With this variety of black bean it’s a no-brainer. When your pod turns a beautiful deep eggplant color, your beans are ready to harvest.
Good question. Happens to me all the time. (Didn’t I tell you summers are for vacation?) If you miss the stage where the beans turn eggplant-colored, they can stay on the plant until they dry out and form a nice, crispy pod. It’s just how nature works, so why not make the most of it? You need to dry the beans anyway. Why not let Mother Nature do some of the work for you?.
Ultimately, these beans are going to “pop” out on their own and replant themselves in the nearby soil. Why not spare yourself some trouble? The kidney beans pictured above are a prime example. You can see that they’ve turned brown and crispy. Your black beans will do the same, but they will keep their beautiful dark purple color.
They can be picked when they are fully ripe or left to “dry on the vine.” They are your choice. Once you decide to pick them, remove beans from their pod and allow to dry completely. Caution: Don’t eat them yet. You must soak these beans prior to ingestion, else you get a sick belly.
Black beans are a delicious and nutritious addition to any home gardener’s edible landscape But knowing when and how to properly harvest your black bean crop is key to getting the best quality beans with optimal flavor and nutrition. Follow this complete guide to harvest black beans at just the right time using the proper techniques.
When Are Black Beans Ready to Harvest?
Timing is everything when it comes to harvesting black beans. Picking too early means you’ll end up with small, underdeveloped beans. Waiting too long risks the pods splitting open and beans falling to the ground.
Watch for these signs your black beans are ready for harvesting
- Plants turn yellow and start to dry out
- Pods turn yellowish-brown in color
- Beans inside pods rattle when shaken
- Some pods are dry while some are still yellowish
Mature beans should be firm yet flexible when gently squeezed. Overly dry, brittle pods were left on the vines too long.
Ideal timing is when about 80% of the pods are yellowish and slightly crispy. Don’t wait until every single pod is brown and dry.
Harvesting Methods for Black Beans
You have two main options when harvesting your black bean crop:
Harvest Individual Dry Pods
With this method, you can pick each dried pod by hand as it ripens over the course of several weeks. Check plants every 2-3 days and select pods that meet the ripeness criteria above.
Use clean, sharp pruners to snip pods off plants, taking care not to damage the stem. Gently place harvested pods in a basket or box.
Hand picking pods spreads out the harvest and ensures only properly mature beans get collected. But it can be time consuming for large plantings.
Harvest Entire Plants
For larger growers, harvesting entire black bean plants at once is more efficient.
Look for the majority (about 80%) of pods to be turning yellowish and dry. Avoid waiting until all pods are brown.
On a dry, sunny day, use clean pruners to cut bean plants off at ground level. Gently lay plants on a tarp and move to a protected drying area.
Cutting entire plants quickens harvest time but results in some less mature beans. Monitor for mold during drying.
Proper Drying and Curing of Harvested Beans
Whether you pick individual pods or whole plants, additional drying and curing is vital to finish the beans properly after harvest.
Here are tips for excellent post-harvest bean drying:
- Hang plants or spread pods in a warm, dry, well-ventilated area out of direct sunlight
- Use drying racks, mesh bags, or bamboo poles to hang bean plants upside down
- Allow 1-2 weeks for thorough drying, shaking pods periodically
- Check for mold growth and discard any affected beans
- Consider a fan or dehumidifier to aid drying if humidity is high
- Shell beans by hand when pods are fully dry and brittle
Proper curing and drying locks in flavor and ensures beans store well. Never wash beans until just before eating or cooking.
What to Do With Your Black Bean Harvest
A successful black bean harvest gives you plenty of options for enjoying the fruits of your labor. Here are some tasty ways to use your homegrown beans:
- Cook dried beans from scratch – richer flavor than store-bought!
- Make flavorful bean soups and chili
- Mash cooked beans into dips like hummus
- Toss beans in salads, bowls, tacos, etc.
- Sprout beans for nutritious microgreens
- Save seeds from select pods for planting next year
And don’t toss those dried bean pods after shelling! Use emptied pods as fire starters or craft projects.
Avoiding Common Black Bean Harvesting Pitfalls
While harvesting black beans isn’t complicated, watch for these potential pitfalls:
-
Picking too early – Immature, undersized beans won’t store well. Let pods ripen fully on plants.
-
Harvesting too late – Overly dry pods split, shatter, and drop beans on the ground. Don’t let all pods get completely brown.
-
Inadequate drying – Wet beans left in pods mold quickly. Dry beans thoroughly before storage.
-
Shelling beans before fully cured – Beans store best when shelled only when pods are fully crisp and dry.
-
Washing dried beans – Never wash until ready to cook, as moisture causes mold.
With close monitoring of your plants, timely harvesting, and proper post-harvest curing, you can revel in a bountiful crop of delicious homegrown black beans!
Frequently Asked Questions About Harvesting Black Beans
If this is your first time growing and gathering black beans, you likely have some questions. Here are answers to some common FAQs:
What’s the best time of day to harvest beans?
Early to mid-morning, after any dew has evaporated, is ideal. Avoid picking when beans are wet.
Should I pull bean plants or cut them off at soil level?
Cutting plants off is better to leave nitrogen-fixing root nodules in place. But carefully pulling up small plants is fine too.
How long does it take black beans to dry/cure after harvest?
Expect the drying process to take 1-2 weeks until pods are fully crisp and beans inside rattle loosely.
Do I need to shell out every single bean right away?
No, you can leave beans to dry further in pods if needed. But do remove and shell all beans before long term storage.
What’s the best way to shell a lot of beans efficiently?
Lay dried pods on a solid surface, cover with a cloth, and roll over them gently with a rolling pin. The shells will crack open.
Enjoy Your Delicious Homegrown Black Bean Harvest!
With the right harvest timing and post-harvest handling, you can easily grow and gather bushels of delicious, nutritious black beans. Getting the perfect pint of beans for cooking up a pot of chili or rice and beans will be deeply satisfying.
The satisfaction of seasoning and cooking your own homegrown black beans eclipses anything from a can or pantry bag. With just a little gardening know-how, a bounty of beautiful black beans can be yours. Happy harvesting!