How long to cook a stuffed turkey?
It’s always best to stuff the turkey’s neck end because stuffing the body cavity will prevent the airflow needed to cook the bird evenly. Just before cooking, stuff, and tuck the skin in to seal.
Utilizing the weight of the stuffed turkey, adhere to the cooking period above. If you have a scale, you can weigh the stuffed turkey to determine its new weight, or you can estimate it based on how much stuffing you added.
How to tell when a turkey is done?
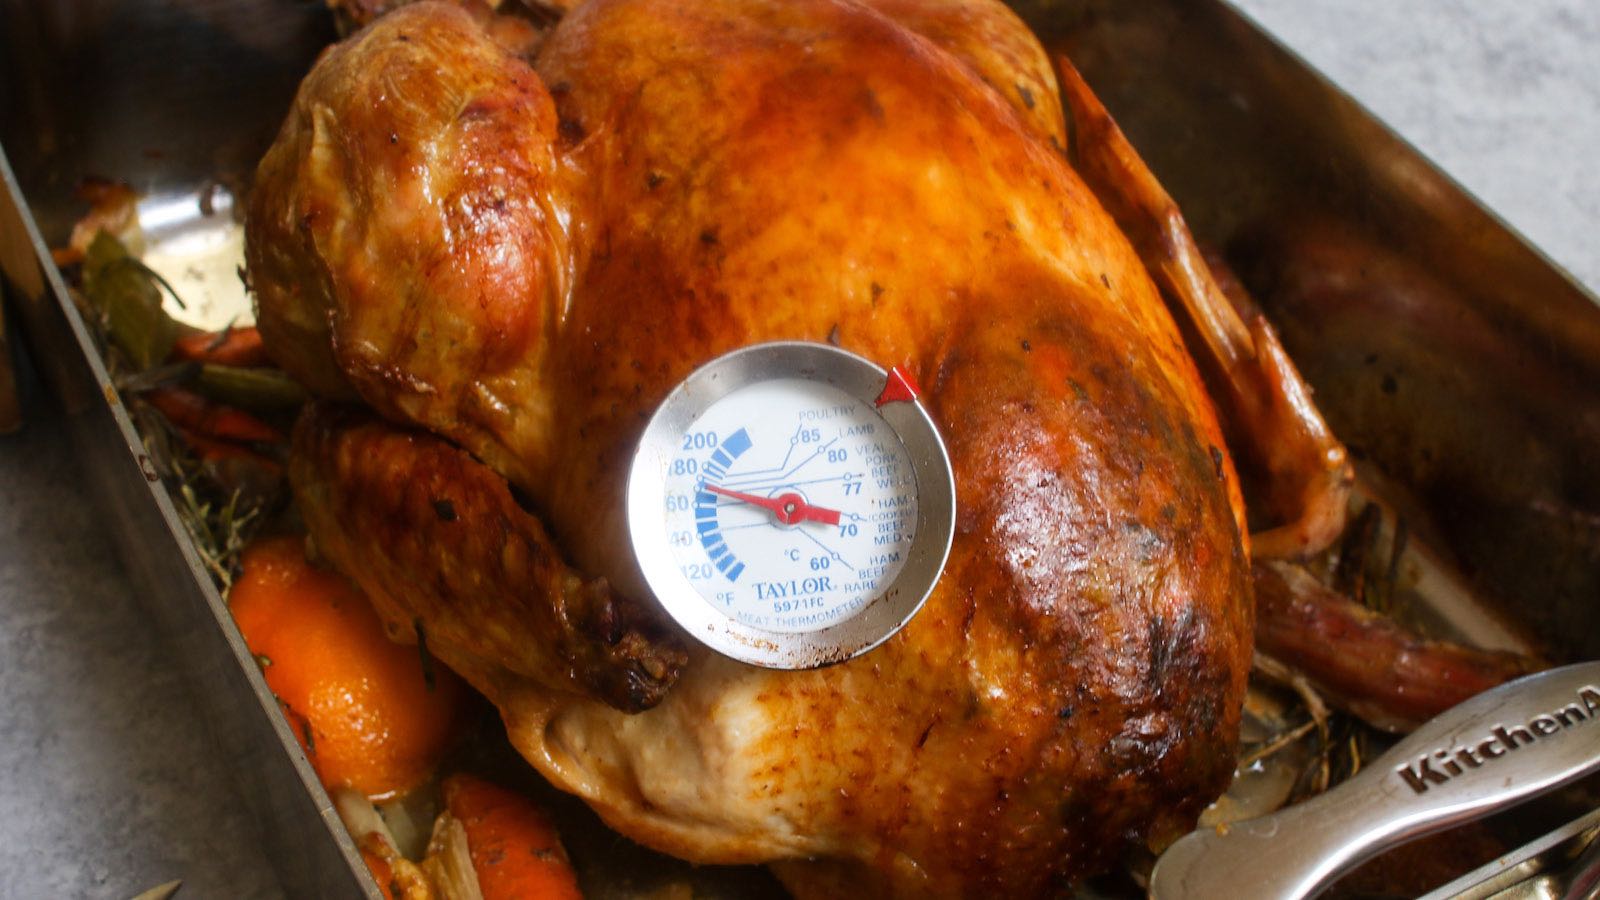
The best way to determine when a turkey is fully cooked is to insert a meat thermometer into the thickest parts of the bird, which are the breast, outer thighs, and inner thighs. A temperature reading of 165°F to 170°F means it’s done.
During the final stages, keep an eye out because the temperature can increase from 130°F to 170°F in as little as 30 minutes!
The Simplest Way to Cook a Turkey Thaw your turkey.
A frozen turkey should be defrosted in the refrigerator, which can take up to a week, depending on the size of the bird. The time needed for a typical turkey to thaw in the refrigerator is as follows:
- 4–12 pounds: 1 to 3 days
- 12–16 pounds: 3 to 4 days
- 16–20 pounds: 4 to 5 days
- 20–24 pounds: 5 to 6 days
While there are quicker ways to thaw a turkey if you’re pressed for time, thawing it in the refrigerator is the safest option for kitchen procedures. Visit our article for advice on how to prepare a turkey for Thanksgiving:
When it’s time to cook your turkey, remove the now-thawed bird from the refrigerator and place it on a rack at room temperature for an hour to remove the chill and dry the skin. (You don’t need to use another dish; you can use the same rack you’ll use to roast your turkey. (Your roasting rack should enable the turkey’s bottom to rest at or just below the pan’s rim. If you don’t have a roasting rack, a sturdy cooling rack placed inside a half-sheet pan will work. 3. Prep your oven.
Set the oven to 350°F and put the rack in the bottom position. Some recipes call for you to roast the turkey for a short time at a high oven temperature before reducing the heat for the remainder of the cooking time. We haven’t found that this makes a significant difference, but the theory holds that high heat “sears” the bird while low heat gently roasts it, producing a bird that is more moist and succulent. Plus, the skin gets browned very quickly (often too quickly). Stable heat means you won’t need to check the oven as frequently, giving you more time to prepare your Thanksgiving side dishes like the mashed potatoes. 4. Butter your turkey.
Place your turkey breast side up on the roasting rack and cover it with your preferred flavored compound butter or room temperature salted butter. (You’ll need about 12 cup [1 stick] of butter for a 12- to 14-pound turkey. (Begin at the neck and slowly work your fingers under the skin, taking care not to split or rip the skin at the deep cavity. The majority of the butter should be applied over the skin, with the remaining butter being applied over the large cavity. 5. Season your turkey (if necessary).
This last seasoning can be skipped if you decided to brine your bird (either with a wet or dry brine). There is no need to salt the cavity of kosher turkeys because they are already salted; however, you should salt the skin. Here’s how to do it: For a 12- to 14-pound bird, add 112 teaspoons of kosher salt and another 112 teaspoons of freshly ground black pepper to the cavity and to the skin.
Sounds random, we know. However, stuffing the neck cavity (rather than the large cavity) with an apple, cut side up and rounded side out, helps insulate the breast from heat and guards against overcooking. But avoid stuffing the main cavity; doing so will only extend the time that it takes to cook the food. As an alternative, make your stuffing recipe in a casserole dish and bake it separately. 7. Add some aromatics.
If you don’t stuff your turkey, there will be space for aromatics, which will give the bird flavor and aroma as well as complexity to the pan drippings used to make gravy. Try stuffing the turkey with celery stalks, parsley, thyme, and other fresh herbs before roasting it.
Additionally, you can add some aromatics directly to the roasting pan under the rack. These will caramelize in the more intense heat, releasing a fragrance that will flavor the meat and the drippings even more. Add a few halved shallots, sliced carrots, and some celery. Pour 2 cups of water into your roasting pan, whether you decide to use aromatics or not, to stop the drippings from burning. 8. Cover (and then uncover) the turkey.
At the beginning of roasting, loosely cover the bird with aluminum foil, shiny side out (to reflect heat). Foil tenting prevents the skin from becoming overly dark too soon. To allow the skin to brown, remove the foil about halfway through cooking. 9. Skip the basting.
To supposedly moisten and flavor the turkey, some traditional recipes call for basting it. We’ve discovered that frequently opening the oven door allows too much heat to escape, increasing the cooking time. Furthermore, squirting or brushing broth onto the skin will prevent it from browning uniformly and could make it lose any crispness it may have attained. To guarantee a moister bird, dry-brine it before cooking. 10. Calculate turkey cooking time and temperature.
Calculating 13 minutes per pound at 350°F for an unstuffed turkey is the simplest way to determine how long to roast a 12- to 14-lb. turkey), or 15 minutes per pound for a stuffed turkey. Roast until the temperature reads 165°F (or 150°F, as the case may be; more on that below) when checked at the thickest part of the thigh meat and the thickest part of the breast meat, about three quarters of the way through that time, and then again every 10 minutes.
But if you’d rather roast your turkey at a higher or lower temperature, adhere to these instructions. (The following cook times are for unstuffed birds. Our general rule is to steer clear of stuffed turkeys and bake the stuffing alongside the turkey so that it can quickly reach a safe temperature. )How long to cook a turkey per pound:
- For an 8- to 12-pound turkey:
- 325°F for 2¾ to 3 hours
- For a 12- to 14-pound turkey:
- 425°F for 2¼ to 2½ hours
- 400°F for 2½ to 2¾ hours
- 350°F for 2¾ to 3 hours
- 325°F for 3 to 3¾ hours
- For a 15- to 16-pound turkey:
- 425°F for 3 to 3¼ hours
- 400°F for 3¼ to 3½ hours
- 350°F for 3½ to 3¾ hours
- 325°F for 3¾ to 4 hours
- For an 18- to 20-pound turkey:
- 425°F for 3½ to 3¾ hours
- 400°F for 3¾ to 4 hours
- 350°F for 4 to 4¼ hours
- 325°F for 4¼ to 4½ hours
- For a 21- to 24-pound turkey:
- 425°F for 4 to 4¼ hours
- 400°F for 4¼ to 4½ hours
- 350°F for 4½ to 4¾ hours
- 325°F for 4¾ to 5 hours
- For a turkey that weighs 24 pounds or more:
- 425°F for 4¼ to 4½ hours
- 400°F for 4½ to 4¾ hours
- 350°F for 4¾ to 5 hours
- 325°F for 5 to 5¼ hours
To eradicate dangerous bacteria, the USDA recommends cooking a turkey to an internal temperature of 165°F. You should take your bird out of the oven when it reaches 150°F for the juiciest meat. Within 30 minutes of being taken out of the oven, the temperature should reach 165°F as the turkey rests. When cooked to an internal temperature of 190°F, some chefs, like Chris Morocco, the food director for Epi, prefer dark meat because it allows more collagen and connective tissues to break down, making the meat more tender. However, since white meat would become dry at this higher temperature, it is best to only aim for it when cooking turkey in pieces.
Regardless of the roasting temperature you select for the turkey, use a reliable meat thermometer to verify the final temperature. Home cooks once relied on the color of the meat to determine when something was done: after piercing the turkey with a knife, they would determine whether it was done if the juices were clear rather than pink. But this is not a reliable method for several reasons. First, pinkness can disappear before a safe temperature is reached. On the other hand, even when cooked to well above 165°F, some turkeys (especially organic and heritage birds) may never lose their pink color.
You can use an instant-read thermometer or a remote food thermometer (the kind with a probe you insert before cooking that connects to a digital display that sits on your counter) to measure the temperature of the turkey. Put the thermometer in either way, making sure that its tip touches the thickest part of the turkey’s breast. Avoid touching the bone to avoid skewing the reading. To make sure the turkey is cooked through evenly, you should also inspect the thigh.
In order to shield the browned areas from the heat, loosely tent them with a double-thick layer of buttered aluminum foil if you notice that the skin is becoming too dark and the desired internal temperature hasn’t been reached. 12. Let the turkey rest.
It’s crucial to let the roast turkey rest for at least 30 minutes before carving once it reaches the proper temperature. Cutting it up too soon will just allow the moisture to run out, leaving you with dried-out meat on top of a puddle on your cutting board. This gives the juices time to settle into the bird and be reabsorbed. The skin will only become limp if the turkey is covered with aluminum foil while it rests, which is not necessary. When it’s time to carve the turkey, it can rest for up to 90 minutes without losing heat. Which means you’ve got plenty of time to make gravy.