All products are independently selected by our editors. If you buy something, we may earn an affiliate commission.
Most people agree that canned beans don’t taste as good as dried ones. But there is disagreement about how to cook dried beans, how to soak beans, and even whether you should do either. There are, of course, the big issues that people argue about (to salt or not to salt), but there are also a lot of small issues that people really care about (rinse the beans or not?)
The “right way to cook beans” is very important to many people, so we took the debate to the kitchen, where it belongs. We grabbed a dozen bags of pinto beans (Goya, if you must know) and got cooking. After twelve pots of beans and a lot of burrito bowls, we’re here to answer some of your most important questions about cooking beans. Ready to bust a few bean myths? Here we go:
Soaking beans before cooking is a common practice that has been passed down for generations. While not strictly necessary, soaking can help reduce cooking times and improve digestibility for many types of beans. But there is some debate around exactly how long you should soak beans, as well as the best soaking methods.
This complete guide will walk you through everything you need to know about soaking times for all types of beans, along with tips for maximizing nutrients and flavor. Read on to become a soaking pro!
Why Soak Beans Before Cooking?
Here are some of the main benefits of soaking beans prior to cooking
-
Reduces cooking time – Beans expand and begin partially hydrating, decreasing total cook time.
-
Improves texture – Water can penetrate the outer coat and begin softening beans.
-
Increases digestibility – Soaking helps break down indigestible sugars that cause gas.
-
Activates nutrients and enzymes – Soaking kickstarts nutritional availability and germination.
-
Enhances flavor – Soaking can impart a more complex, richer bean flavor.
-
Removes toxins – Soaking helps eliminate phytic acid and other anti-nutrients.
For most bean varieties, a good soak before cooking is highly recommended. But exactly how long should you soak them?
Factors That Affect Soaking Time
Several factors impact the minimum soaking time needed for beans:
-
Type of bean – Smaller beans like lentils don’t require soaking. Larger beans need longer.
-
Cooking method – Long simmering dishes allow for shorter soak times.
-
Bean age – Older, drier beans need longer soaking than very fresh beans.
-
Water temperature – Warm water penetrates beans faster than cold.
-
Altitude – Higher elevations require slightly longer soak times.
-
Desired texture – Well soaked beans cook up creamier.
Taking these factors into account allows you to customize soak times.
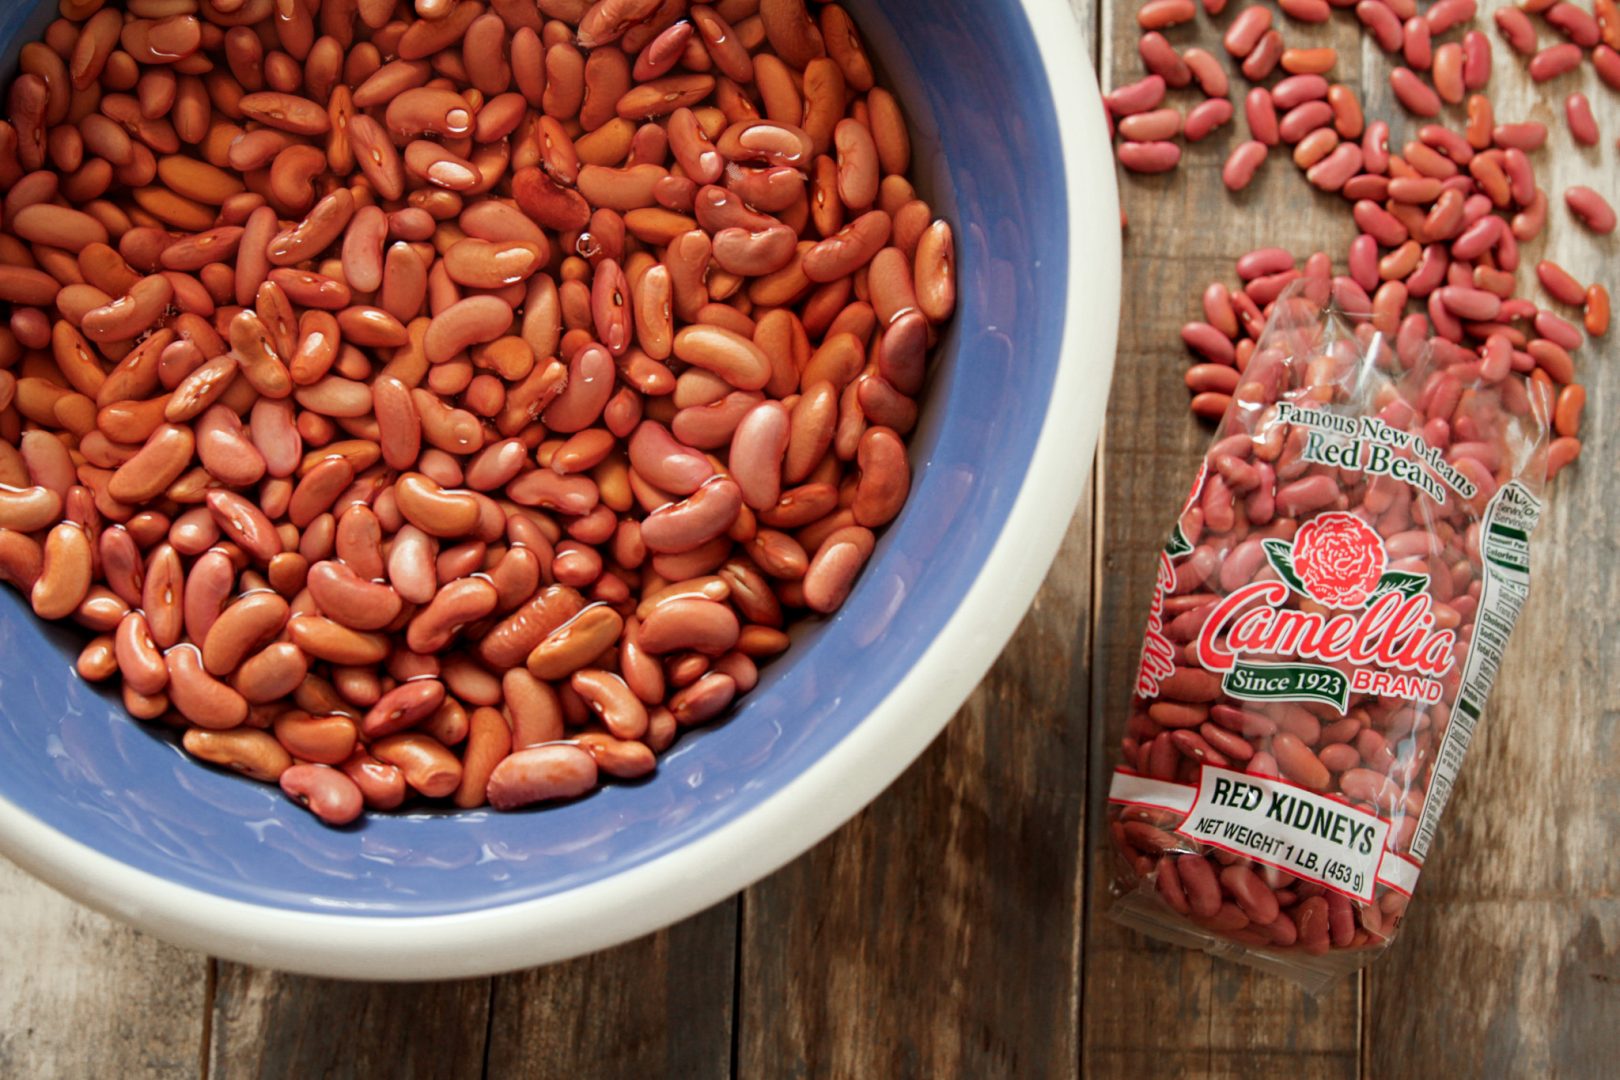
Soaking Times for Common Bean Types
Here are general guidelines for minimum soaking times for popular bean varieties:
- Black beans – 8 hours
- Pinto beans – 8 hours
- Lima beans – 8 hours
- Kidney beans – 8 hours
- Garbanzo beans – 8 hours
- Fava beans – 8 hours
- Cannellini beans – 8 hours
- Great northern beans – 8 hours
- Navy beans – 8 hours
- Adzuki beans – 8 hours
- Mung beans – 8 hours
- Lentils – Do not require soaking
- Split peas – Do not require soaking
- Black-eyed peas – Do not require soaking
While these are good minimums, longer soaking times of 12-24 hours yield even better results.
Soaking Methods for Beans
There are several techniques for soaking beans, each with pros and cons:
Basic Cold Water Soak
- Cover beans with 2 inches cold water and soak 8-24 hours
- Simple but slower hydration
- Use 2 tbsp salt per pound to inhibit microbes
Hot Water Soak
- Cover beans with 2 inches hot tap water and soak 1-4 hours
- Faster hydration but more opportunity for early germination
Boiling Water Soak
- Cover beans with boiling water for 1 minute then soak 1 hour
- Very quick but can damage beans if overheated
Salt Brine Soak
- Create a saltwater brine and soak beans 8-24 hours
- Salt helps tenderize beans but avoid over-salting
Acidic Soak
- Add a splash of vinegar or lemon juice to soak water
- Acid helps break down phytic acid and gas-causing sugars
Experiment to find your preferred soaking method based on time constraints and priorities around texture, digestibility, and nutrients.
Soaking Beans Safely
To prevent any potential foodborne illness when soaking beans:
- Rinse beans before soaking to remove debris
- Use cool water for soaking rather than warm water
- Soak beans for at least 8 hours, overnight is ideal
- Drain and rinse soaked beans before cooking
- Discard soaking water rather than cooking beans in it
- Bring beans to a full boil for at least 1 minute after soaking
Following basic food safety guidelines helps reduce risks when soaking beans.
Tips for Soaking Beans
-
Always use a bowl with ample room for beans to triple in size as they soak and expand.
-
For even hydration, stir beans a few times during soaking.
-
For best texture, don’t soak beans longer than 24 hours as they can become too soft.
-
Check frequently as beans near desired soak time to avoid over-soaking.
-
Drain in a colander and rinse beans well before cooking to remove indigestible sugars.
What to Do With Soaked Beans
Once your beans have soaked for the desired time, you’re ready to cook them! Soaked beans can be used in any recipe calling for cooked beans:
- Chili, stews, and soups
- Rice and bean dishes
- Salads, salsas, and dips
- Baked beans or bean casseroles
- Bean patties, fritters, and burgers
- Hummus, bean spreads, and dips
Soaking is merely the first step to deliciously cooked beans. Follow your favorite recipe as normal after a good long soak.
The Takeaway on Soaking Beans
While not strictly required, soaking most beans for at least 8 hours and up to 24 hours provides texture, digestibility, and nutrient benefits. Make sure to use ample cool water, rinse before cooking, and boil after soaking for food safety. Adjust soak times based on the bean variety, age, cooking method, and elevation. With a little planning ahead, soaking beans can help improve the finished dish.
The Best Way to Cook Dried Beans
For the Epi test kitchen, the results were clear. The beans had great texture and a flavorful broth after being quickly soaked, salted at the start of cooking, and cooked in a pot without a lid. You should rinse the beans in a colander before cooking them. The bags you buy at the store probably won’t have any sand or stones in them, but this is a good idea just in case. Ready? Here’s how to cook dried beans, step-by-step:Step 1. Quick-soak the beans.
Place 1 lb. dried pinto beans in a large pot. Add cold water until it’s about 2 inches above the top of the beans. Beans shouldn’t dry out during cooking, so they should stay in a few inches of water the whole time. Cover pot, bring to a boil over medium-high heat, and then remove from heat. Let rest 1 hour. (You can also quick-soak beans in the Instant Pot or another pressure cooker. )Step 2. Salt and simmer the beans.
Stir in 1½ tsp. sprinkle with kosher salt (and flavorings if you want; see below) and heat the beans and their water until they boil. Take off the lid, lower the heat, and simmer the beans until they are soft and creamy. Check them after an hour and add more water if they need it to stay submerged for another hour and a half.
Even though we tested this method on pinto beans, you can use it on any kind of bean, like black beans, navy beans, kidney beans, white beans, you name it. And don’t forget about heirloom beans. Some beautiful and tasty bean varieties, like Christmas Lima Beans, Yellow Eye Beans, and Scarlet Runners, don’t come in cans and will make your bean game even better.
Note that the cook time of various beans will be dependent on their size. Great Northern beans might take a little longer to cook than small black-eyed peas, which could be done in 35 minutes. Keep an eye on the heat and make sure the water stays at a simmer. If it boils too quickly, the skins could break and the beans will become mushy. Keep an eye on the stockpot, but don’t fuss over it. Your beans will be fine. Add flavorings, if you want.
You could add a half-cut tomato or onion or a few garlic cloves to the pot along with the salt to make the beans taste even better. To add some heat to your beans, a dried chile works well. Take it out when the beans are done. You could also add spices or herbs, like cumin seeds, bay leaves (one or two leaves per pound of beans), or a dash of dried oregano. Fresh sprigs of rosemary, thyme, or marjoram are also tasty. These aromatics infuse the cooking liquid with a burst of bright, herbal flavor.
Similar to a ham hock or the ends of a hard sausage, the rind from a wedge of Parmesan or another hard cheese can add a lot of savory flavor to beans. Keep these kinds of things in the freezer for your next bean cooking session, and you’ll have a pot of flavorful, creamy, tender beans in no time. Step 3. Store your beans.
It’s true that cooking dried beans isn’t as easy as opening a can, but you can still use these beans during the week. When you have time, just cook a lot of beans at once and then freeze them in 1- to 2-cup portions. In the fridge, cooked beans will last for five days in a container with a lid. Frozen beans will last for up to six months in a container that doesn’t let air in.
The Epicurious Myth-Busting Guide to Cooking BeansMyth 1: Dry beans must be soaked.
Do you really need to soak your beans? Soaking dried beans is supposed to help them cook faster and more evenly. Some people also say that soaking beans breaks down some of their complex sugars, which makes them easier to digest. Because every stomach is different, we didn’t test for digestibility. Testing the soaking theory, however, was simple: We covered 8 oz. pinto beans with 8 cups water and left the container on the counter overnight. The next day we placed those beans and their soaking liquid in a pot. In a second pot, we placed an equal amount of dried unsoaked beans and fresh water. Both pots were set over a medium-high flame and tested periodically. Results: The soaked beans did finish cooking first—but the unsoaked pinto beans were finished just 10 minutes later. Our feeling: Why bother?.
Takeaway: Don’t bother soaking beans.Myth 2: Dry beans must be cooked in fresh water.
This myth was no longer true after our first test—if you don’t soak your beans, you’ll always cook them in fresh water. Some people will still want to know if they should drain the soaked beans in a colander and fill the pot with new water, or if they should cook the beans in the water they were soaked in. When we tried this, the beans that were cooked in the liquid that had been soaking were tastier, darker, and had a better texture.
You don’t have to soak your beans, but if you do, cook them in the water that they were soaked in. Myth 3: If you don’t soak overnight, you should at least quick-soak.
Man, people are just really attached to this idea of the presoak. Using the “quick soak” method, you put beans in water, boil them, turn off the heat, and then let the beans soak for an hour. We tried the quick-soak method. The cooking time didn’t change much—the beans cooked 5 minutes faster than the ones that were soaked overnight and 15 minutes faster than the ones that weren’t soaked at all—but the flavor was our favorite.
Takeaway: Quick-soak, but do it for the flavor.
If you cook beans without a lid, some say the result will be a firmer bean. Keeping the lid on? Your beans will be creamy. The beans that were cooked with the lid on took about 15 minutes less time to get ready than the beans that were cooked with the lid off. However, the flavor of the lid-off beans was vastly better. Without a lid, the cooking liquid can evaporate more quickly, making a bean broth that gives each pinto more flavor.
Takeaway: Leave the lid off.Myth 5: Cooking beans in the oven is easier.
It’s easy to cook dried beans, but we heard that putting the pot in the oven could make the process even easier. So we brought some beans to a boil on the stovetop, then placed them in a 325°F oven. The beans were pretty creamy in the end, but they took a long time to cook and didn’t taste great—I think of the word “waterlogged” to describe them. Makes sense: The water in the pot had barely reduced.
Takeaway: Unless you’re making baked beans, keep them on the stovetop. Myth 6: Salted beans take longer to cook—if they ever finish cooking at all.
One of the most persistent myths about how to cook dried beans involves salt. Some recipes say to wait to add salt until the very end of cooking because it stops the beans from getting soft. Some recipes say to add it at the start because, well, salt is flavor and we’re going to eat these beans, right? In our test, we looked at a batch that was cooked with salt added at the start and a batch that was cooked with salt added at the end. The beans that were salted at the start were more tender.
Takeaway: Salt early and often.
Why You Should Soak Beans Overnight Before Cooking
FAQ
How many hours should beans soak before cooking?
What happens if you don’t soak beans before cooking?
Is it possible to soak beans too long?
Why discard bean soaking water?
How do you soak beans before cooking?
Follow your preferred method of soaking below, if desired. Be sure to discard the soaking liquid and rinse the beans with fresh water thoroughly before cooking. Step 3: Place the soaked or unsoaked beans in a large pot, add 1 teaspoon of salt (if using) and cold water. Generally speaking, you need 1 quart of water for every 1 cup of dry beans.
What is the best way to eat beans?
The best way to eat beans is to first cook them in a large pot of water, about 4 cups of water to every 1 cup of beans. Adding lemon grass or other herbs to the water can improve the flavor. Once beans are cooked the best thing to do is combine them with cooked rice, this is because beans are low in methionine and rice is low in lysine, so combining them makes a more complete protein.
How long should dry beans be soaked before canning?
According to the National Center for Home Food Preservation, dry beans should be soaked for 12-18 hours before canning. As with preparing beans in any other way, pre-soaking the beans will help enhance their digestibility and nutrient profile.
Can you soak beans in the refrigerator?
Yes, you can soak beans in the refrigerator, especially if you prefer a longer soaking time. Simply place the beans in a container, cover them with water, and refrigerate. Make sure to soak them for at least 8 hours. 9.