Soaking and sprouting legumes make the beans easier to digest and the nutrients inside more bioavailable. This article will show you how to soak and sprout legumes and explain why such steps are important.
Sprouting beans before cooking is an easy way to boost the nutrients and improve the digestibility of your beans. Sprouted beans have a multitude of benefits that make them worth the extra time. This comprehensive guide will walk you through everything you need to know about sprouting beans at home.
What are the Benefits of Sprouting Beans?
Sprouting activates enzymes and increases nutrients in beans. The sprouting process breaks down complex compounds into more digestible forms that our bodies can better absorb.
Here are some of the top benefits of sprouting beans:
-
Increases protein availability – Sprouting increases the soluble protein content by 10-30%,
-
Reduces anti-nutrients – Sprouting reduces phytic acid, trypsin inhibitors, and other anti-nutrients that can impair mineral absorption
-
Increases vitamin levels – Sprouting increases B vitamins, vitamin C, and carotenoids.
-
Improves digestibility – The starch in beans becomes more digestible after sprouting.
-
Reduces cooking time – Sprouted beans cook faster, saving you time in the kitchen.
-
Better flavor – Sprouting can enhance the flavor of beans.
With all these benefits, it’s easy to see why sprouting beans before cooking is recommended. Even just 24 hours of sprouting can make a significant difference.
Which Beans Can Be Sprouted?
The most common beans for sprouting include:
- Chickpeas
- Lentils
- Adzuki beans
- Mung beans
- Kidney beans
- Pinto beans
- Black beans
- Lima beans
- Fava beans
However, most any bean can be sprouted. Even soybeans, black-eyed peas, cannellini beans, and navy beans can be sprouted successfully.
The trickier beans to sprout are larger beans like garbanzos, kidney beans, and lima beans. Be sure to follow sprouting times carefully with these.
Step-By-Step Guide to Sprouting Beans
Sprouting beans is an easy process that involves just two main steps – soaking and draining/rinsing. Here is a step-by-step guide:
1. Select Your Beans
Pick out beans you want to sprout. Check for any damaged beans or debris and remove. Rinse the beans.
2. Soak The Beans
Place the beans in a bowl and cover with 2-3 inches of cool water. Allow beans to soak 8 hours or overnight.
- Chickpeas, lentils, mung beans – minimum 8 hours
- Adzuki, pinto, kidney – minimum 12 hours
- Larger beans like limas – minimum 18 hours
Soaking allows the beans to absorb water, expand, and begin germinating.
3. Drain and Rinse
Drain the water and give the beans a thorough rinse. Drain any water out.
4. Repeat Rinsing
Rinse the beans 2-3 times per day. Return to bowl and invert bowl to let it drain fully between rinses.
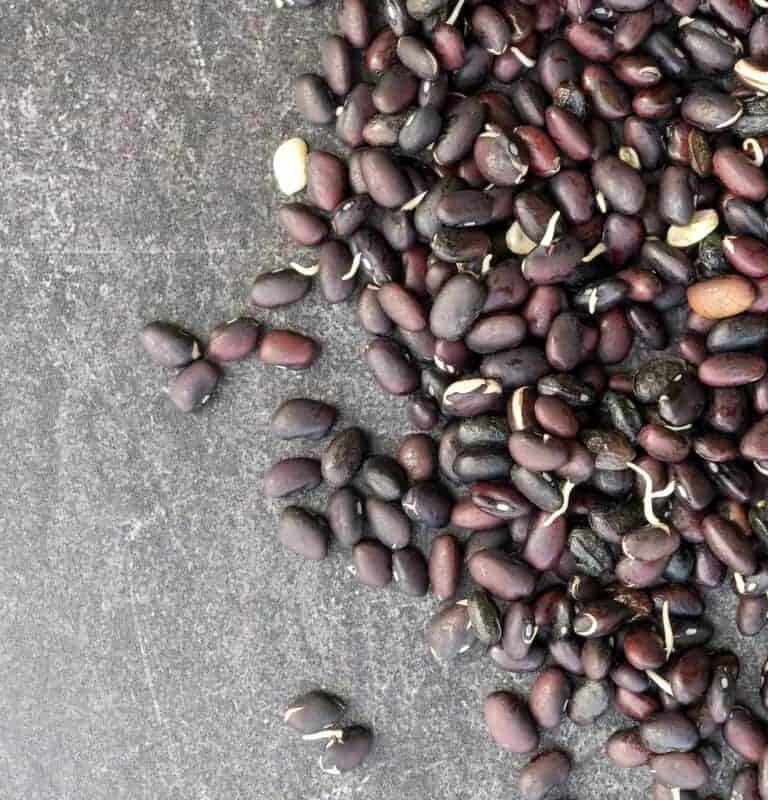
5. Watch Closely For Growth
At room temperature, most beans sprout visibly within 1-3 days. Rinse daily until sprouts are the length you desire. Don’t let sprouts get too long before cooking.
6. Store in Fridge
Once sprouted, store beans in a container in the fridge. Use within 3-5 days.
The longer the sprouting time, the more nutrients are made available. Even just 24 hours of sprouting makes an impact.
Sprouting Times for Common Beans
Here are general sprouting times for some of the most popular beans:
- Adzuki beans – 12-24 hours
- Mung beans – 12-48 hours
- Lentils – 12-48 hours
- Pinto beans – 12-72 hours
- Kidney beans – 12-72 hours
- Chickpeas – 12-96 hours
- Black beans – 12-96 hours
- Lima beans – 18-96 hours
The sprouting time can vary based on the size and type of bean. Larger beans take longer in general. Track sprout growth and rinse frequency to get your perfect sprout length.
Tips for Sprouting Success
Follow these tips for your best bean sprouting results:
-
Pick over beans before soaking to remove any debris.
-
Use a 1:3 bean to water ratio for soaking.
-
Soak beans in cool 60-70 degree water. Avoid warm water.
-
Rinse thoroughly 2-3 times per day. Drain fully between rinses.
-
Sprout beans in a dark space like a cabinet or closet. Light can inhibit growth.
-
Use a sprouting lid or mesh screen to easily drain beans. Or invert a bowl.
-
Don’t let sprouts get longer than 1/4 inch before cooking or they’ll be tough.
-
Cook sprouted beans right away or store in the fridge up to 5 days.
With these tips, you’ll be sprouting delicious beans in no time!
How to Cook Sprouted Beans
Sprouted beans can be used in all your favorite bean recipes. The main difference is sprouted beans cook faster. Follow these guidelines:
-
No presoaking required – sprouted beans go right into cooking water.
-
Cook sprouted beans for 35-45 minutes generally.
-
Lentils and split peas cook even faster at 15-30 minutes.
-
Check frequently and remove sprouted beans as soon as they reach desired tenderness.
-
Undercooking is better than overcooking sprouted beans.
-
Add any seasonings after cooking for best flavor.
Sprouted beans lend themselves well to soups, stews, casseroles, dips, and more. Get creative with these nutritious beans!
Storing Sprouted Beans
Once sprouted, beans are best used right away. However, you can store sprouted beans in the refrigerator for 3-5 days.
-
Place sprouted beans in a container or zip top bag. Exclude as much air as possible.
-
Add a paper towel to absorb excess moisture.
-
Store in the coldest part of the refrigerator.
-
Cook sprouted beans within 5 days for best quality.
Freezing is not recommended for sprouted beans, so plan to cook them within 5 days.
Common Questions about Sprouting Beans
Can you eat raw sprouted beans?
Raw sprouted beans are edible, but cooking makes them more digestible. Eating small amounts of raw sprouts is likely fine, but cooking is recommended.
Do you have to soak beans before sprouting?
Yes, soaking is required before sprouting to allow beans to absorb water and kickstart the germination process. Skipping soaking will result in uneven sprouting.
How is sprouting different than just soaking beans?
With sprouting, you soak first and then continue rinsing beans daily after soaking to allow sprout growth. Just soaking doesn’t lead to the same nutrient increases.
Can all beans be sprouted?
Most any type of bean can be sprouted, though sprouting times vary. Very large beans may have lower germination rates. Avoid sprouting red kidney beans due to toxicity concerns.
Do sprouted beans cause less gas?
For many people, sprouted beans cause less digestive discomfort like gas. The reduced levels of indigestible compounds makes them easier on the gut.
Unlock the Benefits of Sprouted Beans
Adding sprouted beans to your recipes is an easy way to boost nutrition. In just a day or two, you can unlock more protein, vitamins, and antioxidants from beans while also making them more digestible.
With this complete guide, you have all the details on how to soak, sprout, cook, and store beans for maximum benefit. Turn your pantry staples into superfoods with the power of sprouting!

Use your New Knowledge:
Sprouting improves the nutritional benefits of legumes
Sprouting legumes enhances the bioavailability and digestibility of nutrients and therefore plays an important role in human nutrition, as shown in this study on the black eye peas. More importantly, the sprouting process also reduces anti-nutrients like phytic acid, which can impair the absorption of iron, zinc, and calcium and may promote mineral deficiencies and trypsin inhibitor activity (TIA) which interferes with digestion. Sprouting chelates minerals, which means they attach to proteins that increase their functions in the body. Sprouting can also increase a compound called GABA which has been shown to regulate blood pressure.
