Green beans are a great vegetable to grow on your own if you’re not sure if you can do it. They’re easy, rewarding, and fun for both kids and adults. You can grow them in the ground, in pots, or from snap beans or string beans. You can fit them into small places as they really don’t need much space. Bush beans can also be planted close to each other because they will support each other, so they don’t need to be staked. They need some fertilizer and a bit of water, but these plants are not fussy. They are not infallible either, they just aren’t difficult plants. That’s why they’re a great vegetable for kids to grow or adults who want to start with something easy. The seeds are large, also making it easy for kids to handle and plant. With the pictures below I will take you right through it.
Green beans are a delicious summer vegetable that are easy to grow at home. But if you’ve never grown them before, you may be wondering – what do green bean seeds look like? Knowing what the seeds look like can help ensure you plant the right ones in your garden.
At my homestead, we grow green beans every year. Over time, I’ve learned how to identify the different types of green bean seeds so I can be sure I’m planting the variety I want. In this article, I’ll share what I’ve learned so you can also recognize green bean seeds.
The Basic Appearance of Green Bean Seeds
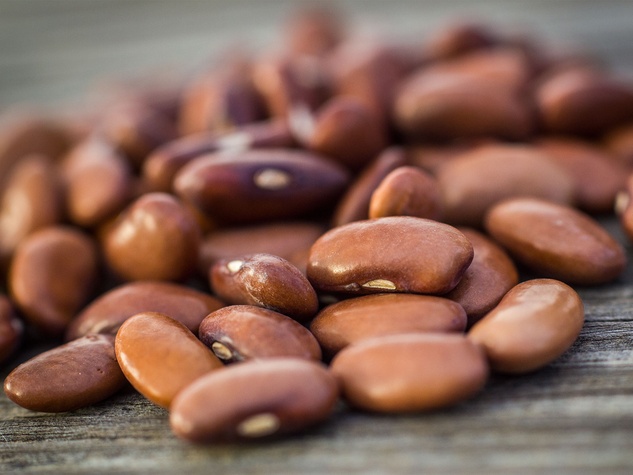
Most green bean seeds are oval or kidney-shaped. They are generally medium to large in size compared to other plant seeds. The seed coats can range in color from white, tan, brown, black, purple, or mottled mixes.
Here are some more details on the appearance of common green bean seed varieties:
-
Bush green beans – These seeds are medium to large in size. Popular varieties like Blue Lake have white seed coats, while others like Royal Burgundy have purple coats.
-
Pole green beans – Pole bean seeds look similar to bush beans but tend to be slightly smaller. They are oval with seed coats in shades of white, brown, tan, or purple.
-
Wax beans – Wax bean seeds are larger than regular green beans They have a distinct kidney shape and white seed coats.
-
Haricot vert – This slender French-style bean has small oval seeds with tan or white coats.
-
Soybeans – Soybean seeds are spherical and small, only about 1/4 inch wide. They have a solid tan, brown, or black seed coat.
How to Tell Green Bean Seeds Apart From Lookalikes
Some other seeds can look similar to green beans at first glance. Here are a few tips for telling them apart:
-
Lima beans – Lima bean seeds are flatter and more square or rectangular shaped than green beans. They also tend to be larger.
-
Cowpeas – Cowpea seeds are rounder than green beans. They are smaller and darker in color as well.
-
Soybeans – As mentioned above, soybeans are distinctly small and spherical shaped. Green bean seeds are much larger and oval.
-
Pinto beans – Pinto bean seeds are more irregularly shaped than the oval green bean seeds. They also exhibit a speckled seed coat pattern.
With all seeds, the surest way to identify them is to purchase from a reputable source that labels the specific green bean cultivar. But keeping these visual cues in mind can help avoid mix ups if you save seeds from your own plants.
Storing Green Bean Seeds Correctly
Once you’ve identified your green bean seeds, proper storage is important for viability. Here are some tips:
-
Store seeds in a cool, dry location around 40-50°F. The refrigerator is a good option.
-
Place seeds in an airtight container like a mason jar or zip-close bag.
-
Use seeds within 1-3 years for best germination rates.
-
Avoid storing seeds in very hot or humid conditions.
Following these tips will keep your seeds fresh until it’s time to plant them in the garden. With the right storage method, identifying your green bean seeds will be easy when spring planting rolls around again.
k
How to Seed and Grow Green Beans
Before you seed, it is a good idea to work some fertilizer into the ground. Green beans are light feeders, so one application will be enough. Most of the time, I use a balanced fertilizer like 10-10-10. If you want, you can also use something a little lower on the nitrogen number, like 5-10-10. Don’t use types that are high in nitrogen, though, because that makes the plants focus on making leaves instead of beans.
I plan how wide I want the row to be before I plant the beans because I plant them right in the ground in my vegetable garden. I need to be able to pick into the middle of the row from both sides, which means it needs to be 3–4 feet wide. Because these seeds are so simple to plant, I’ve done it wrong before and put in too many. I was so overwhelmed with all the plants and beans one year that I secretly hoped something horrible would attack them! Now I succession plant instead, which means I plant a few different sections two to three weeks apart. This way, the beans don’t all come at once, but all summer long.
I tilled this area by hand and added some fertilizer. Then I spread out the beans and got them ready to go into the ground. I put them down about 4 inches apart, or sometimes a bit more, using the width of my hand as a guide. That’s about perfect! They will grow close together and use each other for support. I don’t measure too closely; it isn’t that big of a deal.
Large seeds such as green bean seeds like to be planted deeper than small seeds. A little over an inch is fine. I don’t measure each hole; I just press them down with my finger until I think they’re about an inch deep. The job is quick, easy, and fun because the soil has already been tilled and broken up. Poke, poke, poke… Bada bing bada boom, and it’s done!.
Then I swipe the soil around until the holes are covered.
I water deeply and slowly once the seeds are in so that the soil stays moist deeper down.
After 4-5 days, sometimes a week, I usually see the first sprouts. Bean sprouts are large, thick, and sturdy from the get-go. They look like light green loops coming out of the soil. Sometimes you can see the dirt cracking right above where a sprout is about to emerge. Keep on watering often enough that the soil stays moist a few inches down. The top layer doesn’t have to be wet for the seeds and roots to grow.
Below is the beginning of a little head of leaves ready to lift itself out of the ground!
The pictures are a little fuzzy, but the leaves you can see are seed leaves, the very first leaves that grow. Seed leaves often look different from the true leaves that come next.
Soon, a new set of true leaves will grow from the middle, and the plants will quickly spread out from here. The seed leaves will likely dry out and fall off soon, which is fine because they will have done their job of feeding the new seedlings.
The true leaves come in right away and grow fairly large, and quite quickly. We’re talking days. The plant above sprouted only a couple of days ago and is probably close to two inches tall.
In the picture below I have put down a thick layer of grass clippings to serve as mulch. This helps keep the soil from drying out and also adds nutrition as it breaks down.
During the entire growing season, water regularly. Slow and deep, not just a splash on the leaves but down to the roots. To keep the plant from getting sick, water it early in the day so the leaves have time to dry out before bed.
After a few weeks your plants will have grown to full maturity. They are full and lush, and supporting each other as they grow close together.
They’ll start to bloom with tiny white flowers, which means green beans are coming! I really like how pretty they are.
These plants are in full bloom. As the flowers die and their petals fall off, a thin, green straw will grow from the middle of each one. That’s the beginning of a green bean. It will continue to grow until it’s several inches long and ready for harvest.
Did you know? Some helpful tips before we get started:
Green beans are sometimes called “string beans,” but most types of green beans today don’t have much of a string in them. They only have that old name because people like it, and that bad trait has pretty much been “bred out” of them. I have tried several varieties myself and haven’t had a problem. These days, they’re often called “snap beans” because a fresh bean will snap when you break it.
Green bean plants can’t handle any frost, so don’t plant seeds until there is no longer any risk of frost and the days are getting warmer.
One small thing that can be a problem for beans is that they don’t like being moved. They would rather be planted right where they will grow until they are picked, but that doesn’t mean it can’t be done. To give some plants a head start on the season, it’s nice to start them indoors early. But green beans grow so fast that it’s not really necessary. But if your child grew a plant in a cup at school and brought it home, don’t throw it away! Just move it as carefully as you can, and it should be fine. It will be so educational and fun to see it grow and produce real food!.
When buying seed packets, I do think it’s best to avoid the very cheap ones because the seeds inside are usually smaller and of lower quality. Pay just a little bit more and you’ll get better quality plants and beans in the end.
When you buy seeds, the most important thing to look for is whether they are pole beans or bush beans. Pole beans have long vines that need to be held up by a trellis. Bush beans, on the other hand, stay small and compact and grow to be about a foot tall. Because the beans will be the same, the type of plant you choose should depend on how much space you have. The pictures in this post show bush beans.
There are also wax beans, which are yellow and easier to spot when you pick them. They look good in a salad or mixed with green beans. To me they taste the same as green beans. Otherwise green varieties are fairly similar to each other so I just grab what I find.