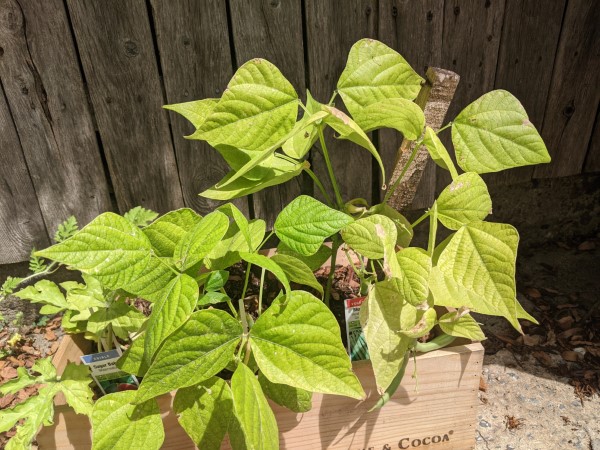
Beans are often recommended as a good plant for new gardeners because they don’t need much care and produce a lot. But when the green leaves on your beans start turning brown and falling off, it’s time to do something about it. However, this is a known issue that can be fixed: if you notice brown leaves on bean plants, act quickly and the plants may still be alive.
As a gardener, few things are more frustrating than seeing your lovingly grown green bean plants suddenly develop brown leaves. After spending time and effort planting, watering, and tending to your vegetable patch, it can be disheartening to see your plants become sickly. However, don’t despair – browning bean leaves can often be treated if caught early. Read on to learn the common causes of brown leaves on green beans and what you can do to get your plants back to their happy, healthy, green selves.
Common Causes of Brown Leaves on Green Beans
There are several potential culprits when green bean leaves turn brown. Here are some of the most common causes:
Fungal Infections
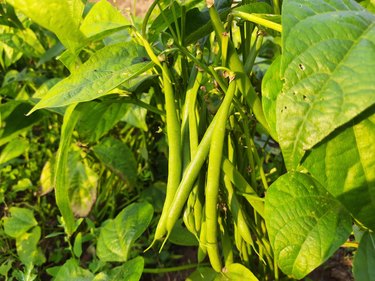
Fungal infections are the usual suspects when it comes to brown spots on common bean leaves. Common bean rust and aspergillosis are frequent fungal diseases that can lead to leaf spotting and deterioration. Rust often leaves a telltale orange or brownish dust on the underside of leaves. Prevent fungal issues by planting resistant bean varieties, avoiding overhead watering, and improving air circulation around plants. Immediately remove and destroy any infected plants. Applying copper fungicide may help protect healthy plants.
Bacterial Infections
Bacterial infections transmitted through seeds are another prime cause of bacterial leaf spot. Look for brown spots surrounded by yellow halos. To avoid bacterial problems, buy certified disease-free seeds from reputable sources. Rotate bean crops each year to prevent buildup of bacteria in the soil. Promptly remove any infected plants. Avoid overhead watering which spreads bacteria. Disinfect tools after working with infected plants.
Root Rot
Excess moisture around bean plant roots can lead to devastating root rot. Affected plants may wilt or have stunted growth. Carefully check soil drainage and avoid overwatering. Allow the top few inches of soil to dry between waterings. Improve drainage by planting beans on beds or raised rows. Drip irrigation is ideal as it keeps foliage dry. Remove and destroy any plants with root rot.
Environmental Stress
Heat, drought, overwatering, compacted soil, and other environmental factors can stress plants, causing marginal leaf browning, curling, and scorching. Monitor soil moisture and water carefully when needed. Use mulch to maintain even moisture. Stake plants for support if needed. Address compacted soils by mixing in compost. Consider providing shade cloths if temperatures spike.
Nutrient Deficiencies
Lack of important nutrients like nitrogen phosphorus and potassium can cause bean leaves to yellow, wilt, or turn brown. Have your soil tested to determine if nutrients are lacking. Amend soil based on recommendations by working in compost, manure, or commercial fertilizers before planting. Side dress growing plants with a balanced fertilizer or compost tea if needed.
Nematodes
Microscopic nematodes in the soil can attack bean roots, forming cysts that block nutrient uptake This leads to yellowing, browning, wilting, smaller pods, or no flowers/fruit. Plant nematode-resistant bean varieties when possible Solarize soil before planting to kill nematodes. Intercrop with nematode-suppressing plants like marigolds. Carefully remove and destroy badly infected plants.
What to Do About Brown Bean Leaves
If you detect brown spots, wilting, or other issues on your green bean plants, take action right away to resolve the problem:
-
Identify the cause – check for signs of fungal infection, bacterial spots, environmental issues, etc. Address any underlying problems.
-
Improve growing conditions – ensure plants have adequate, consistent moisture and nutrients. Provide support if needed.
-
Remove infected plants – pull up entire infected plants and surrounding soil and discard away from garden.
-
Treat with fungicides – apply copper fungicide after removal to protect remaining plants.
-
Disinfect tools and wash hands after handling infected plants.
-
Water at the base of plants, avoid wetting foliage.
-
If bacterial infection is present, apply 2-3 year rotation for beans in that area.
With quick intervention at the first sign of issues, you can often get a bean plant outbreak under control and save the rest of your crop. Don’t hesitate to remove infected plants as they will only spread disease. A few sacrificed plants early on can save your whole bean patch!
Preventing Future Problems with Brown Bean Leaves
An ounce of prevention is truly worth a pound of cure when it comes to avoiding issues with sickly, brown bean plants. Here are some tips to keep your beans happy and healthy in the future:
-
Start with high-quality, disease-resistant seeds – discard old seed.
-
Follow crop rotations – avoid planting beans in the same spot more than once every 3 years.
-
Test soil and amend as needed to ensure proper nutrition.
-
Water carefully – allow soil to dry out between waterings and avoid wetting leaves.
-
Provide support for vining varieties to prevent soil contact.
-
Use drip irrigation and soaker hoses to keep foliage dry.
-
Improve airflow and sun exposure with proper spacing and pruning.
-
Control weeds which can harbor pests and diseases.
-
Apply preventative copper sprays after rainfall to deter fungal issues.
-
Monitor closely and take action at the first sign of problems.
-
Keep detailed garden notes to identify problem-prone areas.
-
Sanitize tools and hands frequently when working around plants.
-
Remove plants immediately at end of season – do not compost diseased plants.
Don’t Lose Heart! Healthy Beans Are Possible
Seeing those nasty brown spots and curling leaves on formerly healthy bean plants can really be a letdown. But don’t get discouraged! With some TLC and prompt troubleshooting, many affected plants can come back from early leaf browning. And by identifying the cause and adjusting your care, you can avoid future issues. Pay close attention, act quickly at the first sign of problems, and your green beans will soon be back on track for a bountiful harvest. Just a few simple cultural changes like improving drainage, fertilizing judiciously, and monitoring for pests can make all the difference. With knowledge and vigilance, you can outsmart whatever is troubling your beans. Soon you’ll have a thriving bean patch that makes you proud. So take heart, gardening friend – healthy, productive green beans are definitely within your reach!
k
Green Bean Leaves Turning Brown
Video of the Day
If there is a brown spot on a leaf, it doesn’t mean that the leaf is turning brown around the edges and curling up. If there is a yellow line around the brown spots, it means something else. Browning leaves are usually caused by bacteria. Infected seeds are usually to blame, but the bacteria inside the seed can live on in the soil for up to two years after it is planted. To keep this from happening, you should always buy new seeds from reputable sources when planting beans, change the crops on a plot of land so that beans are planted no more than every third year, and don’t water them from above.

Video of the Day
Copper fungicides, used no more than once every 10 days, can treat the symptoms of some fungal blights until harvest, but the best way to get rid of them is to carefully pull out the infected plants and the two feet of soil around them, then trash the plants and soil or burn them from a safe distance.
Root rot and rust fungus are two other possible causes of browning leaves. These can be prevented by avoiding overwatering your plants, ensuring good drainage and applying approved fungicides as needed.
Do Insects Cause Browning Leaves?
Neither runner bean nor bush bean pests cause the browning of leaves. Even though there are long lists of all the diseases and fungi that can infect or bother beans, browning leaves are not a sign of a pest problem. However, pests can cause lums, which are holes and yellow spots on the leaf.
Some nematodes can form colonies in bean plant roots, which will create cysts blocking nutrient uptake. This can make the leaves dry out and turn yellow, the bean pods get smaller, or the plant doesn’t flower or fruit at all. But it won’t make the leaves turn brown. Along with this, most bean plants are given rhizobia, a type of beneficial symbiotic fungus that fights nematodes and also helps beans fix nitrogen in the soil.
Why a Green Bean Plant’s Leaves Are Turning Brown
FAQ
What do overwatered green beans look like?
How do you revive a green bean plant?
Why are my green beans leaves dying?
Should green beans be watered every day?