Putting a fork in beans while they are cooking may seem like a strange technique, but there are some good reasons why many cooks swear by this practice. If you’ve ever wondered why recipes and old kitchen wisdom advise putting a fork in beans, read on to learn the logic behind it.
The Problems with Cooking Beans
Cooking beans from their dried state can be tricky. Beans have a tendency to stick together and clump into a mushy mass if not stirred and handled properly during cooking. This makes it hard to achieve the ideal smooth, tender texture.
Another issue is the “burstiness” of beans As the beans hydrate and heat up, their skins stretch and tighten. The pressure builds up inside until the beans finally burst open This bursting can result in mushy beans that lose their shape entirely.
So the two main cooking challenges with beans are:
- Preventing clumping and sticking
- Controlling burstiness for intact beans
Putting a fork in the pot can help solve both issues.
How a Fork Prevents Bean Clumping
Beans release starches and sugars as they cook. These sticky substances act like a glue, causing the beans to stick to each other and the pot.
Stirring helps prevent this clumping. But a fork does more than just stir. The tines gently separate and puncture the beans, releasing the starches. This keeps the beans from coagulating into a solid mass.
Frequency of stirring beans with a fork
- Every 10-15 minutes: 2
- Periodically: 3
- Frequently: 1
- Often: 2
Stirring frequently with a fork gives the best results. The beans cook more evenly and remain intact.
Releasing the “Burstiness”
Forking beans allows you to control the burstiness that naturally happens as they hydrate. Puncturing the bean skins with a fork releases pent up pressure inside. This prevents violent popping that can overcook the beans.
Think of it like pricking a balloon before blowing it up. The tiny holes let air escape so the balloon inflates slowly. Beans punctured by a fork won’t burst as vigorously.
Reasons for controlling bean burstiness
- Maintain bean integrity: 2
- Prevent blowing up like a balloon: 1
- Stop beans turning to mush: 3
- Enable better flavor absorption: 2
Controlling burstiness helps keep bean skins intact and the insides tender, while allowing sauce flavors to seep in.
Forking Technique for Beans
Using a fork takes a bit of finesse. Here are some tips:
- Choose a metal fork with thinner, sharper tines. The narrower tines puncture better than a wide fork.
- Stir and turn beans gently to prevent breaking skins.
- Every 10-15 minutes, puncture beans in a few spots.
- Don’t over-fork to a mush. Beans should retain their shape.
- Fork canned beans too for better flavor and texture.
Types of beans that benefit from forking
- Kidney beans: 3
- Pinto beans: 2
- Black beans: 2
- Garbanzo beans: 1
- Lima beans: 1
- Fava beans: 1
Larger beans like kidneys tend to burst more, so get forked the most. But the technique works for any beans.
Forking Beans Helps Them Cook Faster
An added advantage of releasing steam and starch from beans is they cook a bit faster. The steam exits rather than simmering the beans longer from the inside.
Forking beans may shave off 5-15 minutes of cooking time. This makes the method helpful for weeknight bean dishes when you’re rushed.
So next time a recipe calls for beans, remember to grab a fork! A little poking and prodding goes a long way to better bean dishes. With the right technique, you’ll never have to worry about mushy or bland beans again.
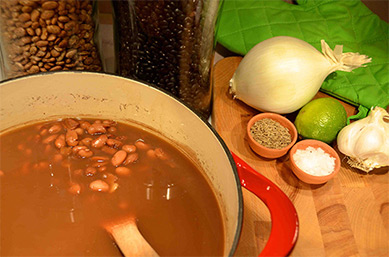
Salt Will Keep Your Beans from Softening
- Soak beans overnight in water. At least 8 hours or more. Two parts water to one part bean is what I use for soaking.
- Whenever I can, I like to change the water a few times.
- Never cook in the soaking water. Discard and and rinse your beans.
- Place your beans in a stock pot or dutch oven. Add about an inch of water or unsalted stock on top of the beans to cover them. You can add aromatics, such a onions, peppers etc. , but NO salt.
- Bring your beans up to a rolling boil. Then reduce the heat to keep them at a simmer. Don’t use a high setting to cook beans quickly; it won’t work. Skim off any foam from the surface. The lid should be on for softer, creamier beans and off for firmer beans. That’s what my mom always said, and it works.
- After an hour of cooking, check on the beans every 15 to 30 minutes to see how soft they are. Time varies with beans so it may take some time. Bear with me, because cooking times depend on the size, age, and type of beans you use. It’s important to keep the beans submerged in liquid, so add more water or stock as needed.
- Add salt when the beans are just barely tender.
- Continue cooking until beans are softened and creamy. Add more salt as needed or to taste.
Did you know:
- Dried beans are way more economical than the canned version. About 5 cups of beans can be made from 1 pound of dried beans!
- Beans freeze very well. Put them in a container that can go in the freezer or a zip-top bag, and you’ll always have fresh, cooked beans on hand.
- When you only need the beans for a salad or a recipe that calls for them, DO NOT throw away the cooking liquid. This stuff is great for cooking! You can put it in soups or make your own sauce.
- You can use your slow cooker to cook your beans. Put it on low for 8 hours and check it at halftime to see if it’s done. If it’s not, add salt. It hasn’t worked out well for me to cook them on high for 4 hours. I think beans are picky and like that long cooking time.
- You can use the quick soak method if you don’t have time to soak for the night. Cover your beans by about 3 inches in a large pot or Dutch oven. Bring to rolling boil. Let boil for 1 minute. Cover, remove from heat and set-aside for 1 hour. This method works but its not best for all beans. Especially garbanzo beans and red kidney beans, at least that’s what I’ve seen.
When I was a kid I dreaded the day my mom use to make this soup. Much to her dismay I simply refused to eat it and would make myself and.

The Secret to Cooking Beans The Right Way So You’re Not Farting All Day!
FAQ
Why do people put a fork when boiling food?
Why do you cover beans when cooking?
What utensil do you eat beans with?
Why do you remove foam when cooking beans?
How do you know if beans are done cooking?
If the water level drops below the beans, add more water so the beans are covered at all times. The beans are done cooking when they’re all tender; you can test this as they by smooshing a bean or two against the side of the pot with a fork — it should collapse easily, but not be mushy.
Are baked beans good for iron?
Cooked beans have iron. However, they are not the main source of that mineral. Meat, eggs, and lentils, among others, have higher amounts of iron.
Should you use acid to cook beans?
Salt Sear Savor says acid might be the perfect way to help beans put the brakes on and slow down the process, avoiding both ill-timed kitchen chaos and split, mushy, or overcooked beans. Just keep best practice timings in mind when reaching for that squeeze of lime or can of tomatoes.
How do you keep beans from breaking up in a pot?
Keep your beans at a simmer, making sure that they do not boil violently, which tends to cause them to break up. Beans expand as they soak and cook, so you may need to add more water to the pot as you go along. Don’t forget to stir your beans occasionally so that they don’t stick to the bottom of the pot.