Learn how to can green beans the easy way using the raw pack method. This is the perfect guide for people who have never canned before or who want to keep their fresh green beans for all year without having to do a lot of work. Home canning just got a little bit easier!.
Green beans are a versatile vegetable that can be preserved for year-round enjoyment through canning. While many people use a pressure canner for canning green beans, it is possible to can them safely without this equipment. This comprehensive guide will walk you through everything you need to know about canning green beans without a pressure cooker.
An Overview of Canning Green Beans Without a Pressure Cooker
Canning green beans using a water bath canning method allows you to preserve the beans without the need for a pressure canner. This technique involves submerging jarred beans in boiling water for a set period to kill any bacteria.
The main requirements are glass canning jars, new lids and bands, a large pot with a lid, and other basic equipment like a jar lifter With fresh green beans, water, vinegar, salt, and spices, you’ll have everything you need
The process starts with preparing the beans – washing trimming and cutting them. They are then packed into the jars with hot liquid like water or brine, leaving headspace. Lids and bands are put on the filled jars before placing them in the canner pot filled with enough hot water to cover them. Once processed, the sealed jars are stored for later use.
While more time-consuming than pressure canning, this gentle heating technique retains flavor and texture well With proper sterilization and processing times, safety can be ensured Let’s look at the process in more detail.
Step-by-Step Instructions for Canning Green Beans Without a Pressure Cooker
Follow these steps for successfully canned green beans without a pressure canner:
1. Select fresh, crisp green beans
Inspect the beans for bruises, blemishes, and overly mature beans. Rinse thoroughly.
2. Prepare the beans
- Trim both ends and remove any strings. Cut into desired sizes if preferred.
- Blanch beans by boiling for 3 minutes (or steam blanch for 5 minutes). This helps set color and deactivate enzymes. Shock in ice water immediately after.
3. Sterilize the jars and lids
Place jars and lids in boiling water for 10 minutes. Use new lids each time.
4. Pack the beans into the jars
- Fill the hot, sterile jars with the blanched beans, leaving 1-inch headspace.
- Add hot water, vinegar, salt, and any seasonings to the jars, maintaining headspace.
- Remove air bubbles by sliding a chopstick along the jar’s inner sides.
- Wipe jar rims with a clean, damp cloth before putting on lids.
5. Process the filled jars in a water bath
- Fill pot with 2-3 inches of water and bring to a boil.
- Load sealed jars into the pot using a jar lifter. Jars should be covered by 1-2 inches of water.
- Once the water is boiling again, process pint jars for 20 minutes and quart jars for 25 minutes.
- Turn off heat and remove jars from canner once time is complete.
6. Cool and store the canned beans
- Allow jars to cool undisturbed for 12-24 hours. Do not retighten bands.
- Check lid seals, wash jars, label, and store in a cool, dark place up to 1 year.
- Refrigerate any unsealed jars and use quickly.
And that’s it! Follow these simple steps for delicious home-canned green beans without needing a pressure canner.
Tips for Successful Canning of Green Beans Without a Pressure Cooker
Here are some tips to help you master canning green beans using a water bath:
-
Use fresh, recently harvested green beans for best quality. Overly mature beans may turn mushy.
-
Cut beans to similar, uniform sizes for even cooking.
-
Blanching is vital to help prevent mushiness and maintain bright color. Do not skip this step!
-
Ensure your jars are fully sterilized before use as well as your canning equipment.
-
Leave proper headspace in jars for a good vacuum seal. Aim for 1 inch for pints, 1.5 inches for quarts.
-
Acidify the jar contents with vinegar or lemon juice to balance pH and inhibit bacteria growth.
-
Process the filled jars for the full recommended time to destroy harmful microorganisms.
-
Check seals thoroughly before storing. Reprocess any unsealed jars within 24 hours.
-
Label jars with contents and canning date. Store in cool, dark place up to 1 year.
Follow these tips carefully and you’ll be rewarded with shelf-stable, safely canned green beans!
Frequently Asked Questions About Canning Green Beans Without a Pressure Cooker
Is it safe to can green beans without a pressure cooker?
Yes, it is safe if you properly sterilize jars, acidify, process for the full recommended time, and ensure a full seal. The water bath technique can effectively destroy bacteria and pathogens when done correctly.
How do I know if my canned beans have sealed properly?
Check jar lids after cooling for an inward curve indicating vacuum sealing. Lids should not flex up and down when pressed. Properly sealed jars will make a ringing “ping” sound as they cool and seal.
Why do my canned beans turn soft?
Beans may turn soft from overcooking during heating steps or natural pectin breakdown over time. Ensure beans are not overcooked when blanching and process for minimum times. Acidifying helps maintain texture.
What is the shelf life of canned green beans without a pressure cooker?
Home canned green beans processed correctly in a water bath can be stored up to 12 months. Always inspect jars before use – do not consume if you see mold, off odors, or spurting liquid upon opening.
Is it okay to adapt recipes and processing times for canning green beans?
No, never modify processing times. Always follow tested recipes and guidelines, adjusting only by altitude. Increasing acidity levels is also not recommended for safety. Only make small additions for flavor.
The Benefits of Canning Your Own Green Beans
Here are some of the biggest advantages of doing your own water bath canning of green beans:
-
Cost savings – Preserving surplus green beans can save money versus buying canned. You control ingredients for a healthier product.
-
Flavor – Home canned beans retain flavor and nutrition better than commercial versions. You control enhancing seasonings.
-
Quality – You can ensure higher quality beans are used, avoiding soft or blemished beans.
-
Convenience – Have tender, ready-to-eat green beans stocked for quick meals or recipes all year.
-
Versatility – Canned green beans work in many dishes like casseroles, soups, sautés, and more.
-
Enjoyment – Many find satisfaction in growing ingredients and canning the bounty themselves.
So don’t be intimidated to try your hand at water bath canning green beans! With a little practice, it can become a fun and valuable skill. Enjoy your own healthy, fresh tasting green beans all year long.
Why I Love This Method
There are a lot of different ways to can green beans, but this is my favorite because it’s quick and easy.
The canning process is simple. All you have to do is:
- Get your freshly picked green beans
- Rinse them clean
- Snap them into bite-size pieces
- Stuff them into jars
- Cover with boiling water
- Pressure can for 20 minutes!
It’s easy, and you don’t even have to cook or blanch the green beans ahead of time or make sure you have hot jars ready.
In fact, when I was first married (I was 18 years old), green beans were the first thing I learned how to can on my own. That was more than twenty years ago.
After seeing how easy it is to can green beans at home, I’ll never buy canned green beans again. Are you with me? Once you taste them, they are very tasty! My kids won’t eat green beans from the store or as a side dish at restaurants because they don’t taste like green beans I canned at home.
How to Can Green Beans
- Pressure Canner— Green beans are a low-acid food, so you can’t use a water bath canner. Instead, you need to use a pressure canner to get them to the right temperature. I love my All-American Pressure Canner. Don’t know which pressure canner to buy? Read this to find the best one for your cost and type of stove.
- Jam Jars: Choose the jar size that works best for your family (think about how many servings you want). Jars the size of pints hold enough green beans for my family of four.
- Tomato Lids and Bands—I buy my tomato lids in bulk sleeves here.
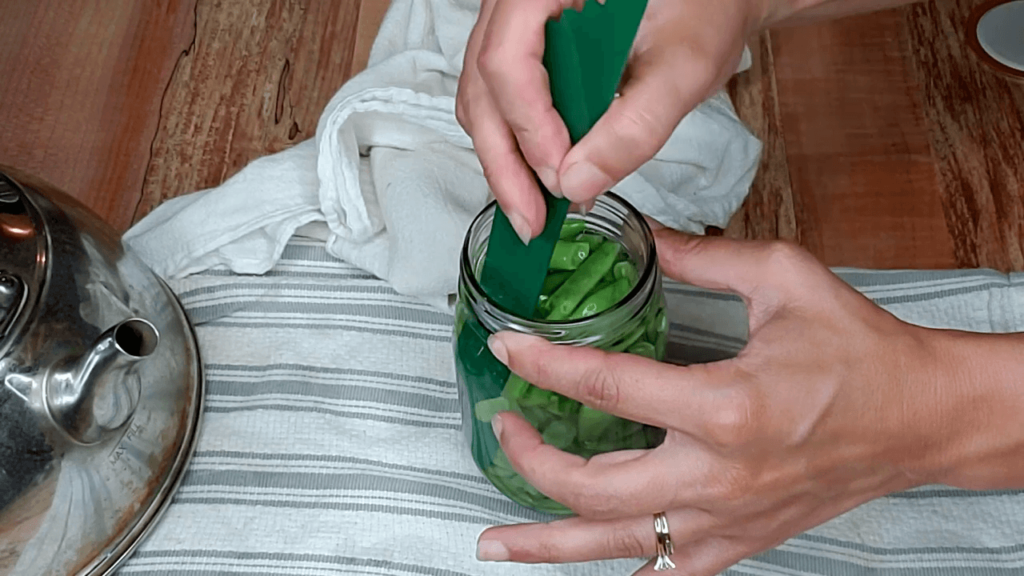
- Canning Tools—I love my canning tools, like a lid lifter, jar lifter, bubble remover, and so on. They make the canning job easier (and safer).
- Kitchen Towel—Once you’re done canning, you’ll want to put a kitchen towel on the counter. This keeps your jars from getting thermal shock and also keeps them from breaking or cracking.
- Fresh Green Beans—For every pint (or quart), you’ll need about 1 pound of green beans.
- Salt—You don’t have to use salt, but I think you should. No one wants beans that don’t taste good, so I use Redmond Real Salt for everything, especially when I can them. Please use that link and the coupon code 20%E2%80%9CPioneering%E2%80%9D to get 15% off your order.
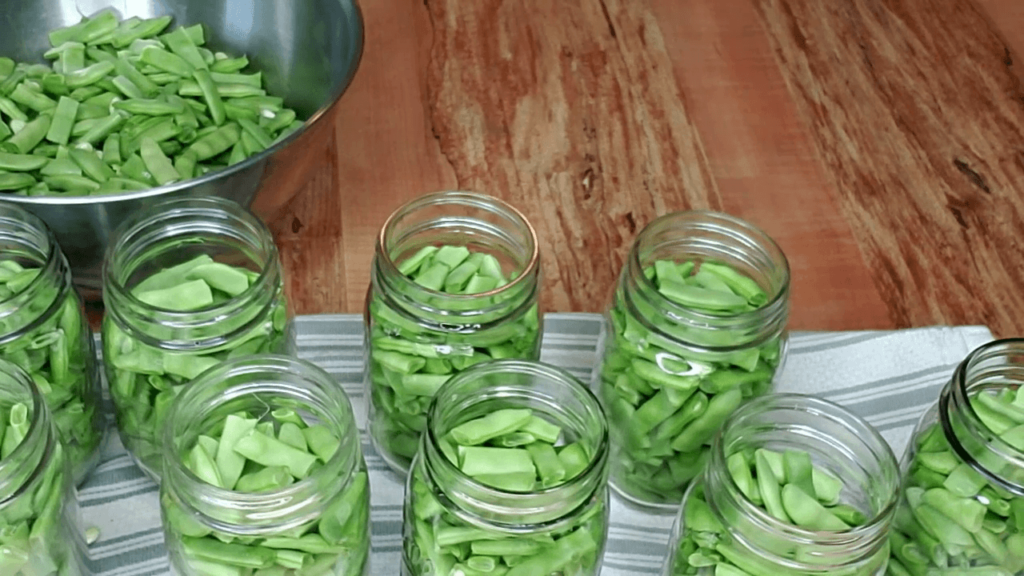
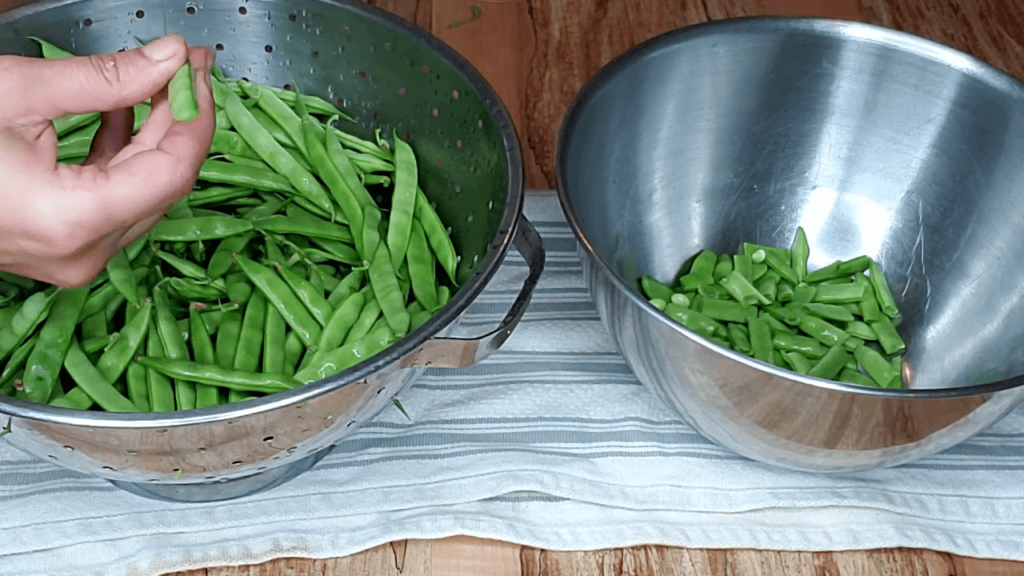
- Pick your green beans. Avoid canning beans with blemishes or rust spots. Choose beans that are tender and crisp when snapped. When picked in the morning, the beans will be the crispiest.
- Rinse green beans thoroughly, then drain off excess water.
- If the beans are string type, cut off the ends and string them. Then, snap them into 1 to 1 and 1/2 inch pieces.
- Put the pressure canner on the stove and add hot water and a rack. It’s faster to start with hot water than cold water. There should be about 2 to 3 inches of water in the bottom of your pressure canner.
- Make sure the water stays at 140 degrees Fahrenheit by setting the burner to medium heat.
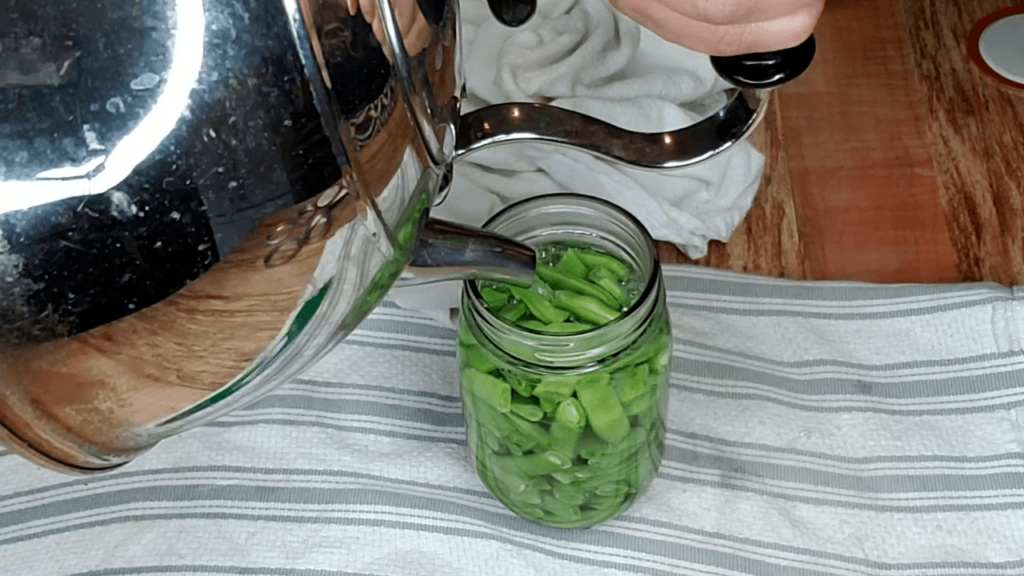
- Bring water to a boil in a kettle or large pot.
- Hand wash the Mason jars and lids in hot soapy water. Then, lay them out on a clean kitchen towel. Pro Tip: DO NOT boil the lids. The rules for canning lids changed in 2014, and boiling the lids can make them less likely to seal. You don’t have to clean the lids or jars as long as you process the jars for 10 minutes or more, which you do when you pressure can.
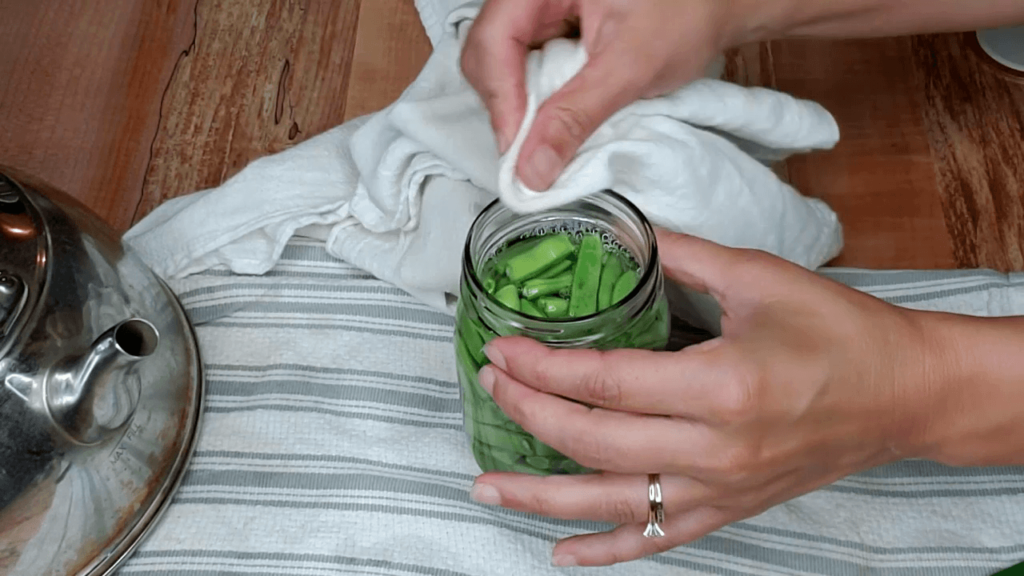
- Leave a 1-inch gap between the top of the green beans and the top of the Mason jar when you fill it with green beans.
- For every pint or quart jar, add 1/2 teaspoon of salt. (Salt is optional but does provide better flavor). Do not use regular table salt; instead, use canning salt or sea salt that does not have any anti-caking ingredients or agents added to it.
- Pour or ladle boiling water over the green beans until the water level reaches the 1-inch headspace around the beans.
- If you don’t have a canner bubble/headspace tool, you can use a ruler instead. Run the ruler between the glass and the food to get rid of air bubbles. Re-measure your headspace and add extra water if needed.
- Clean the rim of your glass jar with a damp cloth or paper towel. This helps make sure that there is nothing that could stop a seal from forming.
- Put the lid and canning band on the jars that are full, and then tighten the bands until they are fingertip tight. (Find out what fingertip tight means here.) If you tighten the bands too much, the lids may buckle.
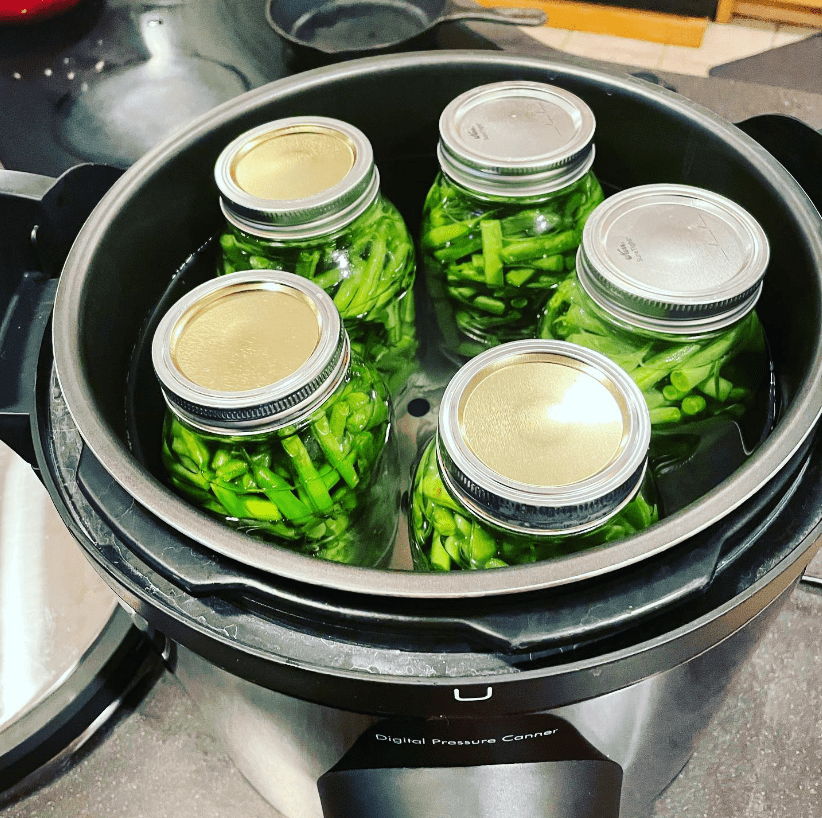
- Place in the prepared pressure canner.
- Put the lid on the pressure cooker and let it sit for 10 minutes to let the steam out.
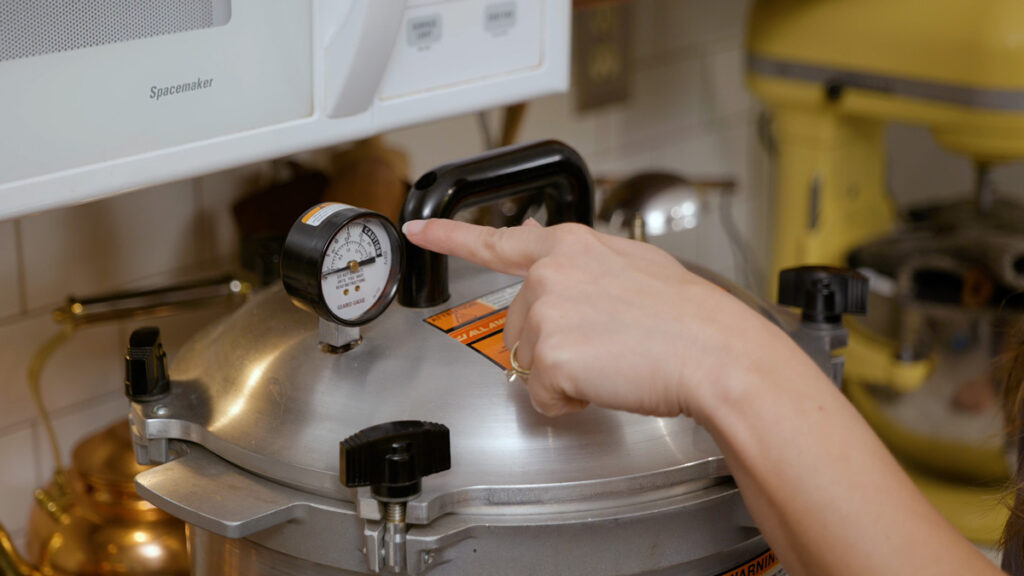
- Fill the tank with air, then add a weighted gauge or jiggler/rocker and let the pressure build up slowly.
- Raise the pressure to the right number of pounds per square inch for your altitude (see graph above for help) and process for 20 minutes for pint jars or 25 minutes for quart jars.
- After the jars are canned, take them out and place them on a towel-lined surface.
- Let the jars sit for 12 to 24 hours before taking off the bands, wiping them down, putting labels on them, and dating them.
Place lid on the pressure canner and allow to vent for 10 minutes. Then, put the right amount of weight on the pressure canner for your elevation and process for 20 minutes for pint jars or 25 minutes for quart jars. Remove from canner and place on a towel-lined surface. Leave the jars to sit for 12 to 24 hours following pressure canning protocol.
Green beans are a low-acid vegetable and must be pressure-canned. Water bath canning is not safe. Adding vinegar to green beans makes the pH level drop to 4, which is the only safe way to water bath can them. 6, making them safe to water bath can.
You want to avoid food waste (or potential botulism) at all costs. Learn more about botulism and safe canning practices here.
Food that was canned at home should be used within a year, according to the National Center for Home Food Preservation. But if you store canned goods out of direct sunlight and below 90 degrees Fahrenheit and follow tried-and-true steps, they will last for years.
We rotate our pantry items and try to eat all of our home-canned food within 18 months. However, there have been times when we’ve opened jars older than that and the food was still fine.
I prefer to use the raw pack (or cold pack) method of canning green beans. It requires less work on my part and is an approved and tested method. The green beans can also be blanched in boiling water for 5 minutes before being put in jars and processed in a pressure canner. This is called the “hot pack” method.
This goes along with the question above. Yes, you can hot-pack green beans. To do this, just boil them for 5 minutes and then put them in jars and process them in a pressure canner.
No, salt is completely optional, but definitely adds to the great flavor of green beans. If youre concerned about salt, you can omit it.
According to the National Center for Home Food Preservation, those at 2,000 feet of elevation and below should pressure can beans at 11 pounds with a dial gauge or 10 pounds with a weighted gauge. Check the NCHFP canning chart to adjust for altitude.
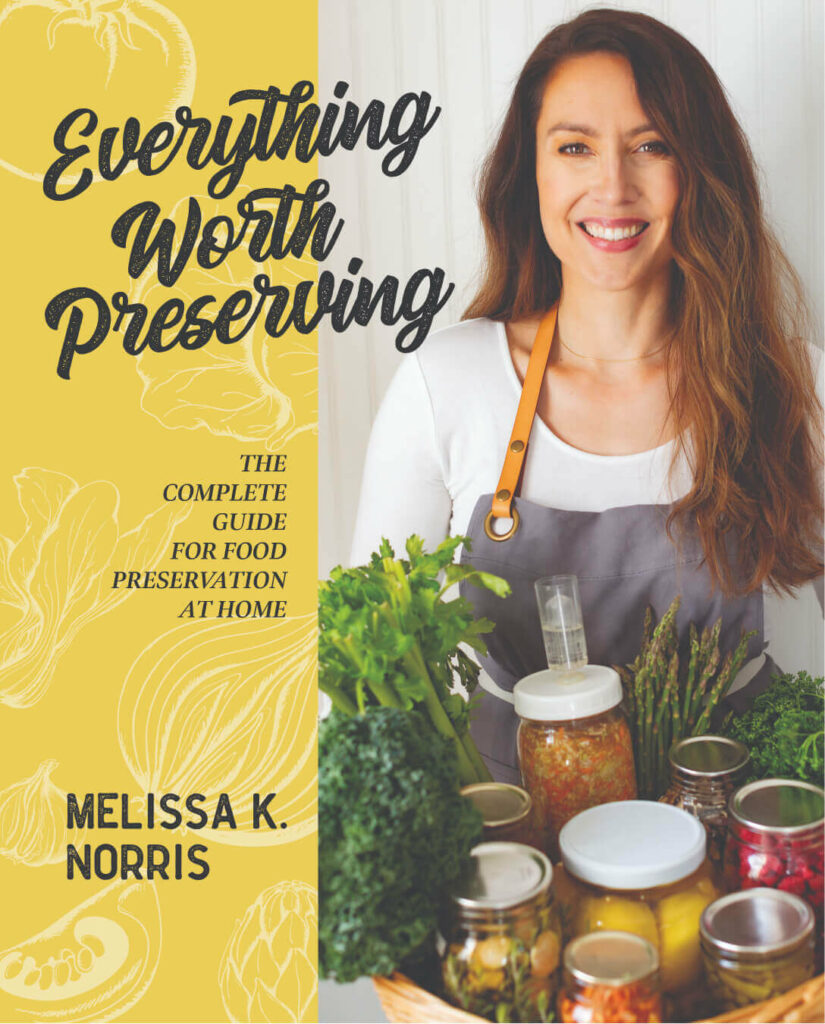
Discover nine different home food preservation methods to safely store delicious food for year-round eating. My book Everything Worth Preserving includes step-by-step tutorials, recipes, and easy-to-use charts.
Read on to find out everything you need to know about freezing, dehydrating, fermenting, pressure canning, salt/curing, root cellaring, and water bath/steam canning.
This book is great for people who have never canned before because it has lots of other recipes like this green bean tutorial.