Dutch oven turkey: This is the easiest, quickest way of roasting a whole turkey. Incredibly moist and flavorful meat, crispy skin, everything you could wish for in a turkey.
When it comes to preparing a whole turkey, I have discovered that cooking it in a Dutch oven is the most efficient and tasty method. It’s okay to roast it in the oven; it will taste great if you brine and butter it properly.
But the Dutch oven makes it even better. Moreover, it’s faster! A 4 kg/9 lb turkey only takes 1 ½ hours to cook, which is very short of the time it would require in the oven and if the brining wasn’t done. The shorter cooking time is determined not only by the Dutch oven but by the brine as well.
The best part of this turkey cooked in a Dutch oven is that not a single dry piece of meat is present. Everything is moist and full of flavor. You could also try the Slow Cooker Turkey Legs (with Gravy), the Dutch Oven Turkey Breast, or the Slow Cooker Turkey [feast_advanced_jump_to].
The aroma of a perfectly roasted turkey wafting through the air, the golden-brown skin glistening under the warm glow of the oven, and the anticipation of succulent, flavorful meat waiting to be devoured – these are the hallmarks of a Thanksgiving feast that will leave your guests wanting more. And what better way to achieve this culinary masterpiece than with the trusty Dutch oven, a kitchen workhorse capable of transforming a humble turkey into a show-stopping centerpiece.
In this comprehensive guide, we’ll delve into the secrets of crafting the ultimate Dutch oven whole turkey, drawing inspiration from two culinary gems: the Homestyle Turkey, the Michigander Way recipe from Allrecipes and the Dutch Oven Whole Turkey masterpiece from EatFoodlicious. We’ll combine the best of both worlds, adding our own personal touch to create a recipe that is both simple and spectacular.
Preparing the Canvas: The Perfect Turkey
The foundation of any great dish lies in the quality of its ingredients. For our Dutch oven masterpiece, we’ll need a fresh, whole turkey, preferably in the 9-10 pound range to ensure it fits comfortably within the confines of our Dutch oven. Look for a bird with plump, moist flesh and a healthy layer of fat, as this will contribute to the overall juiciness and flavor of the finished product.
The Brining Ritual: Unlocking Flavorful Depths
Before we embark on the roasting journey, we’ll elevate our turkey to new heights of flavor with a brining technique inspired by the Homestyle Turkey recipe Brining involves soaking the turkey in a salt-water solution, infusing the meat with moisture and enhancing its natural taste. For our brine, we’ll dissolve 2 tablespoons of salt in 4 cups of warm water, adding a touch of chicken bouillon, dried parsley, minced onion, and seasoning salt for an extra layer of savory goodness.
Submerge the turkey in the brine, ensuring it’s fully covered, and let it rest in the refrigerator for 24 hours, or up to 2 days for maximum flavor absorption. This step is crucial for achieving a moist and tender turkey that will melt in your mouth.
Stuffing the Bird: A Flavorful Symphony
While the turkey undergoes its brining transformation, we’ll prepare a flavorful stuffing inspired by the Dutch Oven Whole Turkey recipe. This aromatic blend of onion, garlic, lemon, apple, rosemary, sage, and thyme will infuse the turkey cavity with irresistible aromas and add another dimension of taste to the finished dish.
Roasting to Perfection: The Art of Patience
Preheat your oven to 425°F and remove the turkey from its brine bath. Let it rest for an hour to allow the surface to dry, ensuring a crispy skin. Resist the urge to rinse off the salt, as it plays a vital role in retaining moisture and enhancing flavor.
Stuff the turkey cavity with the fragrant herb mixture, tie the legs together for a neat presentation, and arrange it atop a bed of chopped carrots and celery in the Dutch oven. Tuck the wing under the leg for a visually appealing presentation, and use a bamboo skewer to secure it in place.
Now comes the moment of truth: the roasting process. We’ll start by basting the turkey with melted butter, ensuring every inch of its skin is coated for a golden-brown finish. Place the Dutch oven in the preheated oven and roast uncovered for 5 minutes at 425°F.
After 5 minutes, reduce the heat to 350°F and continue roasting for 13 minutes per pound of turkey. For a 10-pound bird, this translates to a total roasting time of 2 hours and 10 minutes.
Rest and Relaxation: The Final Touch
Once the roasting time is complete, remove the turkey from the oven and allow it to rest in the Dutch oven for 15 minutes. This resting period allows the juices to redistribute, resulting in a more tender and flavorful bird.
Transfer the turkey to a serving platter, tent it with aluminum foil to maintain its warmth, and prepare to witness the awe-inspiring result of your culinary efforts.
The Grand Finale: A Feast for the Senses
While the turkey rests, we’ll transform the pan drippings into a delectable gravy, the perfect accompaniment to our masterpiece. Strain the liquid from the Dutch oven, discarding the carrots and celery. You should have approximately 2 cups of flavorful turkey broth and grease.
In the Dutch oven, slowly whisk in flour to the grease, creating a smooth roux. Gradually add the turkey broth, whisking continuously to prevent lumps. Incorporate Worcestershire sauce and chicken broth for added depth of flavor, and simmer for 10-15 minutes until the gravy reaches your desired consistency. Season with salt and pepper to taste, and prepare to be amazed by the rich, savory sauce that complements the turkey perfectly.
Serving and Savoring: A Culinary Celebration
With the turkey glistening on the platter and the gravy steaming in its bowl, it’s time to gather your loved ones and indulge in the fruits of your labor. Carve the turkey, drizzle it with the luscious gravy, and watch as your guests savor every bite of this culinary masterpiece.
Beyond the Recipe: Personalizing Your Turkey Journey
While this recipe provides a solid foundation for creating an unforgettable Dutch oven whole turkey, feel free to experiment and add your own personal touch. Explore different herb combinations for the stuffing, try a dry brine for a more concentrated flavor, or experiment with various glazes to add a unique twist to the finished product.
Remember, cooking is an adventure, and the best way to discover your culinary voice is through experimentation and creativity. So, grab your Dutch oven, gather your ingredients, and embark on a journey to create a turkey that will become a cherished tradition in your family for years to come.
Additional Resources:
- Homestyle Turkey, the Michigander Way: https://www.allrecipes.com/recipe/13464/homestyle-turkey-the-michigander-way/
- Dutch Oven Whole Turkey: https://eatfoodlicious.com/dutch-oven-whole-turkey/
- turkey recipe dutch oven
- dutch oven whole turkey
- homestyle turkey
- michigander way
- thanksgiving turkey
- roast turkey
- gravy
- stuffing
- holiday feast
- culinary masterpiece
How to cook a turkey in the Dutch oven?
- A turkey this size will take two to three days in the refrigerator. I usually dry brine it after letting it thaw for about a day and a half in the refrigerator.
How to dry brine it?
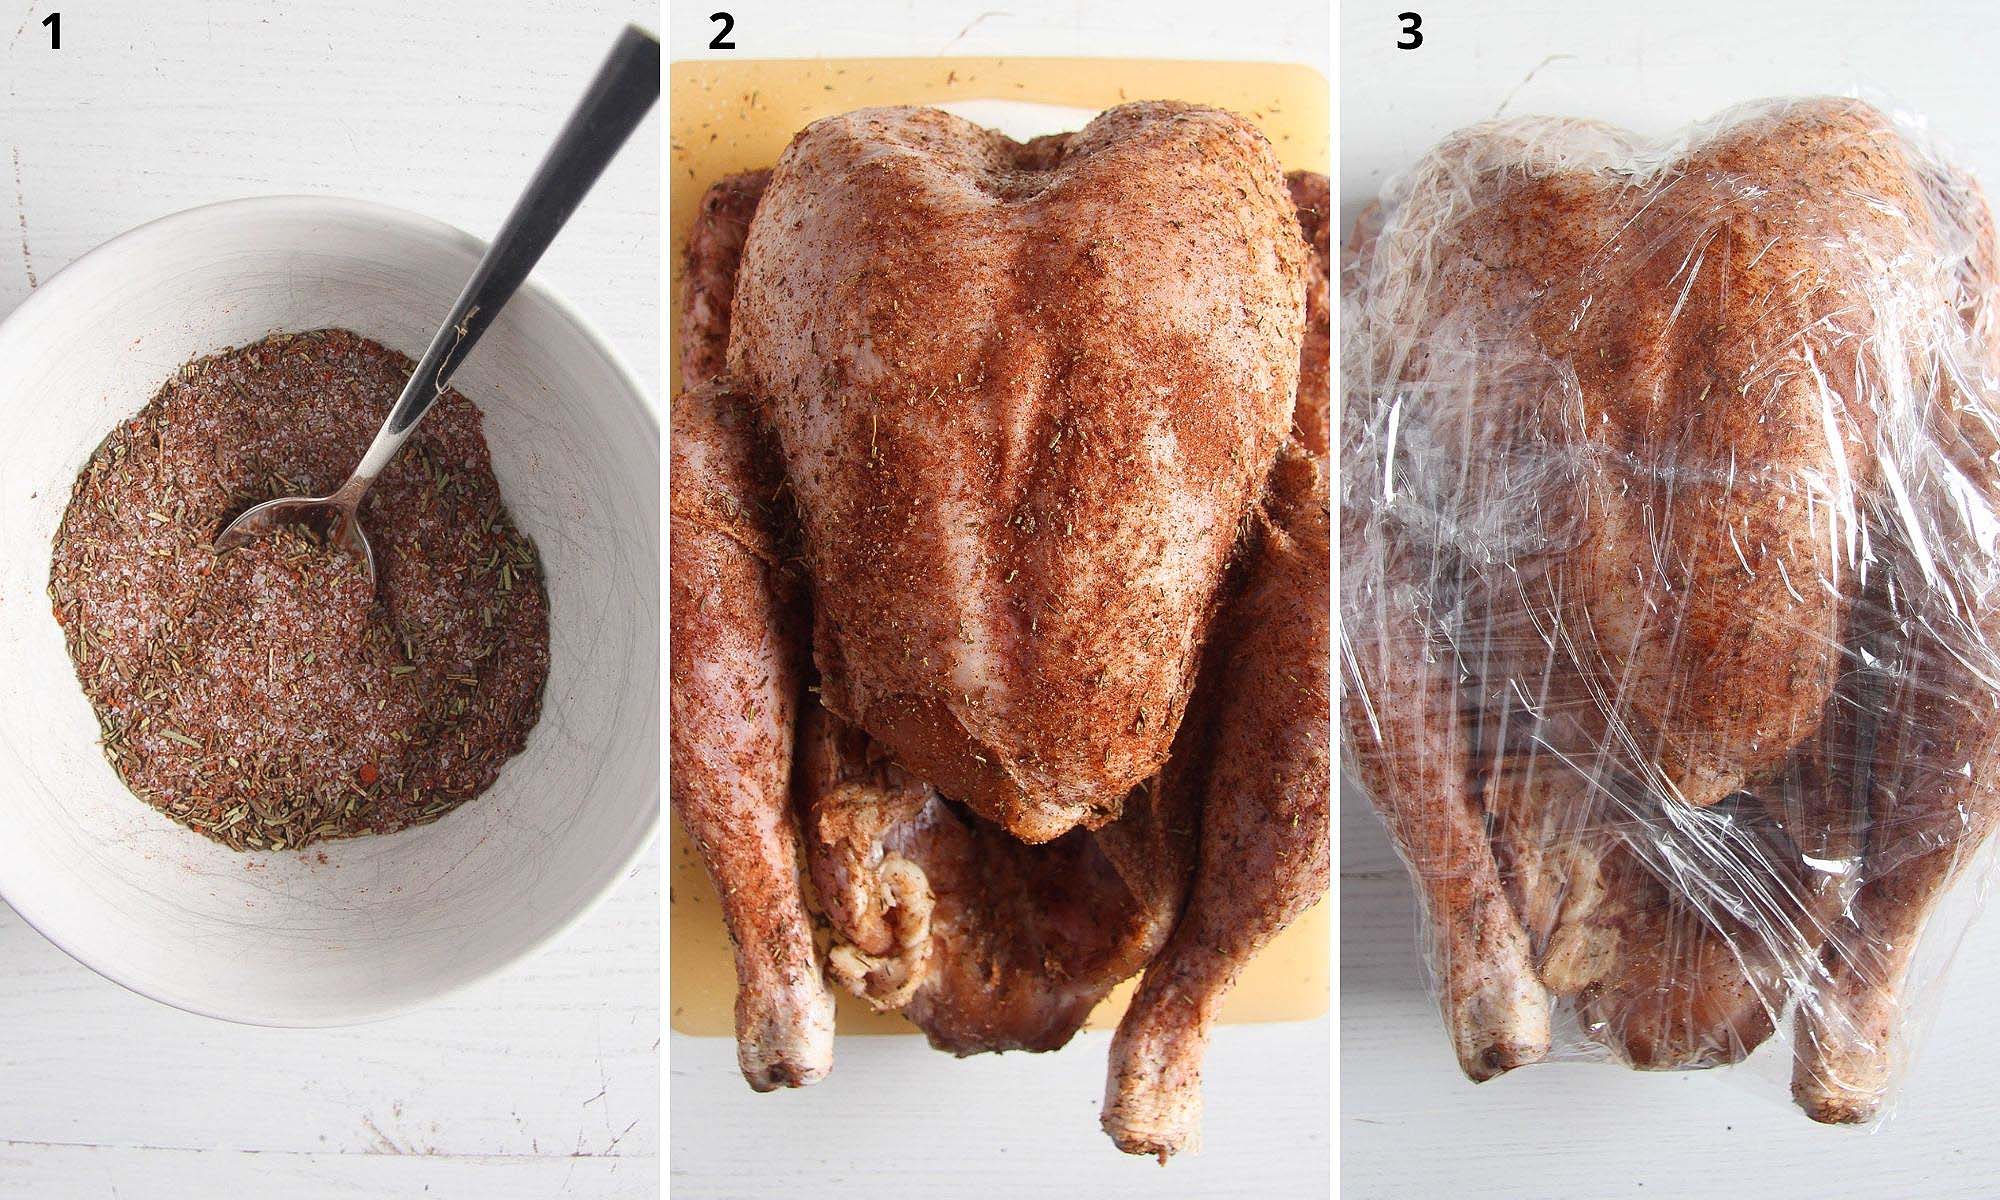
- Mix all the ingredients for the dry brine. (1)
- After using kitchen paper to pat dry, remove the gizzards and neck.
- The FDA states that you should not rinse raw meat or poultry before cooking, so don’t bother! Bacteria are more likely to spread to the areas around the sink and countertops when these foods are cleaned. ”.
- Rub it with the dry brine all over. Don’t forget to massage the area beneath the wings with your hands as well. (2).
- Trim three sizable pieces of plastic foil or cling film, then arrange them on the work surface. Top with the turkey and tightly wrap it with it. An additional piece of cling film might be necessary to ensure that everything is covered. (3).
- Transfer to an appropriate dish and chill for at least 24 hours or up to 48 hours.